
Chocolate Fudge Cake
by Nigella. Featured in NIGELLA BITESIntroduction
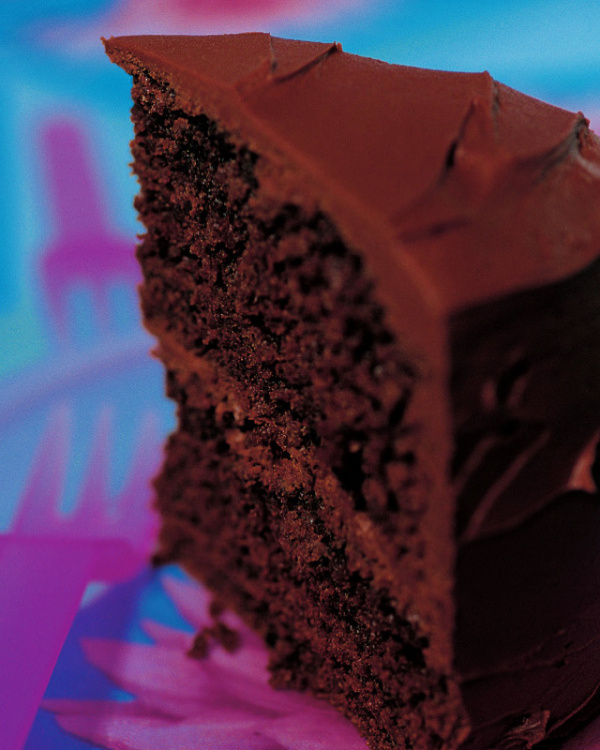
This is the sort of cake you'd want to eat the whole of when you'd been chucked. But even the sight of it, proud and tall and thickly iced on its stand, comforts.
For US cup measures, use the toggle at the top of the ingredients list.
This is the sort of cake you'd want to eat the whole of when you'd been chucked. But even the sight of it, proud and tall and thickly iced on its stand, comforts.
For US cup measures, use the toggle at the top of the ingredients list.

Ingredients
Yields: 10 slices
For the Cake
- 400 grams plain flour
- 250 grams golden caster sugar
- 100 grams light brown muscovado sugar
- 50 grams best-quality cocoa powder
- 2 teaspoons baking powder
- 1 teaspoon bicarbonate of soda
- ½ teaspoon salt
- 3 large eggs
- 142 millilitres sour cream
- 1 tablespoon vanilla extract
- 175 grams unsalted butter (melted and cooled)
- 125 millilitres corn oil
- 300 millilitres chilled water
For the Fudge Icing
- 175 grams dark chocolate (minimum 70% cocoa solids)
- 250 grams unsalted butter (softened)
- 275 grams icing sugar (sifted)
- 1 tablespoon vanilla extract
For the Cake
- 2⅔ cups all-purpose flour
- 1¼ cups superfine sugar
- ½ cup light brown sugar
- ¼ cup best-quality unsweetened cocoa
- 2 teaspoons baking powder
- 1 teaspoon baking soda
- ½ teaspoon salt
- 3 large eggs
- ½ cup sour cream
- 1 tablespoon vanilla extract
- 12 tablespoons unsalted butter (melted and cooled)
- ½ cup corn oil
- 1¼ cups chilled water
For the Fudge Icing
- 6 ounces bittersweet chocolate (minimum 70% cocoa solids)
- 18 tablespoons unsalted butter (softened)
- 2¾ cups confectioners' sugar (sifted)
- 1 tablespoon vanilla extract
Method
- Preheat the oven to 180°C/160°C Fan/gas mark 4/350ºF.
- Butter and line the bottom of two 20cm / 8 inch sandwich tins.
- In a large bowl, mix together the flour, sugars, cocoa, baking powder, bicarb and salt. In another bowl or wide-necked measuring jug whisk together the eggs, sour cream and vanilla until blended. Using a freestanding or handheld electric mixer, beat together the melted butter and corn oil until just blended (you'll need another large bowl for this if using the hand whisk; the freestanding mixer comes with its own bowl), then beat in the water. Add the dry ingredients all at once and mix together on a slow speed. Add the egg mixture, and mix again until everything is blended and then pour into the prepared tins. And actually, you could easily do this manually; I just like my toys and find the KitchenAid a comforting presence in itself.
- Bake the cakes for 50-55 minutes, or until a cake-tester comes out clean. Cool the cakes in their tins on a wire rack for 15 minutes, and then turn the cakes out onto the rack to cool completely.
- To make the icing, melt the chocolate in the microwave — 2-3 minutes on medium should do it — or in a bowl sitting over a pan of simmering water, and let cool slightly.
- In another bowl beat the butter until it's soft and creamy (again, I use the KitchenAid here) and then add the sieved icing sugar and beat again until everything's light and fluffy. I know sieving is a pain, the one job in the kitchen I really hate, but you have to do it or the icing will be unsoothingly lumpy. Then gently add the vanilla and chocolate and mix together until everything is glossy and smooth.
- Cover one of the cake halves with about a quarter of the icing. Top with the second cake layer, and using the rest of the icing for the top and sides of the sandwiched cake, spreading and smoothing with a rubber spatula.
- Preheat the oven to 180°C/160°C Fan/gas mark 4/350ºF.
- Butter and line the bottom of two 20cm / 8 inch sandwich tins.
- In a large bowl, mix together the flour, sugars, cocoa, baking powder, bicarb and salt. In another bowl or wide-necked measuring jug whisk together the eggs, sour cream and vanilla until blended. Using a freestanding or handheld electric mixer, beat together the melted butter and corn oil until just blended (you'll need another large bowl for this if using the hand whisk; the freestanding mixer comes with its own bowl), then beat in the water. Add the dry ingredients all at once and mix together on a slow speed. Add the egg mixture, and mix again until everything is blended and then pour into the prepared tins. And actually, you could easily do this manually; I just like my toys and find the KitchenAid a comforting presence in itself.
- Bake the cakes for 50-55 minutes, or until a cake-tester comes out clean. Cool the cakes in their tins on a wire rack for 15 minutes, and then turn the cakes out onto the rack to cool completely.
- To make the icing, melt the chocolate in the microwave — 2-3 minutes on medium should do it — or in a bowl sitting over a pan of simmering water, and let cool slightly.
- In another bowl beat the butter until it's soft and creamy (again, I use the KitchenAid here) and then add the sieved confectioners' sugar and beat again until everything's light and fluffy. I know sieving is a pain, the one job in the kitchen I really hate, but you have to do it or the icing will be unsoothingly lumpy. Then gently add the vanilla and chocolate and mix together until everything is glossy and smooth.
- Cover one of the cake halves with about a quarter of the icing. Top with the second cake layer, and using the rest of the icing for the top and sides of the sandwiched cake, spreading and smoothing with a rubber spatula.
Additional Information
MAKE AHEAD / STORE:
Make and ice the cake up to 1 day ahead. Leftovers will keep for up to 5 days in an airtight container.
The un-iced sponge layers can be frozen. Wrap each layer in a double layer of food wrap and a layer of foil and freeze for up to 3 months. Unwrap and thaw at room temperature for 2-3 hours before sandwiching and coating with the icing.
Tell us what you think
Thank you {% member.data['first-name'] %}.
Explore more recipesYour comment has been submitted.
What 36 Others have said
-
Posted by Joharney on 27th January 2020
-
Posted by ggv88 on 28th May 2018
-
Posted by Silver64 on 12th March 2018
-
Posted by Juliachef on 7th November 2017
-
Posted by zeweijin on 5th December 2016
-
Posted by maxigirl2901 on 3rd November 2016
-
Posted by Elstro1988 on 6th March 2016
-
Posted by StellaFR on 28th November 2015
-
Posted by Lovesey on 24th May 2015
-
Posted by MinnieMinx on 26th April 2015
-
Posted by lauraashall on 24th January 2015
-
Posted by bakingbeauty57 on 19th January 2015
Show more commentsThe best chocolate fudge cake I’ve ever had... said my boyfriend
Superbly moist cake. Even better than your Old Fashioned Chocolate Cake which is a firm family favourite. I only had the ingredients for half the icing so I spread it on top. It was enough since I'd baked a single large cake. Added 1/4-1/2 tsp of salt and a tsp of rum to offset the sweetness of the icing. It was divine.
fabulous chocolatey cake - deliciously moist and like others so impressed with the 'magic' of the melted butter, oil and ice cold water! I did find though that the chocolate frosting and filling was a bit too rich for us so just use a fresh raspberry puree mixed with creme fraiche and white chocolate instead (refrigerated overnight) - being in France where sour cream is not easy to get hold of, I always use creme fraiche instead - works really well!
This is an amazing cake, and I have baked it possibly 300 times (my most requested cake!) but I would like to add 2 things to the recipe:- Firstly, it needs to be stressed the importance of cooling the melted butter before using it, and then adding very very cold water to the mix. The result of these two steps gives you a thick emulsion which looks like mayonnaise. I sometimes use the whisk attachment of the kitchen aid mixer to help achieve this. The cake doesn’t bake nearly as well if you don’t achieve this. Second thing is that I find there’s too much mixture for two 8” tins and so I always bake it in three tins. I bake it for slightly less time, but as Nigella says, skewer test, touch test or even watching for a slight shrink from the sides of the cake pan are all good ways to tell if it’s done. It makes a lovely layer cake with 3 layers. I use the same amount of icing as in the original recipe, just slightly less in between the layers. Hope this is helpful.
I put this mixture in cupcake cases and mixed in some chocolate chips, baked for around 20 minutes and ended up with really delicious moist cupcakes! Brought them into school and lots of people wanted another one, really delicious :)
This is the best chocolate cake I've ever tasted, and made. It's so good, I can't even mess it up! I've never been a chocolate cake fan, but this one converts. The magical thing that happens with the ice cold water and the oil/butter never fails to amaze me!!!
I (very naughtily) double the amount of chocolate for the frosting, using 1/2 dark, 1/2 milk chocolate. To me it adds extra 'chocolaty-ness' that is not too much at all. Each time I make it, no one can get enough. I also divide the mixture between cup-cake tins. You don't then need as much frosting, probably just over half. I just freeze the rest, and use on something else. Awesome cake!!! My husband is always upset that I'm making the cake for someone else!!!
I have been wanting to find an excuse to make this riotously decadent cake (blame watching Bites on YouTube) and this weekend I could stand it no longer. I am not normally a huge chocolate cake person (think overly sweet cloying icing slathered on a bone dry cake..ick) but this...oh my goodness. Nigella's chocolate cakes have converted me - the chocolate orange loaf from Kitchen was a winner at work every time I made, as was the quadruple chocolate loaf I took in a week or so ago. Just dived into this bad boy and I can see why you'd want to eat the entire thing if you'd been chucked. Deep, deep pleasure indeed. Make sure you do go for a good 70% chocolate for the icing - I deviated a little by using slightly salted butter in the cake and icing to offset a bit of the sweetness.
one of my favourites - now if like me, you don't have 2 baking tins and try to cut THE cake in 2... be super careful as the top may fall into pieces and you may end up having to assemble a 3D puzzle (still delicious though) -
I have made this cake several times, it is so easy. It always gets a wow. I use it to make chocolate birthday cakes.
Lovely moist cake which doesn't last long in this house. Like others I was not too keen on the icing but used the icing from the Old Fashioned Chocolate and that worked a treat.
Fabulous cake and would definitely make again. Icing is more of a buttercream and very rich so would probably look for an alternative icing.
Made this cake for an afternoon tea treat for a girl friend's birthday. The cake itself was SO delicious - chocolatey and very moist. However, I was not keen on the chocolate fudge icing - too much and it was extremely rich. Next time I make this cake will top with my favorite fudge icing: 120g butter 2 tbsp cocoa powder, sifted 400g icing sugar, sifted 6 tbsps evaporated milk 2 tsps vanilla extract Melt butter with milk in a saucepan, then add the cocoa powder, icing sugar and vanilla and beat well until smooth. Really delicious icing! I think this would work really well with this chocolate cake.