
Devil's Food Cake
by Nigella. Featured in KITCHENIntroduction
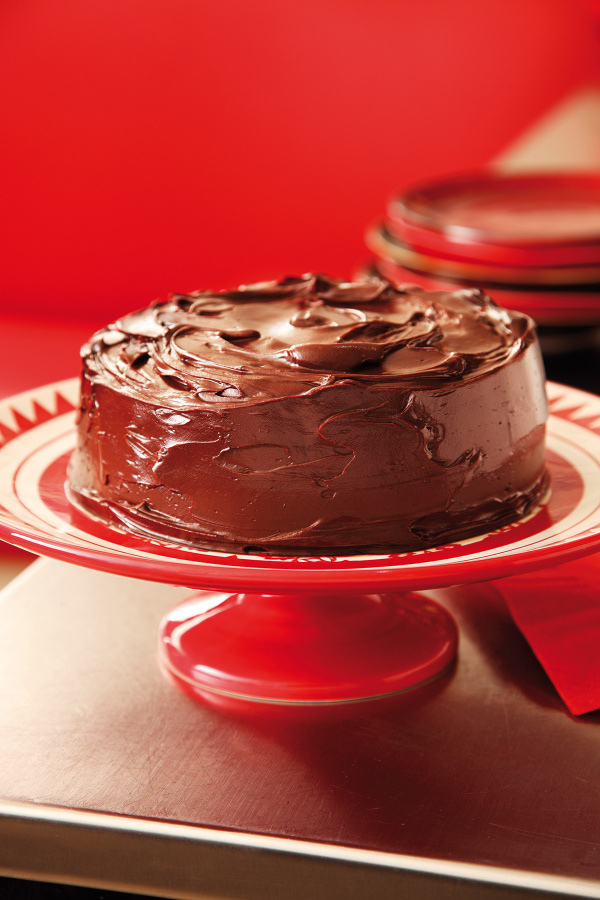
Forget the name, this cake is heavenly. The crumb is tender, the filling and frosting luscious.
When I made it one Friday, I expected my children, resident food critics much in the mould of the Grim eater, to find it too dark, too rich, not sweet enough: you get the gist. Instead, I came down on Saturday morning to find nothing but an empty, chocolate-smeared cake stand and a trail of crumbs.
And please read the Additional Information section at the end of the recipe before proceeding.
For US cup measures, use the toggle at the top of the ingredients list.
Ingredients
Yields: 10-12 slices
For the Cake
- 50 grams best-quality cocoa powder (sifted)
- 100 grams dark brown muscovado sugar
- 125 grams soft unsalted butter (plus some for greasing)
- 150 grams caster sugar
- 225 grams plain flour
- ½ teaspoon baking powder
- ½ teaspoon bicarbonate of soda
- 2 teaspoons vanilla extract
- 2 large eggs
For the Frosting
- 30 grams dark brown muscovado sugar
- 175 grams unsalted butter (cubed)
- 300 grams best-quality dark chocolate (finely chopped)
For the Cake
- ½ cup best-quality unsweetened cocoa (sifted)
- ½ cup dark brown sugar
- 9 tablespoons soft unsalted butter (plus some for greasing)
- ¾ cup superfine sugar
- 1½ cups all-purpose flour
- ½ teaspoon baking powder
- ½ teaspoon baking soda
- 2 teaspoons vanilla extract
- 2 large eggs
For the Frosting
- 2 tablespoons dark brown sugar
- 1½ sticks unsalted butter (cubed)
- 10⅗ ounces best-quality bittersweet chocolate (finely chopped)
Method
- Preheat the oven to 180°C/160°C Fan/gas mark 4/350°F.
- Line the bottoms of two 20cm / 8inch round sandwich tins with baking parchment and butter the sides.
- Put the cocoa and 100g / ½ cup dark muscovado sugar into a bowl with a bit of space to spare, and pour in 250ml/1 cup of boiling water. Whisk to mix, then set aside.
- Cream the butter and caster sugar together, beating well until pale and fluffy; I find this easiest with a freestanding mixer, but by hand wouldn’t kill you.
- While this is going on — or as soon as you stop if you’re mixing by hand — stir the flour, baking powder and bicarb together in another bowl, and set aside for a moment.
- Dribble the vanilla extract into the creamed butter and sugar — mixing all the while — then drop in 1 egg, quickly followed by a scoopful of flour mixture, then the second egg.
- Keep mixing and incorporate the rest of the dried ingredients for the cake, then finally mix and fold in the cocoa mixture, scraping its bowl well with a spatula.
- Divide this fabulously chocolatey batter between the 2 prepared tins and put in the oven for about 30 minutes, or until a cake tester comes out clean.
- Take the tins out and leave them on a wire rack for 5–10 minutes, before turning the cakes out to cool.
- But as soon as the cakes are in the oven, get started on your frosting: put 125ml/½ cup of water, 30g / 2 tablespoons muscovado sugar and 175g / 1½ sticks butter in a pan over a low heat to melt.
- When this mixture begins to bubble, take the pan off the heat and add the chopped chocolate, swirling the pan so that all the chocolate is hit with heat, then leave for a minute to melt before whisking till smooth and glossy.
- Leave for about 1 hour, whisking now and again — when you’re passing the pan — by which time the cakes will be cooled, and ready for the frosting.
- Set one of the cooled cakes, with its top side down, on a cake stand or plate, and spread with about a third of the frosting, then top that with the second cake, regular way up, and spread the remaining frosting over the top and sides, swirling away with your spatula. You can go for a smooth look, but I never do and probably couldn’t.
- Preheat the oven to 180°C/160°C Fan/gas mark 4/350°F.
- Line the bottoms of two 20cm / 8inch round sandwich tins with baking parchment and butter the sides.
- Put the cocoa and 100g / ½ cup dark muscovado sugar into a bowl with a bit of space to spare, and pour in 250ml/1 cup of boiling water. Whisk to mix, then set aside.
- Cream the butter and superfine sugar together, beating well until pale and fluffy; I find this easiest with a freestanding mixer, but by hand wouldn’t kill you.
- While this is going on — or as soon as you stop if you’re mixing by hand — stir the flour, baking powder and bicarb together in another bowl, and set aside for a moment.
- Dribble the vanilla extract into the creamed butter and sugar — mixing all the while — then drop in 1 egg, quickly followed by a scoopful of flour mixture, then the second egg.
- Keep mixing and incorporate the rest of the dried ingredients for the cake, then finally mix and fold in the cocoa mixture, scraping its bowl well with a spatula.
- Divide this fabulously chocolatey batter between the 2 prepared tins and put in the oven for about 30 minutes, or until a cake tester comes out clean.
- Take the tins out and leave them on a wire rack for 5–10 minutes, before turning the cakes out to cool.
- But as soon as the cakes are in the oven, get started on your frosting: put 125ml/½ cup of water, 30g / 2 tablespoons muscovado sugar and 175g / 1½ sticks butter in a pan over a low heat to melt.
- When this mixture begins to bubble, take the pan off the heat and add the chopped chocolate, swirling the pan so that all the chocolate is hit with heat, then leave for a minute to melt before whisking till smooth and glossy.
- Leave for about 1 hour, whisking now and again — when you’re passing the pan — by which time the cakes will be cooled, and ready for the frosting.
- Set one of the cooled cakes, with its top side down, on a cake stand or plate, and spread with about a third of the frosting, then top that with the second cake, regular way up, and spread the remaining frosting over the top and sides, swirling away with your spatula. You can go for a smooth look, but I never do and probably couldn’t.
Additional Information
You may prefer to prepare this the other way round from me, and get the frosting underway before you make the cakes. Either way, read the recipe through before you start cooking (I shouldn't have to remind) to get the shape of things in your head, not least because the frosting is softer, stickier than you may be used to. While you're making it, don't panic. The mixture will seem very runny for ages once the chocolate has melted and you will think you have a liquid gleaming glaze, beautiful but unfit for purpose; leave it for about an hour, as stipulated, though, and it will be perfect and spreadable. It never quite dries to the touch, but this is, in part, what makes the cake so darkly luscious.
Goo here is good.
MAKE AHEAD:
The cake layers can be baked 1 day ahead and assembled before serving: wrap tightly in clingfilm and store in an airtight container. Iced cake will keep for 2-3 days in an airtight container in a cool place.
FREEZE:
Un-iced cake layers can be frozen on the day of baking, each wrapped in a double layer of clingfilm and a layer of foil, for up to 3 months. Defrost for 3-4 hours on a wire rack at room temperature.

Tell us what you think
Thank you {% member.data['first-name'] %}.
Explore more recipesYour comment has been submitted.
What 79 Others have said
-
Posted by LT123 on 25th November 2023
-
Posted by Chocolatelover1777 on 20th December 2022
-
Posted by Odelle on 29th October 2022
-
Posted by Trudy sampson on 3rd August 2022
-
Posted by AishaMah on 28th February 2022
-
Posted by stacies52 on 1st November 2021
-
Posted by Colmort on 9th November 2020
-
Posted by Clairecarter1 on 11th April 2020
-
Posted by Yabayee on 3rd November 2019
-
Posted by cherylyeo25 on 6th March 2019
-
Posted by oakesy on 28th October 2018
-
Posted by FleurDavies on 30th April 2018
Show more commentsI'm a corner cutter and have little patience for cakes precisions - although I often make OTT themed celebration cakes for family, with success, but only after immense amounts of 'fixing' & shaving years off my life expectancy due to be unable to resist cutting corners. Anyway, thought I'd give the devil's cake a bash - it looked simple enough & better than messing with buttercream etc. I had 2. 5 hours max to knock it up in secret. All I can say is trust in the process! My first scare was how flat the sponges cake out, approx 2-3cm high, I thought this would end up looking like a couple of stacked pancakes. My second scare - the frosting. It was liquid and I couldn't understand how it'd ever be able to cover a cake without pouring off into the floor. I left it for an hour as instructed and it was still more liquid than anything close to spreadable. So I put the pan outside where today's temperature is 4 degrees. Et voila, within half an hour it was firm and spreadable. And once filled and stacked the sponges looked pancakes no more, with a hefty top spreading of the frosting, it looks like the picture! Phew! Sprinkled on some e number crunchy sprinkles and some sparkler canons for my partners birthday and it's a showstopper. Don't panic like me, follow the instructions exactly and rope in the fridge if needed.
AMAZING! the frosting was perfect, not too sweet and the perfect consistency. It got thicker as mentioned in the recipe, but melts in your mouth and feels super light. The sponge is airy and pairs super well with the decadent rich frosting. Definitely making this again.
A scrumptious, decadent, moist succulent chocolate cake delicious! I'm so looking forward to making this cake for Halloween. I adore the rich icing it's perfect for me naughty but fabulous with double cream poured over. Another winner Nigella x
I made this cake years ago as I'm a huge fan of chocolate cake but it has to have good frosting and boy this one does. Someone else suggested to make the frosting first as it needs to sit and I agree with that. I made it quite late at night as a friend was coming over the next day for morning tea. The finished cake looked divine. I woke up the next morning to find half of it missing. Hungry teenager was the culprit he loved it.
This cake tastes amazing! It's probably better to make the icing first as it takes longer time. The sponge was very moist. Made three layers using smaller tins for a showstopper! There was still plenty of icing. It would great for a birthday or family celebration. Only change I made is used less per cent chocolate. 70% dark chocolate is too bitter.
I woke up at 1:00 am to let the dog out and passed by this lusciously smooth chocolatey cake, and found I was transported to the end of a Nigella episode…a happy, quiet dark house…she grabs a knife… slices a healthy size piece, eats the said piece standing up with no napkin or fork… yum!
Made it for Halloween exactly as written. It is the “devils food” after all. Perfect. Watch the 30 minute mark for the cake. Mine cooked in 25. Also, if I make it again, I might play around with adding 1/4 cup of coffee and 3/4 water in step 3.
Hey. I made this chocolate cake. And everybody thought it was fantastic. This for me in my 86th year. I’m guessing if I can make, anyone can make it. Good for you Nigella.
Delicious!!! Just made as my Easter cake and added a few decorations.
Superb cake. Halloween hit.
Thank you Nigella. I watched and love you for years. I love your outlook of life, way you cook and how you inspire everyday people how to eat and cook. Much appreciate this recipe. Was successful ( I think!) from 1st try. Will definitely do it again. Everyone like the cake. Again, wonderful! :) From Singapore
I've made this scrumptious cake numerous times for birthdays and it always works well. Sometimes I've done 3 layers for a showstopper !!
I have loved this recipe for years! It never fails and always tastes amazing. My son recently baked it for his 7th birthday cake. It was a big hit.