
Toasted Marshmallow and Rhubarb Cake
by Nigella. Featured in COOK EAT REPEATIntroduction
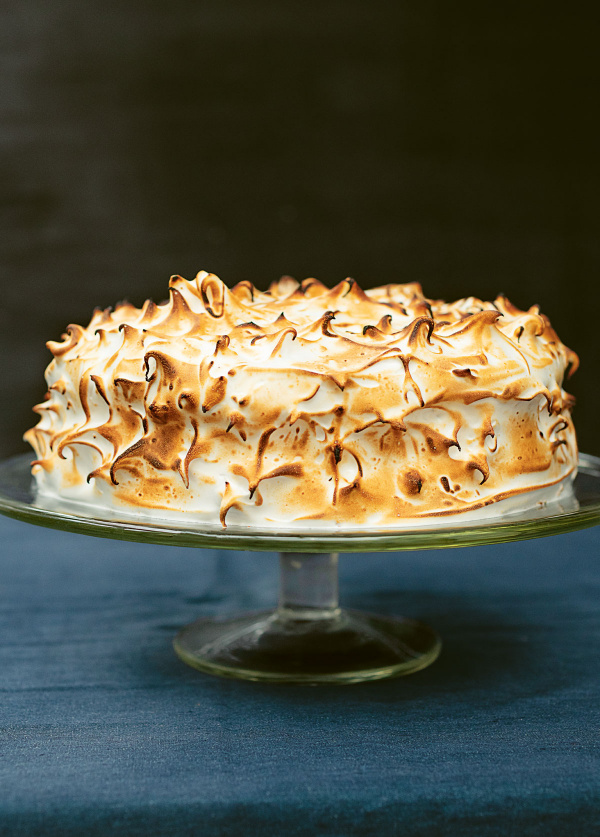
This beauty is the newest addition to my repertoire and I couldn’t be more excited about it. It is splendidly celebratory, but not dauntingly difficult. You need a bit of elbow grease and a blow torch, but making it feels more like play than work to me; I can’t tell you how much I enjoy teasing out the snowy spikes of marshmallow-meringue and then scorching them. (And I thank Stella Parks, whose enthralling ‘Bravetart: Iconic American Desserts’ provided the original inspiration for the marshmallow icing.)
You do need to be prepared to whisk the whites until truly thick, but I give timings below and it’s not as if I’m asking you to whisk them, at this stage, by hand. The yolks are used to make two tender and celestially light sponges, and the rhubarb that goes between them provides its emphatic tang. I also think lemon curd and sharp raspberries would make a wonderful filling, but that’s for another day. For now, I simply can’t stop making this.
And please read the Additional Information section at the end of the recipe before proceeding.
For US cup measures, use the toggle at the top of the ingredients list.
Ingredients
Yields: 10 slices
For the Rhubarb Layer
- 500 grams forced rhubarb
- 100 grams caster sugar
For the Cake
- 6 large eggs (at room temperature)
- 1 unwaxed lemon
- 100 millilitres full fat milk (at room temperature)
- 25 grams cornflour
- 100 grams plain flour
- 2 teaspoons baking powder
- ½ teaspoon bicarbonate of soda
- ¼ teaspoon fine sea salt
- 150 grams caster sugar
- 150 millilitres vegetable oil (plus more for greasing)
For the Icing
- 6 egg whites from eggs above
- 350 grams caster sugar
- ¼ teaspoon fine sea salt
- ½ teaspoon cream of tartar
- 2 teaspoons vanilla extract
For the Rhubarb Layer
- 1¼ pounds hothouse rhubarb
- ½ cup superfine sugar
For the Cake
- 6 large eggs (at room temperature)
- 1 unwaxed lemon
- 7 tablespoons whole milk (at room temperature)
- 2 tablespoons cornstarch
- ¾ cup all-purpose flour
- 2 teaspoons baking powder
- ½ teaspoon baking soda
- ¼ teaspoon fine sea salt
- ¾ cup superfine sugar
- ⅔ cup vegetable oil (plus more for greasing)
For the Icing
- 6 egg whites from eggs above
- 1¾ cups superfine sugar
- ¼ teaspoon fine sea salt
- ½ teaspoon cream of tartar
- 2 teaspoons vanilla extract
Method
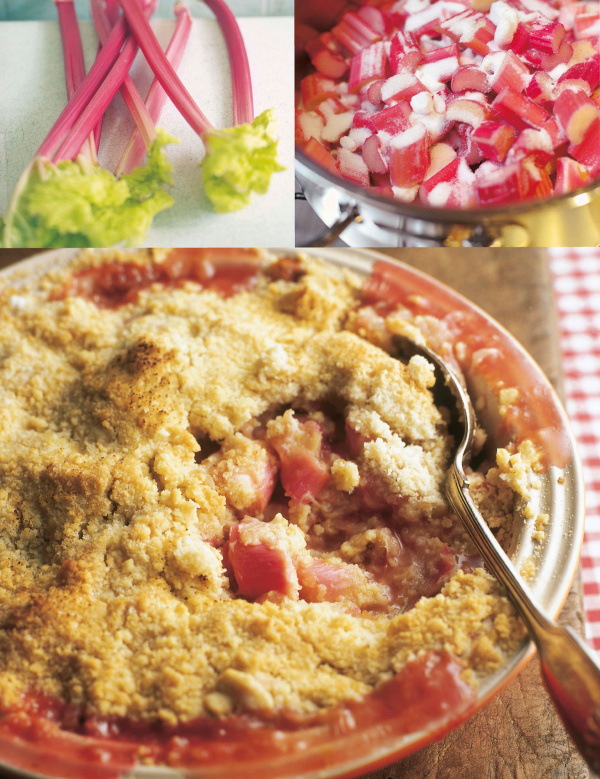
- Start by cooking the rhubarb. Preheat the oven to 200°C/180°C Fan/400°F. Cut the trimmed rhubarb into about 5cm/2inch lengths, if they are slender; if chunky, then cut into about 2.5cm/1-inch pieces. Put in an ovenproof dish in which they will be able to sit in a single layer — I use a 23cm/9-inch square Pyrex dish — and sprinkle over the 100g / ½ cup sugar. Mix together well with your hands, leaving the rhubarb in a single layer, then cover the dish with foil, sealing the edges well, and cook in the oven for approximately 30 minutes until cooked but still holding its shape.
- Remove the foil, and leave the dish of rhubarb on one side to cool. Turn the oven down to 170°C/150°C Fan/325°F. Line the bottoms of 2 x 20cm/8-inch loose-bottomed sandwich tins or cake pans, and lightly grease the sides.
- Separate the eggs and drop the whites into a large mixing bowl (or bowl of a freestanding mixer) and the yolks into another. Cover the bowl of whites with clingfilm, and put to one side while you mix and bake the cake.
- Finely grate the zest of the lemon and add to the bowl of yolks. Measure out the milk, juice the lemon and add 2 x 15ml tablespoons of juice to the milk, and leave to stand. Mix together the cornflour, flour, baking powder, bicarbonate of soda and salt and set this aside for now, too.
- Add the 150g / ¾ cup sugar and oil to the yolks and whisk on medium-high speed for 3 minutes, by which time the mixture will be rich, gleaming and billowy. Actually, it looks rather like a glorious mayonnaise.
- Still whisking, but slightly more slowly now, gently pour and scrape in the now curdled milk, and once it’s in, carry on whisking until combined; the mixture looks like custard at this stage. Finally, whisking more gently now, gradually spoon in the dry ingredients. Once in, use a spatula to scrape down the sides, and fold everything gently together, before dividing the airy mixture between the prepared tins.
- Bake for about 20 minutes, by which time the cakes will have risen up extravagantly, the tops a golden brown; they will feel soft and puffy to the touch, but a cake tester should come out clean. Remove to a wire rack and let the cakes cool in their tins for 15 minutes before very carefully turning out. You’ll need to loosen the edges with a small cranked spatula first. These are tender sponges, so don’t rush or be rough. Gently pull back and remove the lining paper.
- Once the cakes are completely, completely cold — which will take about an hour — you can get on with the icing. But first, tear off four strips of baking parchment, scrunch them, then unfurl them and make the outline of a square with them on a cake stand. (This is to stop you covering the cake stand with sticky marshmallow icing later. It may sound a faff, but I wouldn’t advise you to leave out this step.) Place one of the cakes on it, top-side down. Also, now’s the time to lift the rhubarb pieces out of the syrup onto a plate (and yes, there is a good reason not to do this earlier).
- So, to the icing: get out a tall pan that you can sit your big bowl o’ whites on (without the bottom of the bowl touching the water) and heat a little water in it until just about to come to a simmer. Mix the 350g / 1¾ cups of sugar, the salt and the cream of tartar together and add to the egg whites. Then sit the mixing bowl on top of the pan, so it’s gently warmed by the barely simmering water underneath and, just using a balloon whisk (making sure it is thoroughly washed and grease-free), keep whisking for about 3 minutes, to dissolve the sugar. I couldn’t say this is hard to do, but you can really feel it on your forearm. I’m always grateful when my 3-minute timer goes off.
- Once the sugar’s dissolved and you have a smooth opaque mixture that’s warm to the touch, remove the bowl from the saucepan. Whisk at high speed for 5 minutes with a freestanding mixer, and for 6-7 minutes if using an electric handheld whisk, by which time the whites will be very, very thick and ludicrously voluminous. Finally, whisk in 1 teaspoon of the vanilla and when it’s incorporated, whisk in the remaining teaspoon, then give a good fold by hand to make sure every bit is mixed in.
- Dollop a generous amount of marshmallow icing onto the waiting cake, and smooth right to the edges of the cake, so that you have a layer about 1cm/ ½ inch thick. Now, cover this with the rhubarb, though leave about ½ centimetre / ¼ inch perimeter around the edge. You might want to tip the rhubarb plate slightly as you transfer the slices, to make sure you leave any pooling liquid behind.
- Top with the second cake, right way up, and use just under half the icing left in the bowl to cover the top, going just over the edges. Then carefully spread the rest of the icing thickly around the sides — leaving a tiny bit in the mixing bowl — until the whole cake is completely covered. Dip your fingers in the bit of icing left in the bowl and then dab the top and sides of the cake, lightly pulling up spikes of marshmallowing icing. Gently pull out the strips of paper, and seal the bottom of the cake in with any remaining icing should you need to.
- Now, take the cake somewhere you can kindle fire safely. Light a blowtorch and, holding it fairly near the cake and with not too timorous a flame, toast the top and the sides of the icing. I find this cake best to slice if left to stand before serving; 1-2 hours is fine, though it suits me always to have it ready 3-4 hours before I need it. And you need to slice generously, as with all layer cakes.
- Start by cooking the rhubarb. Preheat the oven to 200°C/180°C Fan/400°F. Cut the trimmed rhubarb into about 5cm/2inch lengths, if they are slender; if chunky, then cut into about 2.5cm/1-inch pieces. Put in an ovenproof dish in which they will be able to sit in a single layer — I use a 23cm/9-inch square Pyrex dish — and sprinkle over the 100g / ½ cup sugar. Mix together well with your hands, leaving the rhubarb in a single layer, then cover the dish with foil, sealing the edges well, and cook in the oven for approximately 30 minutes until cooked but still holding its shape.
- Remove the foil, and leave the dish of rhubarb on one side to cool. Turn the oven down to 170°C/150°C Fan/325°F. Line the bottoms of 2 x 20cm/8-inch loose-bottomed sandwich tins or cake pans, and lightly grease the sides.
- Separate the eggs and drop the whites into a large mixing bowl (or bowl of a freestanding mixer) and the yolks into another. Cover the bowl of whites with clingfilm, and put to one side while you mix and bake the cake.
- Finely grate the zest of the lemon and add to the bowl of yolks. Measure out the milk, juice the lemon and add 2 x 15ml tablespoons of juice to the milk, and leave to stand. Mix together the cornstarch, flour, baking powder, baking soda and salt and set this aside for now, too.
- Add the 150g / ¾ cup sugar and oil to the yolks and whisk on medium-high speed for 3 minutes, by which time the mixture will be rich, gleaming and billowy. Actually, it looks rather like a glorious mayonnaise.
- Still whisking, but slightly more slowly now, gently pour and scrape in the now curdled milk, and once it’s in, carry on whisking until combined; the mixture looks like custard at this stage. Finally, whisking more gently now, gradually spoon in the dry ingredients. Once in, use a spatula to scrape down the sides, and fold everything gently together, before dividing the airy mixture between the prepared tins.
- Bake for about 20 minutes, by which time the cakes will have risen up extravagantly, the tops a golden brown; they will feel soft and puffy to the touch, but a cake tester should come out clean. Remove to a wire rack and let the cakes cool in their tins for 15 minutes before very carefully turning out. You’ll need to loosen the edges with a small cranked spatula first. These are tender sponges, so don’t rush or be rough. Gently pull back and remove the lining paper.
- Once the cakes are completely, completely cold — which will take about an hour — you can get on with the icing. But first, tear off four strips of baking parchment, scrunch them, then unfurl them and make the outline of a square with them on a cake stand. (This is to stop you covering the cake stand with sticky marshmallow icing later. It may sound a faff, but I wouldn’t advise you to leave out this step.) Place one of the cakes on it, top-side down. Also, now’s the time to lift the rhubarb pieces out of the syrup onto a plate (and yes, there is a good reason not to do this earlier).
- So, to the icing: get out a tall pan that you can sit your big bowl o’ whites on (without the bottom of the bowl touching the water) and heat a little water in it until just about to come to a simmer. Mix the 350g / 1¾ cups of sugar, the salt and the cream of tartar together and add to the egg whites. Then sit the mixing bowl on top of the pan, so it’s gently warmed by the barely simmering water underneath and, just using a balloon whisk (making sure it is thoroughly washed and grease-free), keep whisking for about 3 minutes, to dissolve the sugar. I couldn’t say this is hard to do, but you can really feel it on your forearm. I’m always grateful when my 3-minute timer goes off.
- Once the sugar’s dissolved and you have a smooth opaque mixture that’s warm to the touch, remove the bowl from the saucepan. Whisk at high speed for 5 minutes with a freestanding mixer, and for 6-7 minutes if using an electric handheld whisk, by which time the whites will be very, very thick and ludicrously voluminous. Finally, whisk in 1 teaspoon of the vanilla and when it’s incorporated, whisk in the remaining teaspoon, then give a good fold by hand to make sure every bit is mixed in.
- Dollop a generous amount of marshmallow icing onto the waiting cake, and smooth right to the edges of the cake, so that you have a layer about 1cm/ ½ inch thick. Now, cover this with the rhubarb, though leave about ½ centimetre / ¼ inch perimeter around the edge. You might want to tip the rhubarb plate slightly as you transfer the slices, to make sure you leave any pooling liquid behind.
- Top with the second cake, right way up, and use just under half the icing left in the bowl to cover the top, going just over the edges. Then carefully spread the rest of the icing thickly around the sides — leaving a tiny bit in the mixing bowl — until the whole cake is completely covered. Dip your fingers in the bit of icing left in the bowl and then dab the top and sides of the cake, lightly pulling up spikes of marshmallowing icing. Gently pull out the strips of paper, and seal the bottom of the cake in with any remaining icing should you need to.
- Now, take the cake somewhere you can kindle fire safely. Light a blowtorch and, holding it fairly near the cake and with not too timorous a flame, toast the top and the sides of the icing. I find this cake best to slice if left to stand before serving; 1-2 hours is fine, though it suits me always to have it ready 3-4 hours before I need it. And you need to slice generously, as with all layer cakes.
Additional Information
The frosting contains only lightly cooked egg whites so may not be suitable for those with a compromised immune system.
You can use lemon juice if you can’t get cream of tartar.
In the US hothouse rhubarb may be used in place of the forced rhubarb.
NOTE: this recipe contains raw or lightly cooked eggs, and is not suitable for people with compromised or weak immune systems, such as younger children, the elderly or pregnant women.
MAKE AHEAD:
Bake sponges up to 1 month ahead. Once cold, wrap each sponge in double layer of food wrap. Freeze on baking sheet until solid, remove from baking sheet, wrap in layer of foil and freeze until needed. Freeze egg whites in grease-free, airtight container for up to 1 month. Defrost egg whites overnight in fridge and bring to room temperature before making frosting. To assemble cake, make frosting as directed in recipe. Remove sponges from freezer and assemble cake while the sponges are still frozen and frosting is slightly warm. Toast frosting then let cake stand for 1-2 hours before slicing. The cake with frosting is best on day it is made.
STORE:
Refrigerate leftovers, covered, for up to 1 day. Frosting will soften slightly in fridge.

Tell us what you think
Thank you {% member.data['first-name'] %}.
Explore more recipesYour comment has been submitted.
What 3 Others have said
-
Posted by jtv0310 on 23rd April 2023
-
Posted by DelAbadilla on 30th April 2021
-
Posted by George739 on 17th February 2018
Show more commentsThis cake is a real beauty! The cake layers are very light and fluffy, the frosting is light and sweet, and the rhubarb filling adds just enough sharp contrast. The finished cake looks like you bought it from a professional bakery! This is definitely the first thing to make when you see rhubarb at the stores!
I absolutely enjoyed making this cake having seen it as an elimination challenge on MasterChef Australia 2021 last week. It is highly achievable goal. I wasn’t very confident at the start: my rhubarb was overcooked and the sponge cakes deflated. I persevered. As they say in MasterChef, I have to plate up something for the judges. The meringue icing was fun to make and so was the blow torching. I took it to our family dinner tonight at my sister’s and the “judges” were very happy with the look, flavour and texture. Even my 3yo grandson loved it. I wish I can post photos here. Thank you Nigella for the inspiration.
This was a rather grand cake to make on an regular Tuesday evening just for myself but I just couldn't wait to try it as it looked amazing and I got to use the blowtorch. Although it isn't one of my all time favourite Nigella cakes, it was nice to use rhubarb which is not something I often cook (though do love) and I was glad to try my hand at this type of meringue icing; speaking of, for me, the recipe made LOADS and I had quite a bit left over even after lathering the cake generously. I have to be honest and say that it wasn't much effort despite the 3 minutes of hand whisking - do try it, though if I made this again I'd personally not use the rhubarb layer but perhaps use fresh strawberries instead. Keep the occasional special treat recipes coming please Nigella and team! :)