
Victoria Sponge
by NigellaIntroduction
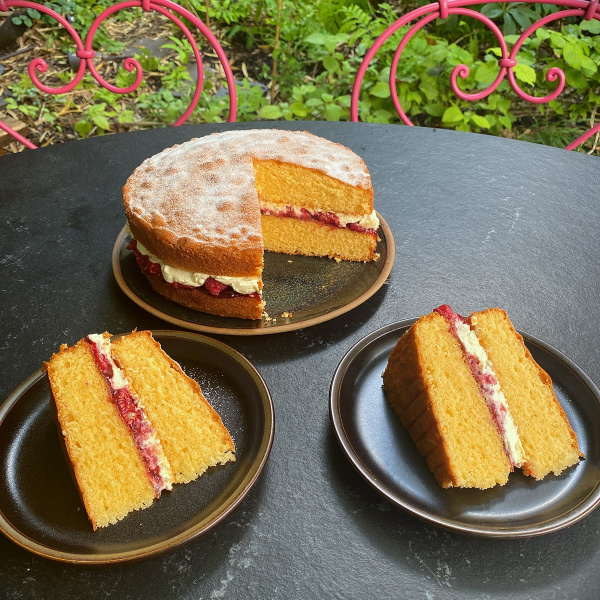
A Victoria Sponge is one of the simplest cakes there is and quite one of the best. Plain, airy cakes, sandwiched with sweet jam and smooth, whipped cream: it is no wonder that it has been such a favourite through the generations. My version tinkers only a little with the traditional model: I use a mixture of flour and cornflour/cornstarch in the sponge, which creates cakes that are exceptionally light and tender; and I add some fruit along with the jam. Here, I’ve used raspberry jam and raspberries, but I can tell you that some sliced strawberries with strawberry jam, or blackberries with their corresponding jam, are also to be considered. Should you decide you wish to leave out the fruit, which in winter may be necessary, I’d add perhaps a little more jam, sharpened with a good spritz of lemon juice.
Anyway, this is the Victoria Sponge I’ve been making for decades, and I’m absolutely thrilled that it is now on the site. I don’t advise making this in advance, as it stales quickly. As with so many simple pleasures, just savour it in the moment.
For US cup measures, use the toggle at the top of the ingredients list.
Ingredients
Yields: 8-10 slices
For the cake
- 225 grams very soft unsalted butter (plus extra for greasing tins)
- 225 grams plus another 1-2 teaspoons caster sugar
- 1 teaspoon vanilla extract
- 200 grams plain flour
- 25 grams cornflour
- 2½ teaspoons baking powder (plus another ½ teaspoon if making in a processor)
- a pinch of salt
- 4 large eggs (at room temperature)
- 2 - 3 x 15ml tablespoons milk (at room temperature)
For the filling
- 75 grams - or as desired - seedless raspberry jam
- 150 grams fresh raspberries
- 150 millilitres double cream
For the cake
- 2 sticks very soft unsalted butter (plus extra for greasing tins)
- 1 cup plus 2 tablespoons plus another 1-2 teaspoons granulated sugar
- 1 teaspoon vanilla extract
- 1⅔ cups all-purpose flour
- 3 tablespoons cornstarch
- 2½ teaspoons baking powder (plus another ½ teaspoon if making in a processor)
- a pinch of salt
- 4 large eggs (at room temperature)
- 2 - 3 tablespoons milk (at room temperature)
For the filling
- ¼ cup - or as desired - seedless raspberry jam
- 1⅓ cups fresh raspberries
- ⅔ cup heavy cream
Method
You will need 2 x 20cm / 8-inch sandwich tins
- Heat the oven to 180°C/160°C Fan/350°F. Grease the sides of the tins with a small amount of butter and line the bases with baking parchment.
- You can make the sponge with a processor – in which case just blitz all the ingredients together (except for the 2 teaspoons of sugar and the milk) including the extra half-teaspoon of baking powder, until you have a smooth batter, and then, with the motor running, pour in 2 tablespoons of the milk slowly down the funnel until the mixture has a soft, dropping consistency, adding the third tablespoon only if necessary — or you can make it with an electric mixer and, indeed, the old-fashioned way, by hand; and if either of those is this case, start by creaming the butter and sugar, that’s to say, beating them vigorously together until very light and fluffy. Add the teaspoon of vanilla extract and beat that in, too.
- In another, smaller, bowl mix together the flour, cornflour, baking powder and salt.
- Beat one egg into the creamed butter and sugar, followed by one tablespoon of the flour mixture and, once both are absorbed, continue in this manner until all 4 eggs are used up. Give a good scrape down, and then, gently, gradually but thoroughly beat in the rest of the flour mixture.
- Once everything’s smoothly combined, start beating in the milk, one cautious tablespoon at a time (you shouldn’t need more than 3) until your batter drops easily off the beaters, paddle or wooden spoon when lifted up out of the bowl.
- Divide the cake batter evenly between the two prepared tins, and smooth the tops a little. Place side by side in the oven and bake for 20–25 minutes, or until the deep burnished gold tops of the cakes are delicately springy to the touch and a cake tester comes out clean.
- Take them out of the oven and leave on a cooling rack for 10 minutes before turning them out and removing the parchment. Choose which cake you want on top — generally when I bake, I choose the thicker cake for the bottom layer, but with a Victoria Sponge, I go for the one which I think will look most appealing — and place that layer with the top uppermost to stop the rack leaving an impression. The bottom layer should be cooled top-side down, so as to help diminish any doming. Allow the cakes to cool completely. If needed, you can keep the cooled cakes on the wire rack, draped with a clean tea towel, for a couple of hours before sandwiching.
- When you are ready to serve the cake, put the bottom layer on its serving plate, top side down, so that you are sandwiching the two flat sides together. Beat the jam in a cup or small bowl, just to make it easier to spread, and then duly spread it over the waiting cake.
- Put the raspberries onto a plate and lightly fork to crush them a little and add them evenly to the layer of jam.
- Whip the cream until it’s thick but still with a little softness to it, and spread it gently over the jam and fruit. Place your second cake on top, and then sprinkle over the 2 teaspoons of sugar to give the cake a light, sparkly dusting. Eat immediately and with joy in your heart.
You will need 2 x 20cm / 8-inch sandwich tins
- Heat the oven to 180°C/160°C Fan/350°F. Grease the sides of the tins with a small amount of butter and line the bases with baking parchment.
- You can make the sponge with a processor – in which case just blitz all the ingredients together (except for the 2 teaspoons of sugar and the milk) including the extra half-teaspoon of baking powder, until you have a smooth batter, and then, with the motor running, pour in 2 tablespoons of the milk slowly down the funnel until the mixture has a soft, dropping consistency, adding the third tablespoon only if necessary — or you can make it with an electric mixer and, indeed, the old-fashioned way, by hand; and if either of those is this case, start by creaming the butter and sugar, that’s to say, beating them vigorously together until very light and fluffy. Add the teaspoon of vanilla extract and beat that in, too.
- In another, smaller, bowl mix together the flour, cornstarch, baking powder and salt.
- Beat one egg into the creamed butter and sugar, followed by one tablespoon of the flour mixture and, once both are absorbed, continue in this manner until all 4 eggs are used up. Give a good scrape down, and then, gently, gradually but thoroughly beat in the rest of the flour mixture.
- Once everything’s smoothly combined, start beating in the milk, one cautious tablespoon at a time (you shouldn’t need more than 3) until your batter drops easily off the beaters, paddle or wooden spoon when lifted up out of the bowl.
- Divide the cake batter evenly between the two prepared tins, and smooth the tops a little. Place side by side in the oven and bake for 20–25 minutes, or until the deep burnished gold tops of the cakes are delicately springy to the touch and a cake tester comes out clean.
- Take them out of the oven and leave on a cooling rack for 10 minutes before turning them out and removing the parchment. Choose which cake you want on top — generally when I bake, I choose the thicker cake for the bottom layer, but with a Victoria Sponge, I go for the one which I think will look most appealing — and place that layer with the top uppermost to stop the rack leaving an impression. The bottom layer should be cooled top-side down, so as to help diminish any doming. Allow the cakes to cool completely. If needed, you can keep the cooled cakes on the wire rack, draped with a clean tea towel, for a couple of hours before sandwiching.
- When you are ready to serve the cake, put the bottom layer on its serving plate, top side down, so that you are sandwiching the two flat sides together. Beat the jam in a cup or small bowl, just to make it easier to spread, and then duly spread it over the waiting cake.
- Put the raspberries onto a plate and lightly fork to crush them a little and add them evenly to the layer of jam.
- Whip the cream until it’s thick but still with a little softness to it, and spread it gently over the jam and fruit. Place your second cake on top, and then sprinkle over the 2 teaspoons of sugar to give the cake a light, sparkly dusting. Eat immediately and with joy in your heart.
Additional Information
MAKE AHEAD/STORE:
This cake is best eaten on the day it’s made, but if you have to make ahead, and you have an airtight cake keeper (often sold as a cake carrier) you can put the cakes in, with a sheet of baking parchment between then, one day in advance. Make sure it’s clicked shut! Do not sandwich the cakes with jam, fruit and cream until serving.
FREEZE:
Cake layers can be frozen. Once cold wrap cake layers in a double layer of clingfilm and a layer of foil and freeze for up to 3 months. To defrost, unwrap and put on a wire rack at room temperature for 2–3 hours.

Tell us what you think
Thank you {% member.data['first-name'] %}.
Explore more recipesYour comment has been submitted.
What 4 Others have said
-
Posted by whoneycat on 27th June 2022
-
Posted by whoneycat on 26th June 2022
-
Posted by limejelly on 10th June 2022
-
Posted by Piglet11 on 1st June 2022
Show more commentsWe just had our first slice and let’s just say I will be the talk of the lunch room tomorrow. And I can’t wait to have this again tomorrow. It is so good!
Oh my gosh! Nigella you hit out of the park yet again. My husband wanted a cake but I didn’t want something too heavy. This was the ticket. I did make some homemade jam ish with some frozen strawberries that have been looking at me for a bit. This cake looks beautiful. I can’t wait for dessert tonight!
I made this today. I think it's the best cake I have ever accomplished. I used the processor method and it was so easy! Thank you so much for sharing that tip!
Wonderful!