
Vanilla Layer Cake with Ermine Icing
by Nigella. Featured in AT MY TABLEIntroduction
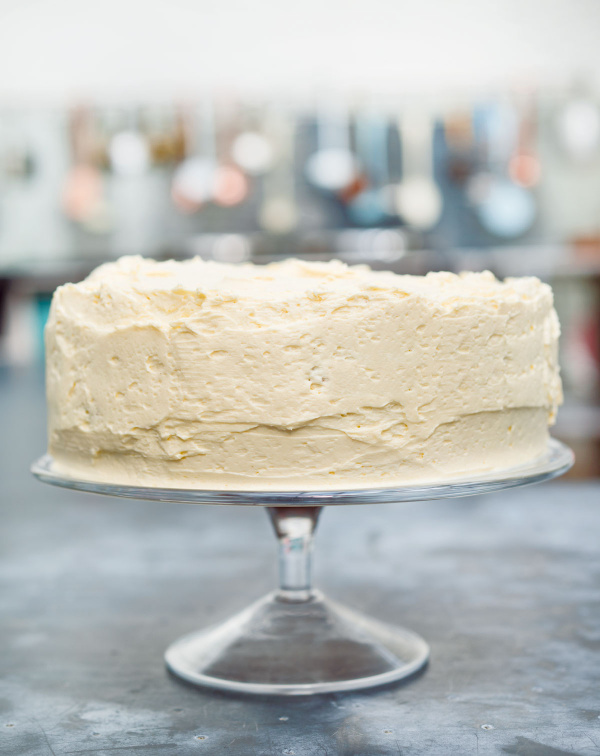
This is the sort of cake you’d find in an old-fashioned diner of your dreams: a majestic creation, frosted with fluffy, super-sweet buttercream, just made to stand aloft and enticingly on the counter. The Ermine Buttercream (often less alluringly known as Flour Buttercream) is a revelation: before you even get on to the butter, you start off by making a roux with flour, sugar and milk, and although I know that the idea of a gluey flour-paste doesn’t sound immediately appealing, trust me that it creates the most divinely light and moussy buttercream. Since this roux must be used completely cold, I advise making this part first, then actually finishing off the buttercream when the cakes have cooled.
And those of you who are inclined to be disparaging about the idea of adding vegetable shortening to a cake should know that this is what helps create a gorgeously fluffy sponge, best eaten on the day it's made, though no hardship after.
For me this cake is all about its pale vanilla splendour, but I admit that were I making this for a child's birthday party, I would add a vulgar note with a confetti-covering of sprinkles. Indeed, at Christmas, you could scatter over festive red and green sprinkles — and it’s a wonderful alternative for children and others who fail to see the charm of fruit cake — but I still can’t help thinking the simple, snow-covered effect of the unadorned icing wins out.
I know this looks like a dauntingly long recipe, but nothing about it is complicated, I promise you.
For US cup measures, use the toggle at the top of the ingredients list.
Ingredients
Serves: 8-12 slices
FOR THE ICING BASE
- 40 grams plain flour
- 200 grams caster sugar
- 250 millilitres full fat milk
FOR THE CAKE
- 150 millilitres full fat milk (at room temperature)
- 1 teaspoon fresh lemon juice
- 125 grams soft unsalted butter (plus more for greasing)
- 75 grams vegetable shortening (such as Trex)
- 225 grams caster sugar
- 3 large eggs (at room temperature)
- 225 grams plain flour
- 1 teaspoon baking powder
- ½ teaspoon bicarbonate of soda
- A pinch of fine sea salt
- 2½ teaspoons vanilla extract
TO FINISH THE ICING
- 250 grams soft unsalted butter
- A pinch of fine sea salt
- 2½ teaspoons vanilla extract
FOR THE ICING BASE
- ⅓ cup all-purpose flour
- 1 cup granulated sugar
- 1 cup whole milk
FOR THE CAKE
- ⅔ cup whole milk (at room temperature)
- 1 teaspoon fresh lemon juice
- 1 stick soft unsalted butter (plus more for greasing)
- 6 tablespoons vegetable shortening (such as Crisco)
- 1 cup plus 2 tablespoons superfine sugar
- 3 large eggs (at room temperature)
- 1¾ cups all-purpose flour
- 1 teaspoon baking powder
- ½ teaspoon baking soda
- A pinch of fine sea salt
- 2½ teaspoons vanilla extract
TO FINISH THE ICING
- 2 sticks soft unsalted butter
- A pinch of fine sea salt
- 2½ teaspoons vanilla extract
Method
2 x 20cm / 8-inch loose-bottomed sandwich cake tins
- Start with the icing base: in a wide-ish saucepan (I use one of 22cm / 9inches diameter), whisk together the flour and sugar, then slowly whisk in the milk. Put the pan over a medium-low heat and, whisking continuously, bring to the boil, then let it cook, still whisking assiduously until it’s thickened and lost its overtly floury taste. This shouldn’t take more than a minute or two from boiling. Take the pan off the heat, whisk for 30 seconds, then scrape the thick paste into a shallow bowl and press a piece of cling film directly on the surface of this admittedly not terribly attractive mixture. Leave it to cool — this will probably take 1½–2 hours — then stick the bowl in the fridge to make sure it’s properly cold when called into service later, though to speed the process you could just put it straight in the fridge while still hot.
- To make the cakes, preheat the oven to 180°C/160°C Fan/350°F. Grease the sides and line the bases of your cake tins with baking parchment.
- Pour the milk into a jug and stir in the lemon juice. Leave this to one side for a moment and, with an electric mixer (for ease), beat the butter and shortening until pale and creamy. Still beating, add the sugar, a tablespoonful at a time, until you have a light fluffy mixture in front of you. Still beating, add the eggs, one at a time, making sure each one is incorporated before adding the next. Give the bowl a good scrape down.
- Mix the flour, baking powder, bicarb and salt together in bowl and, more gently now, beat a third of this into the cake batter, followed by a third of the lemon-soured-milk, and continue until both are used up. Beat in the vanilla extract, give a good fold and scrape by hand, then divide between the prepared tins.
- Bake for 20–25 minutes until the cakes are golden brown and coming away at the sides, the surface feels springy and a cake tester comes out clean. Leave the tins on a wire rack for 15 minutes before carefully turning out; go gently as these are tender babies. Peel off the lining from the base (now uppermost) and leave to cool.
- So, when the paste’s cold and the cakes are ditto, you can carry on with the buttercream. Using either a freestanding mixer or an electric hand whisk, duly whisk the butter for 2 minutes or so, scraping the bowl down regularly, until it’s smooth, creamy and pale. Do not stint on this part: you want it really whipped. Whisk in the cold paste, a tablespoon at a time, mixing well between each spoonful and making sure it’s properly combined before adding the next one. You will — again — need to do a bit of scraping down from time to time. Once you’ve used up the paste, add the salt and the vanilla extract and carry on whisking for a good 3 minutes — still on scraping-down duty — until the mixture has increased in volume and you have an impressively light and creamy buttercream in front of you.
- If one of the cakes is fatter than the other, use that one as the bottom layer and sit it on your cake stand or plate, flat-side up, then spread just under a third of the buttercream on top; a small cranked spatula is my tool of choice for this work. Sandwich with the other cake, flat-side down, and spread half the remaining icing on top, smoothing it to cover it entirely, then swirl delicately away, unless you have the patience, dexterity and desire to give this cake a smooth, hat-box finish. Smooth the rest of the buttercream around the edges so that the cake is completely covered. Here, even I attempt a smooth look, though often with only qualified success.
- I am quite cavalier about leaving the cake out of the fridge for a few hours before serving (as long as the weather isn’t hot) as I find refrigerating it gives the sponge a heavier, denser texture, though no doubt health and safety officers would advise against. Your risk, your call.
Additional Information
MAKE AHEAD / STORE:
The buttercream can be made up to 4 days ahead. Store in an airtight container in the fridge. To use, let the buttercream come to room temperature, then beat for 3-5 minutes until smooth. Cake layers can be baked 1 day ahead. Cool, wrap in cling film, then store in an airtight container. Refrigerate leftovers for up to 3 days. Remove from the fridge about 30 minutes before serving to take the chill off the cake.
FREEZE:
Wrap un-iced cake layers in a double layer of cling film and a layer of foil and freeze for up to 3 months. To defrost, unwrap cake layers and put on a wire rack for 2-3 hours. Ice before serving. The buttercream can also be frozen in an airtight container for up to 3 months. Defrost overnight in the fridge and use as above.
Tell us what you think
Thank you {% member.data['first-name'] %}.
Explore more recipesYour comment has been submitted.
What 3 Others have said
-
Posted by Odelle on 11th December 2022
-
Posted by Puppybaker4life on 14th December 2021
-
Posted by craig74 on 29th August 2020
Show more commentsA wonderful old fashioned diner type cake that's light fluffy vanilla cake that's light in texture it's got the most fluffy textured cake imaginable. Made with a roux sauce frosting that's buttery, tastes fantastic and is best eaten on the day it's made unless you're freezing it as a whole cake or in portions ideal for Christmas time or any other occasion. This cake serves 8-10 portions easily It's utterly scrumptious. Enjoy!
this really brightened up my day! great for the kids
This cake is absolutely delicious. I had never made ermine icing before and it was completely worth the effort.