
Rococoa Cake
by Nigella. Featured in FEASTIntroduction
Forgive the whimsy of its naming, but every time I've tried to rename this cake, I veer back to this. I used to refer to it as Venetian chocolate cake, because its inspiration comes from a cake of that name in Nick Malgieri's luscious chocolate book but as my cake changed from his specifications, the title seemed misleading. Anyway, it's ended up like this simply because Caz, the designer, art director and adviser on my books ever since How To Eat, remarked on its baroque appearance as we were photographing it; from baroque to rococo to "rococoa" was an obvious stagger.
And please read the Additional Information section at the end of the recipe before proceeding.

Ingredients
Yields: 10-12 slices
For the Cake
- 50 grams plain flour
- 50 grams cornflour
- 40 grams cocoa powder
- 4 large eggs (separated)
- 150 grams caster sugar
- pinch of salt
For the Rum Espresso Syrup
- 100 grams caster sugar
- 2 teaspoons instant espresso powder dissolved in 125ml / ½ cup hot water
- 60 millilitres dark rum
For the Creamy Filling
- 3 large egg yolks
- 70 grams caster sugar
- 80 millilitres dark rum
- 250 grams mascarpone cheese
- 250 millilitres double cream
For the Icing
- 100 grams caster sugar
- 60 millilitres golden syrup
- 60 millilitres dark rum
- 1 teaspoon instant espresso powder
- 150 grams best-quality dark chocolate (chopped very small)
- sugar flowers or gold sprinkles, nibbed pistachios, wafer roses or any other decoration that pleases you
For the Cake
- ⅓ cup all-purpose flour
- ⅓ cup cornstarch
- ⅓ cup unsweetened cocoa
- 4 large eggs (separated)
- ¾ cup superfine sugar
- pinch of salt
For the Rum Espresso Syrup
- ½ cup superfine sugar
- 2 teaspoons instant espresso powder dissolved in 125ml / ½ cup hot water
- ¼ cup dark rum
For the Creamy Filling
- 3 large egg yolks
- ⅓ cup superfine sugar
- ⅓ cup dark rum
- 8 ounces mascarpone cheese
- 1 cup heavy cream
For the Icing
- ½ cup superfine sugar
- ¼ cup golden syrup or light corn syrup
- ¼ cup dark rum
- 1 teaspoon instant espresso powder
- 5 ounces best-quality bittersweet chocolate (chopped very small)
- sugar flowers or gold sprinkles, nibbed pistachios, wafer roses or any other decoration that pleases you
Method
- Preheat the oven to gas mark 4/180°C/160°C Fan/350ºF. Butter and line the bottom of a 23cm / 9 inch springform tin.
- Sift together the flour and cornflour, and add the cocoa, pushing it through a sieve. Whisk the separated yolks with half of the sugar — you can judge this by eye — until the mixture becomes pale and moussey.
- In a separate bowl, whisk the egg whites with a pinch of salt until firm, then whisk in the remaining sugar, one spoonful at a time, until you have gleaming white peaks.
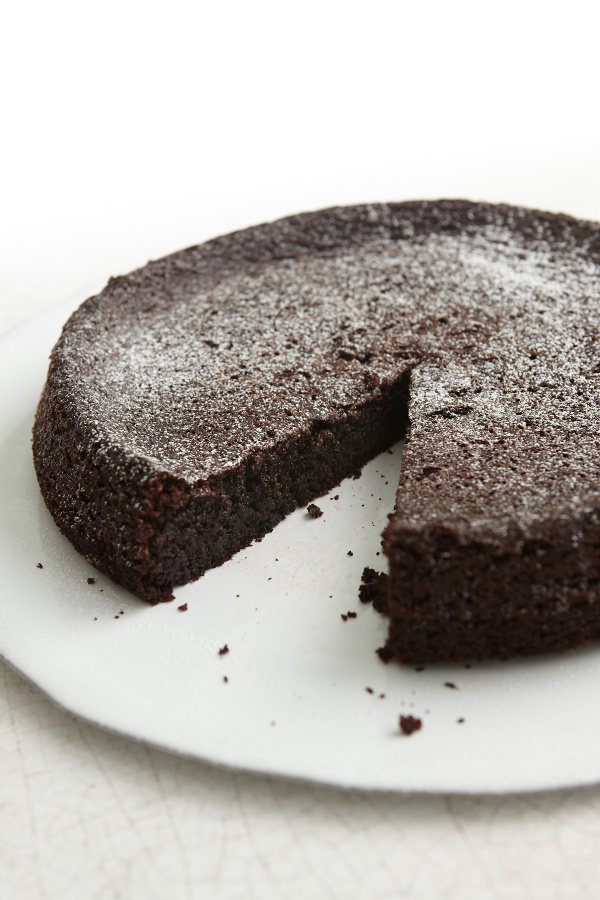
- Gently fold the yolk mixture into the whites, and then add the flour, cornflour and cocoa, folding gently again until combined. Pour this moussey liquid into the tin and bake for 30 minutes. The cake will be almost silicon-springy on top. Unclip the tin and let the cake cool on a rack, right side up.
- Meanwhile, to make the syrup, bring the sugar and 60ml/¼ cup of water to a boil in a small saucepan and let it bubble for a scant minute before taking the pan off the heat and adding the coffee or espresso powder made up with water, and the rum. Stir — just with a fork or anything — pour the hot syrup into a jug or bowl and let it cool.
- To make the filling, put the yolks, sugar and rum into a bowl that will fit over a saucepan of barely simmering water. Whisk (I use a hand-held electric mixer for this) until the mixture has thickened airily and then lift the bowl off the pan and let it sit on a cold surface while you whisk for another few minutes to help it cool down. Don't agitate yourself too much about whether it's thick enough or not: as long as it has thickened, the marscarpone and cream will give it the right texture to fill the cake with later.
- Make sure your rum-zabaglione mixture is pretty well cool before whisking in the mascarpone. Softly whip the cream in a separate bowl and beat or fold that into the filling as well.
- To assemble the rococoa cake, cut the cake you made into thin vertical slices, that's to say as if you were slicing a round loaf of bread rather than a cake. Don't worry about breakages: you are, after all, able to wodge everything together with the syrup in the tin. So: brush a 23cm / 9 inch springform tin with some of the syrup and then layer a third of the sliced chocolate cake, laid horizontally, to line the bottom of the tin. Brush again with the syrup to dampen the cake and seal the joins.
- Spread the layer of chocolate cake with half of the zabaglione using a rubber spatula and a light hand to coat evenly, and then add another layer of cake slices to cover.
- Dribble again or brush with the syrup until the cake is damp as before, and then spread over the final half of the filling.
- Cover with the final third of chocolate cake slices and drip, pour or brush over the syrup to give the cake a smoothish layer, which can be iced later; if the cake is damp, there's no call to drench it. And if the top of the cake is quite wet, don't be tempted to use all of the syrup; the bought chocolate cake is often damper and denser (and needs less syrup) than the homemade cocoa-sponge.
- Put the cake, covered with clingfilm, in the fridge overnight to set. You can ice the cake ahead of your dinner party and put the cake back in the fridge again (though see the caveat in the final paragraph below), but do let it set overnight first.
- To make the icing, put the sugar, syrup, rum and espresso powder into a small saucepan and bring to the boil. Turn off the heat and add the chopped chocolate, swirling it around so that the chocolate melts in the hot liquid. Leave for a few minutes and then whisk everything together in the pan (just using a little hand whisk) to make a smooth shiny glaze. Moving quickly, spring open your tin, taking care with the sides as the cake will be damp and delicate; you might want to run a small spatula around the inside first.
- Sit the cake on a plate or stand (don't even think of trying to loosen it from the tin's base) and pour over the icing, not worrying if it dribbles down the sides too much. You may need to ease it over the top of the cake while it is still malleable. It will set quite quickly — the fridge will have made the layer it sits on very cold — and you will ruin the finish if you try and spread the icing after your initial pouring.
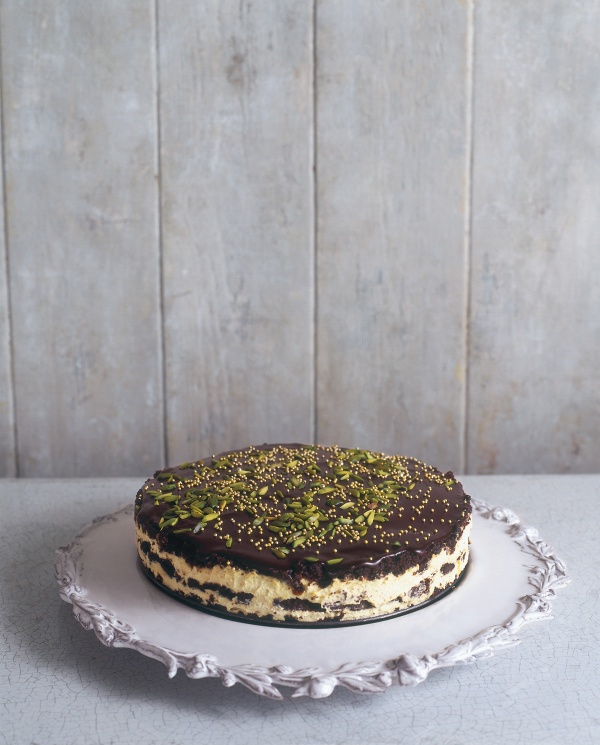
- Scatter with gold sprinkles, nibbed or chopped pistachios, wafer roses, sugar flowers or any other decorations of your choice. The glaze will dull a little if you put it back in the fridge, so on the whole it's best to ice the cake and decorate it about 20 minutes before you want to eat it, or just before you sit down to dinner.
- Preheat the oven to gas mark 4/180°C/160°C Fan/350ºF. Butter and line the bottom of a 23cm / 9 inch springform tin.
- Sift together the flour and cornstarch, and add the cocoa, pushing it through a sieve. Whisk the separated yolks with half of the sugar — you can judge this by eye — until the mixture becomes pale and moussey.
- In a separate bowl, whisk the egg whites with a pinch of salt until firm, then whisk in the remaining sugar, one spoonful at a time, until you have gleaming white peaks.
- Gently fold the yolk mixture into the whites, and then add the flour, cornstarch and cocoa, folding gently again until combined. Pour this moussey liquid into the tin and bake for 30 minutes. The cake will be almost silicon-springy on top. Unclip the tin and let the cake cool on a rack, right side up.
- Meanwhile, to make the syrup, bring the sugar and 60ml/¼ cup of water to a boil in a small saucepan and let it bubble for a scant minute before taking the pan off the heat and adding the coffee or espresso powder made up with water, and the rum. Stir — just with a fork or anything — pour the hot syrup into a jug or bowl and let it cool.
- To make the filling, put the yolks, sugar and rum into a bowl that will fit over a saucepan of barely simmering water. Whisk (I use a hand-held electric mixer for this) until the mixture has thickened airily and then lift the bowl off the pan and let it sit on a cold surface while you whisk for another few minutes to help it cool down. Don't agitate yourself too much about whether it's thick enough or not: as long as it has thickened, the marscarpone and cream will give it the right texture to fill the cake with later.
- Make sure your rum-zabaglione mixture is pretty well cool before whisking in the mascarpone. Softly whip the cream in a separate bowl and beat or fold that into the filling as well.
- To assemble the rococoa cake, cut the cake you made into thin vertical slices, that's to say as if you were slicing a round loaf of bread rather than a cake. Don't worry about breakages: you are, after all, able to wodge everything together with the syrup in the tin. So: brush a 23cm / 9 inch springform tin with some of the syrup and then layer a third of the sliced chocolate cake, laid horizontally, to line the bottom of the tin. Brush again with the syrup to dampen the cake and seal the joins.
- Spread the layer of chocolate cake with half of the zabaglione using a rubber spatula and a light hand to coat evenly, and then add another layer of cake slices to cover.
- Dribble again or brush with the syrup until the cake is damp as before, and then spread over the final half of the filling.
- Cover with the final third of chocolate cake slices and drip, pour or brush over the syrup to give the cake a smoothish layer, which can be iced later; if the cake is damp, there's no call to drench it. And if the top of the cake is quite wet, don't be tempted to use all of the syrup; the bought chocolate cake is often damper and denser (and needs less syrup) than the homemade cocoa-sponge.
- Put the cake, covered with clingfilm, in the fridge overnight to set. You can ice the cake ahead of your dinner party and put the cake back in the fridge again (though see the caveat in the final paragraph below), but do let it set overnight first.
- To make the icing, put the sugar, syrup, rum and espresso powder into a small saucepan and bring to the boil. Turn off the heat and add the chopped chocolate, swirling it around so that the chocolate melts in the hot liquid. Leave for a few minutes and then whisk everything together in the pan (just using a little hand whisk) to make a smooth shiny glaze. Moving quickly, spring open your tin, taking care with the sides as the cake will be damp and delicate; you might want to run a small spatula around the inside first.
- Sit the cake on a plate or stand (don't even think of trying to loosen it from the tin's base) and pour over the icing, not worrying if it dribbles down the sides too much. You may need to ease it over the top of the cake while it is still malleable. It will set quite quickly — the fridge will have made the layer it sits on very cold — and you will ruin the finish if you try and spread the icing after your initial pouring.
- Scatter with gold sprinkles, nibbed or chopped pistachios, wafer roses, sugar flowers or any other decorations of your choice. The glaze will dull a little if you put it back in the fridge, so on the whole it's best to ice the cake and decorate it about 20 minutes before you want to eat it, or just before you sit down to dinner.
Additional Information
NOTE: this recipe contains lightly cooked eggs, and so may not suitable for people with compromised or weak immune systems, such as younger children, the elderly or pregnant women.
MAKE AHEAD / STORE:
The chocolate sponge can be made a day ahead. Store in an airtight container until needed. Leftovers should be stored, covered, in the fridge and eaten within 2 days.


Tell us what you think
Thank you {% member.data['first-name'] %}.
Explore more recipesYour comment has been submitted.
What 3 Others have said
-
Posted by samikoivusaari on 27th August 2017
-
Posted by tartecitron on 2nd January 2015
-
Posted by ladida on 12th September 2014
Show more commentsJust an amazing thing to offer as a highlight of your dinner party! Easy enough to make. I used an 18cm form to assemble so did 3 teers and it was perfect. Just enough rum taste without being 'boozy'. Thank you!
Seismic. That is absolutely the only word to describe this luscious cake that made New Year's Eve as festive and glamorous an event at home as if I were in a Venetian restaurant. It definitely is the kind of cake that you need a leisurely, uninterrupted afternoon to assemble but I really enjoyed the challenge. I was nervous at first to cut the cake into three parts, but it was no problem and Nigella's directions were perfectly clear and true to life, as always. I used half the amount of syrup and am glad that I did, otherwise it would have collapsed into a soupy tiramisu. And I find that the rich shellack of rum, espresso and chocolate seals in the moist cake so that it tastes fresh today, and perhaps tomorrow. Grazzi.
this cake is soooo yumm! However my advice for the first time bakers: don't be scared if the cake is flat, small and a little bit dry, it will come together when assembled with the zabaglione. I have used blueberry, raspberry and crushed meringues on top. The fruits just lighten up the cake a bit.