
Double Marble Loaf Cake
by Edd Kimber, featured in Chocolate Baking Published by QuadrilleIntroduction
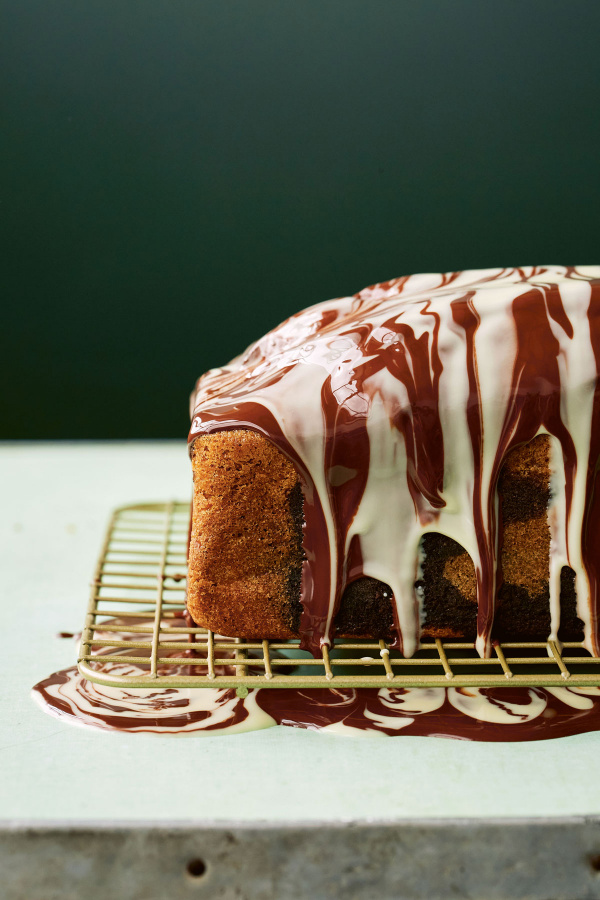
A marble cake with a bonus marble glaze, as beautiful in flavour as it is in appearance. The cake itself is very straightforward, a one-bowl batter that is then split in two so that cocoa powder can be added to half. Once baked, it needs nothing more than melted chocolate, mixed with a little oil, poured randomly over to create an almost zebra-like effect.
A marble cake with a bonus marble glaze, as beautiful in flavour as it is in appearance. The cake itself is very straightforward, a one-bowl batter that is then split in two so that cocoa powder can be added to half. Once baked, it needs nothing more than melted chocolate, mixed with a little oil, poured randomly over to create an almost zebra-like effect.
Ingredients
Serves: 10
FOR THE MARBLE LOAF CAKE
- 2 tablespoons cocoa powder (dutched or black)
- 2 tablespoons boiling water
- 170 grams unsalted butter (room temperature)
- 175 grams caster sugar
- 2 large eggs (lightly whisked)
- 220 grams plain flour
- 1½ teaspoons baking powder
- ¼ teaspoon bicarbonate of soda
- ½ teaspoon fine sea salt
- 100 millilitres buttermilk
- 1 teaspoon vanilla extract
FOR THE MARBLE CHOCOLATE GLAZE
- 125 grams dark chocolate (65–75% cocoa solids), roughly chopped
- 100 grams white chocolate (roughly chopped)
- 30 millilitres vegetable oil (divided equally)
FOR THE MARBLE LOAF CAKE
- 2 tablespoons unsweetened cocoa (dutched or black)
- 2 tablespoons boiling water
- 1½ sticks unsalted butter (room temperature)
- ¾ cup + 2 tablespoons superfine sugar
- 2 large eggs (lightly whisked)
- 1¾ cups all-purpose flour
- 1½ teaspoons baking powder
- ¼ teaspoon baking soda
- ½ teaspoon fine sea salt
- ⅓ cup + 1 tablespoon buttermilk
- 1 teaspoon vanilla extract
FOR THE MARBLE CHOCOLATE GLAZE
- 4½ ounces bittersweet chocolate (65–75% cocoa solids), roughly chopped
- 3½ ounces white chocolate (roughly chopped)
- 2 tablespoons vegetable oil (divided equally)
Method
Double Marble Loaf Cake is a guest recipe by Edd Kimber so we are not able to answer questions regarding this recipe
- Preheat the oven to 180°C/160°C Fan (350°F). Lightly grease a 450 g (1 lb) loaf tin (pan) and line with a single long strip of parchment so that the excess paper hangs over the long sides of the pan, securing in place with a couple of metal binder clips.
- To make the cake, in a small bowl whisk together the cocoa powder and boiling water until a smooth paste is formed. Set aside. Place the butter and sugar in a large bowl and use an electric mixer to beat together until light and fluffy, about 5 minutes. Add the eggs to the butter mixture a little at a time, beating until fully combined before adding more. In a separate bowl whisk together the flour, baking powder, bicarbonate of soda and salt. With the mixer on low/medium speed, add the flour mixture to the butter mixture in three additions, alternating with the buttermilk and vanilla – starting and finishing with the flour mixture. Divide the batter evenly into two bowls and to one mixture, briefly beat in the cocoa paste.
- Spoon both batters into the loaf tin, in a random pattern, then use a skewer to briefly swirl to create a marble effect. When swirling together, less is always more, too much swirling creates a less defined marbled pattern.
- Bake in the preheated oven for about 45 minutes or until a skewer inserted into the cake comes out clean. Leave to cool in the tin for 15 minutes before using the parchment to lift the cake onto a wire rack to cool completely. Once the cake is at room temperature wrap in cling film (plastic wrap) and freeze for 30–60 minutes.
- For the glaze, place the chocolates in separate small heatproof jugs and melt, using a microwave (see Additional Information, below), then stir half the vegetable oil into each chocolate. Remove the cake from the freezer, unwrap, and place on a cooling rack set over a baking tray (pan). Pour over about three-quarters of the dark chocolate glaze, covering as much of the cake as possible. Before it has a chance to set, drizzle over the white chocolate glaze, trying to create a marbled effect. Use the reserved dark chocolate glaze to create extra definition in the marbling and to fill in any uncoated spots on the cake. Lift the cake from the rack and set onto a platter. Allow the glaze to set and the cake to come to room temperature before serving.
- Kept covered, the cake will keep for 3–4 days.
- Preheat the oven to 180°C/160°C Fan (350°F). Lightly grease a 450 g (1 lb) loaf tin (pan) and line with a single long strip of parchment so that the excess paper hangs over the long sides of the pan, securing in place with a couple of metal binder clips.
- To make the cake, in a small bowl whisk together the unsweetened cocoa and boiling water until a smooth paste is formed. Set aside. Place the butter and sugar in a large bowl and use an electric mixer to beat together until light and fluffy, about 5 minutes. Add the eggs to the butter mixture a little at a time, beating until fully combined before adding more. In a separate bowl whisk together the flour, baking powder, baking soda and salt. With the mixer on low/medium speed, add the flour mixture to the butter mixture in three additions, alternating with the buttermilk and vanilla – starting and finishing with the flour mixture. Divide the batter evenly into two bowls and to one mixture, briefly beat in the cocoa paste.
- Spoon both batters into the loaf tin, in a random pattern, then use a skewer to briefly swirl to create a marble effect. When swirling together, less is always more, too much swirling creates a less defined marbled pattern.
- Bake in the preheated oven for about 45 minutes or until a skewer inserted into the cake comes out clean. Leave to cool in the tin for 15 minutes before using the parchment to lift the cake onto a wire rack to cool completely. Once the cake is at room temperature wrap in cling film (plastic wrap) and freeze for 30–60 minutes.
- For the glaze, place the chocolates in separate small heatproof jugs and melt, using a microwave (see Additional Information, below), then stir half the vegetable oil into each chocolate. Remove the cake from the freezer, unwrap, and place on a cooling rack set over a baking tray (pan). Pour over about three-quarters of the bittersweet chocolate glaze, covering as much of the cake as possible. Before it has a chance to set, drizzle over the white chocolate glaze, trying to create a marbled effect. Use the reserved bittersweet chocolate glaze to create extra definition in the marbling and to fill in any uncoated spots on the cake. Lift the cake from the rack and set onto a platter. Allow the glaze to set and the cake to come to room temperature before serving.
- Kept covered, the cake will keep for 3–4 days.
Additional Information
Using a microwave to melt chocolate is probably my favourite method, as it is simple and creates the least washing up, a big bonus! Use short bursts of heat; microwaves are powerful machines, so to prevent scorching or burning, never heat the chocolate for more than 30 seconds at a time. If your microwave allows you to, select a lower wattage. It's better to go a little slower than to risk scorching your chocolate. To ensure an even melt and to prevent the chocolate overheating, make sure you give it a stir between each burst of heat, even if it doesn't seem to have melted at first.
Note: I often bake this in a 23 x 10 x 10 cm (9 x 4 x 4 in) pullman loaf tin (pan), which has straight sides, which gives the cake an even more polished look.


Tell us what you think
Thank you {% member.data['first-name'] %}.
Explore more recipesYour comment has been submitted.