
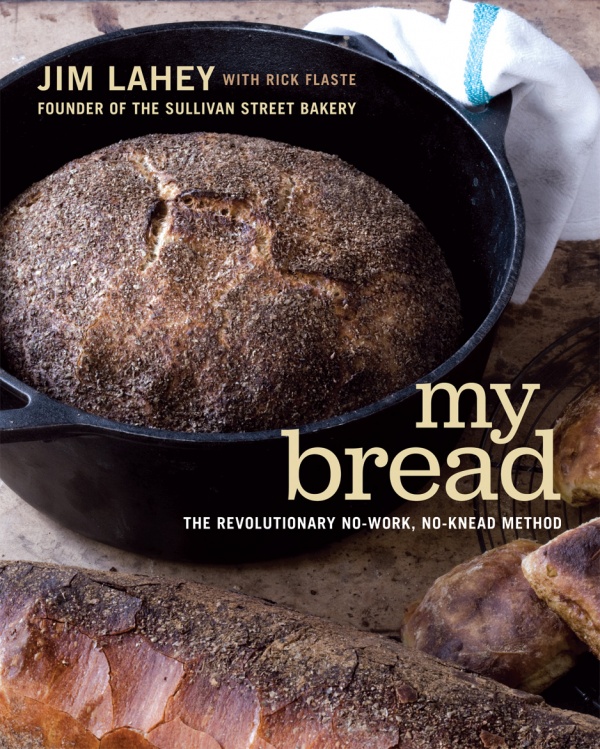
Basic No-Knead Bread
by Jim Lahey, featured in My Bread: The Revolutionary No-Work, No-Knead Method Published by W. W. Norton & CompanyIntroduction
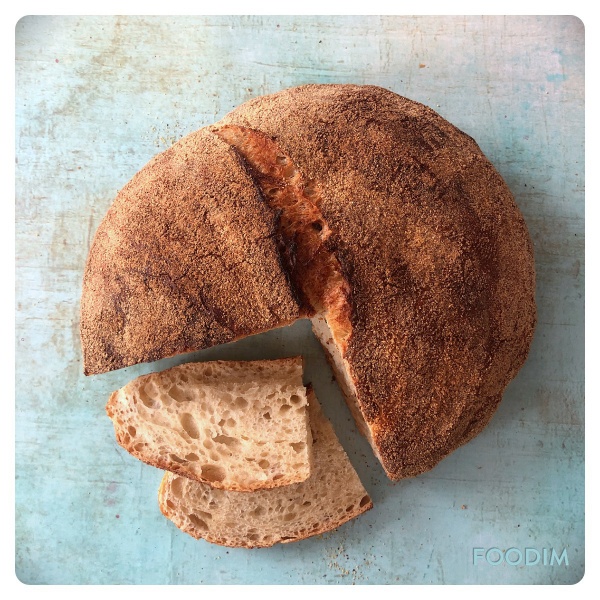
Here’s my basic no-knead, long-fermented rustic bread, a round loaf, or boule. It’s an adaptation for the home kitchen of the much larger oval filone and the football-shaped pugliese sold at the Sullivan Street Bakery. Even if you’ve baked before, the process is probably nothing like what your experience would lead you to expect. For one thing, many people who bake this bread find the dough to be unusually wet. Remember that most of the water is meant to be released as steam in the covered pot, and you’ll be handling the dough very little anyway.
Don’t feel too uptight about any of this. For example, I specify that the dough should rise at room temperature, about 72°F / 22°C. (In many of the recipes, I say to put the dough in a warm, draft-free spot - same thing.) But if that’s not what you have at the moment, you’ll be okay anyway. Just pay attention to the visual cues: at the end of the first rise, the dough is properly fermented when it has developed a darkened appearance and bubbles, and long, thread-like strands cling to the bowl when it’s moved. After the second, briefer, rise, the loaf has risen sufficiently if it holds the impression of your fingertip when you poke it lightly, making an indentation about ¼ inch / ½ cm deep. It should hold that impression. If it springs back, let it rise for another 15 minutes.
Despite my own efforts to get this and all the other recipes in this book to reflect what I think is the optimal approach, conditions are going to vary from kitchen to kitchen. I hope you’ll ultimately have the confidence to experiment yourself, adjusting the ingredients and timing to your own taste and circumstances. As the journalists who’ve reported on my bread have written, even the loaves that aren’t what you’d regard as perfect are way better than fine.
On timing: this bread is incredibly simple and involves little labor, but you need to plan ahead. Although mixing takes almost no time, the first rise requires from 12 to 18 hours. Then you’ll need to shape the dough and let it rise for another 1 to 2 hours. The longer rise tends to result in a richer bread, but you need the patience and the schedule to do it. In any event, the shorter rise is acceptable too: Just pay attention to the signs of a good rise described in the recipes. A reminder: the visual cues - a bubbly surface with a darkened appearance - are key. Usually, 18 hours is optimal. (Very cold weather exception: in the dead of winter, when the dough will tend to rise more slowly, a longer period may be necessary, as much as 24 hours.)
After preheating the oven and the pot, you’ve got 30 minutes of covered baking, another 15 to 30 of uncovered baking, and about an hour of cooling. And, please, don’t gulp down that first slice. Think of the first bite as you would the first taste of a glass of wine: smell it (there should be that touch of maltiness), chew it slowly to appreciate its almost meaty texture, and sense where it came from in its hint of wheat. Enjoy it. You baked it, and you did a good job.
For UK metric measures, use the toggle at the top of the ingredients list.
Ingredients
Yields: One 10-inch / 25cm round loaf
- 3 cups bread flour
- 1¼ teaspoons table salt
- ¼ teaspoon instant or other active dry yeast
- 1⅓ cups cool (55-65°F / 12-18°C) water
- wheat bran or cornmeal or additional flour for dusting
- 400 grams bread flour
- 8 grams table salt
- 1 gram instant or other active dry yeast
- 300 grams cool (55-65°F / 12-18°C) water
- wheat bran or cornmeal or additional flour for dusting
Method
Basic No-Knead Bread is a guest recipe by Jim Lahey so we are not able to answer questions regarding this recipe
Equipment: A 4½- to 5½-quart heavy pot
- In a medium bowl, stir together the flour, salt, and yeast. Add the water and, using a wooden spoon or your hand, mix until you have a wet, sticky dough, about 30 seconds. Make sure it’s really sticky to the touch; if it’s not, mix in another tablespoon or two of water. Cover the bowl with a plate, tea towel, or plastic wrap and let sit at room temperature (about 72°F / 22°C), out of direct sunlight, until the surface is dotted with bubbles and the dough is more than doubled in size. This will take a minimum of 12 hours and (my preference) up to 18 hours. This slow rise - fermentation - is the key to flavor.
- When the first fermentation is complete, generously dust a work surface (a wooden or plastic cutting board is fine) with flour. Use a bowl scraper or rubber spatula to scrape the dough onto the board in one piece. When you begin to pull the dough away from the bowl, it will cling in long, thin strands (this is the developed gluten), and it will be quite loose and sticky - do not add more flour. Use lightly floured hands or a bowl scraper or spatula to lift the edges of the dough in toward the center. Nudge and tuck in the edges of the dough to make it round.
- Place a cotton or linen tea towel (not terry cloth, which tends to stick and may leave lint in the dough) or a large cloth napkin on your work surface and generously dust the cloth with wheat bran, cornmeal, or flour. Use your hands or a bowl scraper or wooden spatula to gently lift the dough onto the towel, so it is seam side down. If the dough is tacky, dust the top lightly with wheat bran, cornmeal, or flour. Fold the ends of the towel loosely over the dough to cover it and place it in a warm, draft-free spot to rise for 1 to 2 hours. The dough is ready when it is almost doubled. If you gently poke it with your finger, making an indentation about ¼ inch deep, it should hold the impression. If it doesn’t, let it rise for another 15 minutes.
- Half an hour before the end of the second rise, preheat the oven to 475°F / 245°C, with a rack in the lower third position, and place a covered 4½ - to 5½ -quart / 4¼ - 6¼ litre heavy pot in the center of the rack.
- Using pot holders, carefully remove the preheated pot from the oven and uncover it. Unfold the tea towel, lightly dust the dough with flour or bran, lift up the dough, either on the towel or in your hand, and quickly but gently invert it into the pot, seam side up. (Use caution - the pot will be very hot) Cover the pot and bake for 30 minutes.
- Remove the lid and continue baking until the bread is a deep chestnut color but not burnt, 15 to 30 minutes more. Use a heatproof spatula or pot holders to carefully lift the bread out of the pot and place it on a rack to cool thoroughly. Don’t slice or tear into it until it has cooled, which usually takes at least an hour.


Tell us what you think
Thank you {% member.data['first-name'] %}.
Explore more recipesYour comment has been submitted.
What 6 Others have said
-
Posted by belindatheninja on 7th April 2022
-
Posted by sancarloscharlie on 21st November 2020
-
Posted by GrapePine on 28th March 2020
-
Posted by Sarahdxb on 9th March 2020
-
Posted by killerhoneyb on 7th October 2019
-
Posted by tessa_calder on 15th August 2019
Show more commentsI love this recipe. I’ve used different flours a blend of white bread flour and malted seeded bread flour (50/50) and it’s worked a treat. I’ve also added seed mixes about 50g and added a little more water. Agree that it’s a little salty for me so used 1 teaspoon instead. It’s always worked and come out a treat. It’s definitely my go to bread recipe.
Don't be tempted with a longer initial rise than Mr. Lahey recommends. I've learned the hard way that it is definitely possible to over-proof a yeast dough! Did it with this recipe and his no-knead pizza dough. Follow his instructions and you'll be rewarded with spectacular results!
Worked a treat. Made it in a loaf tin. Will use a bit less salt next time.
Want to confirm the water is it cold water, room temperature or lukewarm
Gorgeous bread, speaking as someone who has wasted countless kilos of flour trying to bake bread. I gave it a full 24 hours initial rise.
This worked perfectly with 1 1/2 cups of water. Great recipe thanks.