
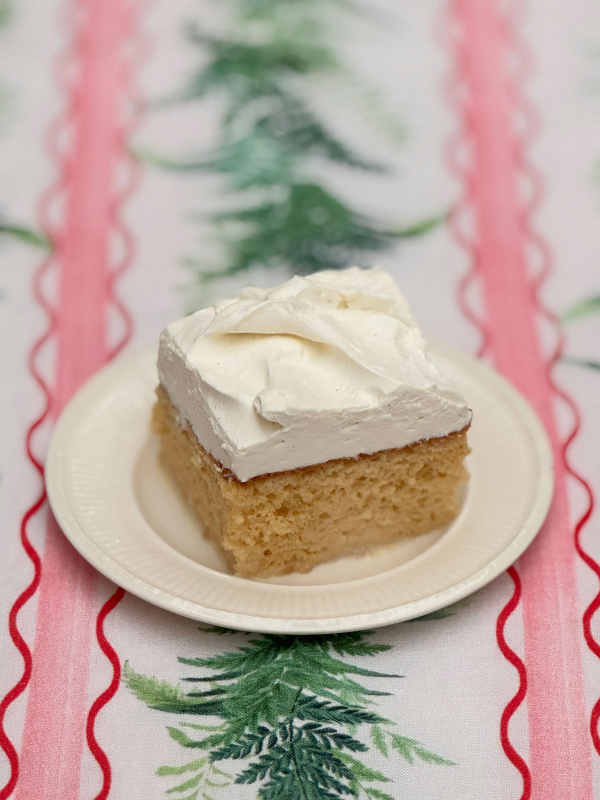
Tres Leches Cake
by NigellaIntroduction
If you are lactose-intolerant, turn away now. This is, sadly, not for you. This triple threat of dairy desserts is Latin American in origin, though which country in Latin America is contested (there is also, incidentally, an Albanian version known as Trilece) and the Tres Leches of the title indicate the three milks you need to make it: sweetened condensed milk; evaporated milk; and either cream or milk, though I use both. On this information alone, it hardly sounds appealing, I concede, but you’re just going to have to trust me when I tell you it tastes utterly ambrosial.
In the US, where the Tres Leches Cake is much more familiarly known, differently flavoured versions abound, and I’ve played around with some myself, but the traditional iteration is the one I keep coming back to. I have tweaked it slightly though: I add finely grated lemon zest to the cake itself, and mascarpone to the cream topping. Both additions beautifully temper the sweetness, and the mascarpone also helps stabilise the cream.
I know the recipe looks forbiddingly long, but it’s not hard to make at all. It’s just that there are a number of processes, all of them straightforward: the making then baking of the sponge; the patient ladling over of the milky mixture to drench the cooled cake, followed by its long soaking time in the fridge; the whisking and application of the creamy topping. Yes, you do need to start making this two days before you plan to eat it, but a dessert that’s made in advance is a positive boon as far as I’m concerned.
You might be assuming that a cake soaked in a vatful of liquid would turn to mush. Miraculously it doesn’t. Its texture is a dream, and the cream and mascarpone topping just adds to the lusciousness. You may want to serve some sharp berries alongside and, indeed, I sometimes do, but it is simply perfection as it is.
One final note: I always make this in an oblong cake tin measuring 33 x 23 x 5 cm / 13 x 9 x 2 inches (mine’s the Rectangular USA Pan, if that helps). I know plonking a metal tin on the table when serving is not the most elegant way to go, but once your guests have had their very first bite, I can assure you no one will be fretting over anything. And nor should you.
Ingredients
Serves: 12-24 depending on squares cut
FOR THE SPONGE
- 6 eggs
- 175 grams plain flour
- ½ teaspoon bicarbonate of soda
- 1 teaspoon baking powder
- 1 teaspoon fine sea salt
- ½ teaspoon cream of tartar (or lemon juice if cream of tartar is not available)
- 200 grams caster sugar
- zest of an unwaxed lemon
- 75 millilitres full fat milk (at room temperature)
- 2 teaspoons vanilla paste (or extract)
FOR THE SOAKING LIQUID
- 1 x 397 grams can condensed milk
- 1 x 410 grams can evaporated milk
- 250 millilitres full fat milk
- 125 millilitres double cream
- 2 teaspoons vanilla paste (or extract)
FOR THE TOPPING
- 250 grams mascarpone cheese
- 2 tablespoons caster sugar
- 2 teaspoons vanilla paste (or extract)
- 1 pinch of teaspoon fine sea salt
- 600 millilitres double cream
FOR THE SPONGE
- 6 eggs
- 1⅓ cups plus 1 tablespoon all-purpose flour
- ½ teaspoon baking soda
- 1 teaspoon baking powder
- 1 teaspoon fine sea salt
- ½ teaspoon cream of tartar (or lemon juice if cream of tartar is not available)
- 1 cup superfine sugar
- zest of an unwaxed lemon
- 5 tablespoons whole milk (at room temperature)
- 2 teaspoons vanilla paste (or extract)
FOR THE SOAKING LIQUID
- 1 x 14 ounces can sweetened condensed milk
- 1¾ cups can evaporated milk
- 1 cup whole milk
- ½ cup heavy cream
- 2 teaspoons vanilla paste (or extract)
FOR THE TOPPING
- 1 cup mascarpone cheese
- 2 tablespoons superfine sugar
- 2 teaspoons vanilla paste (or extract)
- ⅛ teaspoon fine sea salt
- 2½ cups heavy cream
Method
FOR THE CAKE
- Heat the oven to 180°C/160°C Fan/350°F.
- Get out two large mixing bowls, one for the egg whites, the other for the yolks, and make sure the one for the whites is grease free by wiping its interior with a little lemon juice or vinegar and, if needed, do likewise to the whisk or whisk attachment. Now separate the eggs into their respective bowls, and set the yolk bowl to one side for now.
- Weigh out the flour into another – smaller bowl – then add the bicarb/bicarbonate of soda, baking powder and salt and give it a stir to combine before setting this bowl, too, to one side.
- Add the cream of tartar (or lemon juice) to the bowl of egg whites, then whisk until the whites form soft peaks that can just hold their shape. Beware of over-whisking: you don’t want the mixture to go too thick and dry. Set the bowl of whisked whites to one side while you get on with the rest of the cake batter.
- Add the sugar to your bowl of yolks then finely grate in the lemon zest. Using the same whisk/whisk attachment (no need to clean it) duly whisk the mixture until it becomes pale, thick and voluminous, looking a bit like an aerated mayonnaise. When you lift up the whisk, the mixture should fall like ribbons back into the batter.
- Whisk again while you gradually pour in the milk followed by the vanilla paste or extract. Carry on whisking, though at a slightly lower speed, as you spoon in the flour mixture, and continue until you have a smooth batter with no flour visible, stopping just to give the bowl a scrape down with a bendy spatula as needed.
- Retrieve your bowl of whisked egg whites and, using a large metal spoon, take out a quarter of the whites (no need to measure: just eyeball it) and add this to the bowl of batter. Now using your spatula, mix it in briskly – no need to be gentle with this first addition – until completely incorporated with no flecks of whisked egg whites visible. Proceed with the remaining egg whites, quarter by quarter (so three more goes) only this time, fold the whites in gently, waiting for each remaining quarter to be smoothly incorporated before moving on to the next quarter. Don’t use any of the liquid egg white that may have collected at the bottom of the bowl while it stood.
- Now pour this buoyant batter into your tin, then rap the tin 5 times on the counter before it goes into the oven to get rid of any air bubbles sitting on the surface. Bake for 25 minutes (it’s bang on this every time I make it, but do give it up to an extra few minutes if needed in your oven) by which time it will have turned a dark golden brown and have risen in an even layer; if you insert a cake tester, it should come out without even a hint of raw batter clinging to it. The cake should also have started to come away from the edges of the tin, and will do so more as it cools.
- Leave the cake on a cooling rack until it’s completely cold; it’s probably safe to reckon on this taking around about 90 minutes, but obviously this depends on climate, time of year, and the temperature of your kitchen.
FOR THE SOAKING LIQUID
- Once the cake has cooled completely, put holes in it all the way through to the bottom with a bamboo or metal skewer. It does rather look as if it’s been shot at by the time you’re done! If any bit of the cake is still stuck to the sides of the tin, use a small spatula or palette knife to unstick it, running it along the edges to ease it away.
- Put all the soaking ingredients into a large jug or bowl and give it a good stir – or a light mix with a little handwhisk – to combine everything before ladling this gently over the cake. This will take a good 10 minutes, so be prepared to take your time. I find it best to start in the middle and let the liquid sit on the surface then start to be absorbed. Keep ladling over the cake, waiting a little in between each ladleful, until you have used all the liquid. Don’t worry that it hasn’t all soaked in at the end, as there will inevitably still be some of the liquid still sitting on the surface of the cake. It will also pool at the edges of the tin, but there’s plenty of time yet for it to soak in.
- Tightly cover the top of the tin, without actually touching the cake, with food wrap and place in the fridge ideally for 48 hours, though if push comes to shove I give you permission to leave it for only 24 hours!
FOR THE TOPPING
- When soaking-time’s up, take the cake out of the fridge and unwrap it in readiness, then get on with the topping.
- Scrape out the mascarpone into a large bowl, add the sugar, vanilla paste (or extract) and salt and whisk until smooth and amalgamated.
- Stir in the cream, then whisk until soft peaks start to form and just hold their shape. Go easy here, as you need the topping to be soft enough to spread easily over the cake.
- Dollop the topping mixture all over the top of the cake in creamy mounds, and then, using a small cranked spatula, smooth it right to the edges of the tin in an even layer. If you have the patience, carry on smoothing away, like an obsessive plasterer, to create a perfectly flat surface. I don’t have the patience, so use my little cranked spatula to swirl the top instead.
- Cover again carefully with wrap, trying not to let it touch the topping (though if it does, you can make good with a palette knife later) and then leave again in the fridge for at least 30 minutes before cutting into slabs or squares and serving straightaway. It yields 12 generous portions, or 24 more modest ones, and although you can certainly serve with berries or other fruit of your choice, I love it just as it is. By the way, if some of the gorgeous soaking liquid is visible, as it collects under the sponge on each plate, that’s fine. Indeed, it is how it should be. Note that the first slice is always the hardest to remove neatly, but don’t worry about it – just give that first portion to yourself.
FOR THE CAKE
- Heat the oven to 180°C/160°C Fan/350°F.
- Get out two large mixing bowls, one for the egg whites, the other for the yolks, and make sure the one for the whites is grease free by wiping its interior with a little lemon juice or vinegar and, if needed, do likewise to the whisk or whisk attachment. Now separate the eggs into their respective bowls, and set the yolk bowl to one side for now.
- Weigh out the flour into another – smaller bowl – then add the bicarb/baking soda, baking powder and salt and give it a stir to combine before setting this bowl, too, to one side.
- Add the cream of tartar (or lemon juice) to the bowl of egg whites, then whisk until the whites form soft peaks that can just hold their shape. Beware of over-whisking: you don’t want the mixture to go too thick and dry. Set the bowl of whisked whites to one side while you get on with the rest of the cake batter.
- Add the sugar to your bowl of yolks then finely grate in the lemon zest. Using the same whisk/whisk attachment (no need to clean it) duly whisk the mixture until it becomes pale, thick and voluminous, looking a bit like an aerated mayonnaise. When you lift up the whisk, the mixture should fall like ribbons back into the batter.
- Whisk again while you gradually pour in the milk followed by the vanilla paste or extract. Carry on whisking, though at a slightly lower speed, as you spoon in the flour mixture, and continue until you have a smooth batter with no flour visible, stopping just to give the bowl a scrape down with a bendy spatula as needed.
- Retrieve your bowl of whisked egg whites and, using a large metal spoon, take out a quarter of the whites (no need to measure: just eyeball it) and add this to the bowl of batter. Now using your spatula, mix it in briskly – no need to be gentle with this first addition – until completely incorporated with no flecks of whisked egg whites visible. Proceed with the remaining egg whites, quarter by quarter (so three more goes) only this time, fold the whites in gently, waiting for each remaining quarter to be smoothly incorporated before moving on to the next quarter. Don’t use any of the liquid egg white that may have collected at the bottom of the bowl while it stood.
- Now pour this buoyant batter into your tin, then rap the tin 5 times on the counter before it goes into the oven to get rid of any air bubbles sitting on the surface. Bake for 25 minutes (it’s bang on this every time I make it, but do give it up to an extra few minutes if needed in your oven) by which time it will have turned a dark golden brown and have risen in an even layer; if you insert a cake tester, it should come out without even a hint of raw batter clinging to it. The cake should also have started to come away from the edges of the tin, and will do so more as it cools.
- Leave the cake on a cooling rack until it’s completely cold; it’s probably safe to reckon on this taking around about 90 minutes, but obviously this depends on climate, time of year, and the temperature of your kitchen.
FOR THE SOAKING LIQUID
- Once the cake has cooled completely, put holes in it all the way through to the bottom with a bamboo or metal skewer. It does rather look as if it’s been shot at by the time you’re done! If any bit of the cake is still stuck to the sides of the tin, use a small spatula or palette knife to unstick it, running it along the edges to ease it away.
- Put all the soaking ingredients into a large jug or bowl and give it a good stir – or a light mix with a little handwhisk – to combine everything before ladling this gently over the cake. This will take a good 10 minutes, so be prepared to take your time. I find it best to start in the middle and let the liquid sit on the surface then start to be absorbed. Keep ladling over the cake, waiting a little in between each ladleful, until you have used all the liquid. Don’t worry that it hasn’t all soaked in at the end, as there will inevitably still be some of the liquid still sitting on the surface of the cake. It will also pool at the edges of the tin, but there’s plenty of time yet for it to soak in.
- Tightly cover the top of the tin, without actually touching the cake, with food wrap and place in the fridge ideally for 48 hours, though if push comes to shove I give you permission to leave it for only 24 hours!
FOR THE TOPPING
- When soaking-time’s up, take the cake out of the fridge and unwrap it in readiness, then get on with the topping.
- Scrape out the mascarpone into a large bowl, add the sugar, vanilla paste (or extract) and salt and whisk until smooth and amalgamated.
- Stir in the cream, then whisk until soft peaks start to form and just hold their shape. Go easy here, as you need the topping to be soft enough to spread easily over the cake.
- Dollop the topping mixture all over the top of the cake in creamy mounds, and then, using a small cranked spatula, smooth it right to the edges of the tin in an even layer. If you have the patience, carry on smoothing away, like an obsessive plasterer, to create a perfectly flat surface. I don’t have the patience, so use my little cranked spatula to swirl the top instead.
- Cover again carefully with wrap, trying not to let it touch the topping (though if it does, you can make good with a palette knife later) and then leave again in the fridge for at least 30 minutes before cutting into slabs or squares and serving straightaway. It yields 12 generous portions, or 24 more modest ones, and although you can certainly serve with berries or other fruit of your choice, I love it just as it is. By the way, if some of the gorgeous soaking liquid is visible, as it collects under the sponge on each plate, that’s fine. Indeed, it is how it should be. Note that the first slice is always the hardest to remove neatly, but don’t worry about it – just give that first portion to yourself.
Additional Information
You will need a 33 x 23 x 5 cm / 13 x 9 x 2-inch baking tin – you need to have at least 5cm/2 inches depth because the cake rises so much. Don’t grease or line the tin.
MAKE AHEAD / STORE
Can be stored in the fridge, tightly wrapped with food wrap, for up to 5 days after the day the cake is topped.
You will need a 33 x 23 x 5 cm / 13 x 9 x 2-inch baking tin – you need to have at least 5cm/2 inches depth because the cake rises so much. Don’t grease or line the tin.
MAKE AHEAD / STORE
Can be stored in the fridge, tightly wrapped with food wrap, for up to 5 days after the day the cake is topped.


Tell us what you think
Thank you {% member.data['first-name'] %}.
Explore more recipesYour comment has been submitted.