
Khaliat Nahal - Honeycomb Bread
by Dina Macki, featured in Bahari: Recipes from an Omani Kitchen and Beyond Published by DKIntroduction
Qaranqasho is an Omani celebration that takes place on the 14th day of Ramadan, mainly across the north coast. Children dress up in traditional clothing and mothers prepare lots of nibbles and sweet baskets, then open up their doors to all. We call it Omani Halloween, where all the kids go “trick or treating” — but without the tricks! Everyone heads out after prayer time to visit friends, family and neighbours and collect sweets, little gifts and sometimes, if we’re very lucky, money. I got to celebrate one Ramadan as a child in Oman, and I still remember the excitement as we ran through the streets, looking to see how many sweets we could collect.
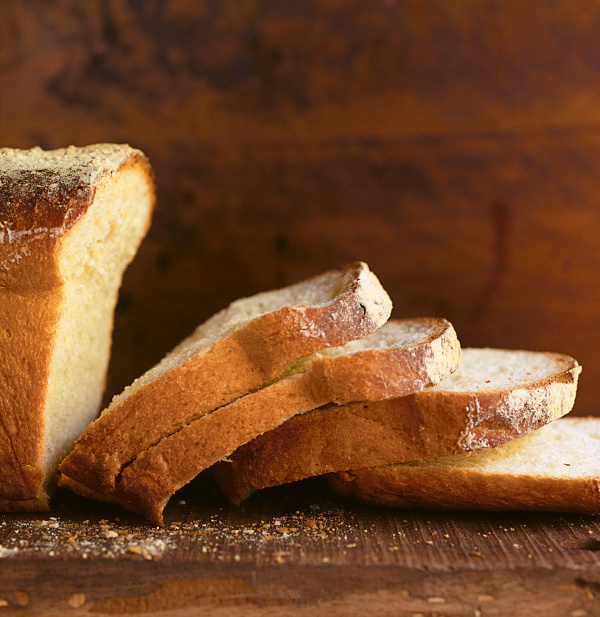
Ramadan, specifically on Qaranqasho, is the only time of year you’ll see khaliat nahal. My Auntie Nasra always made this bread instead of sweets. She’d set out whole trays of it on a table and wait for the children to run up, tear away their part and eat it on the go. Even as adults, we still want this bread at Ramadan; we know what’s hidden inside, but there’s still a joyful element of surprise. Khaliat nahal (which means “honeycomb”) is a sweet, yeasted bread known for its honeycomb shape. This recipe is found in both Oman and Yemen; it’s always filled with cheese, but the syrups drizzled over differ from family to family.
Qaranqasho is an Omani celebration that takes place on the 14th day of Ramadan, mainly across the north coast. Children dress up in traditional clothing and mothers prepare lots of nibbles and sweet baskets, then open up their doors to all. We call it Omani Halloween, where all the kids go “trick or treating” — but without the tricks! Everyone heads out after prayer time to visit friends, family and neighbours and collect sweets, little gifts and sometimes, if we’re very lucky, money. I got to celebrate one Ramadan as a child in Oman, and I still remember the excitement as we ran through the streets, looking to see how many sweets we could collect.
Ramadan, specifically on Qaranqasho, is the only time of year you’ll see khaliat nahal. My Auntie Nasra always made this bread instead of sweets. She’d set out whole trays of it on a table and wait for the children to run up, tear away their part and eat it on the go. Even as adults, we still want this bread at Ramadan; we know what’s hidden inside, but there’s still a joyful element of surprise. Khaliat nahal (which means “honeycomb”) is a sweet, yeasted bread known for its honeycomb shape. This recipe is found in both Oman and Yemen; it’s always filled with cheese, but the syrups drizzled over differ from family to family.

Ingredients
Makes: 20 pieces
- 400 millilitres + 2 tbsp warm milk
- 14 grams fast-action dried yeast (2 packets)
- 650 grams plain flour
- 130 grams caster sugar
- 2 eggs
- sesame seeds (for sprinkling)
- sea salt flakes
FOR THE SYRUP
- 200 grams caster sugar
- 2 tablespoons runny honey
- juice of ½ orange
- 4 cardamom pods (crushed)
FOR THE FILLING
- 200 grams mozzarella
- 200 grams soft cream cheese (I use Laughing Cow)
- 1¾ cups + 2 tbsp warm milk
- scant ½ ounce fast-action dried yeast (2 packets)
- 5¼ cups all-purpose flour
- scant ¾ cup superfine sugar
- 2 eggs
- sesame seeds (for sprinkling)
- sea salt flakes
FOR THE SYRUP
- 1 cup superfine sugar
- 2 tablespoons honey
- juice of ½ orange
- 4 cardamom pods (crushed)
FOR THE FILLING
- 7 ounces mozzarella
- 7 ounces soft cream cheese (I use Laughing Cow)
Method
Khaliat Nahal - Honeycomb Bread is a guest recipe by Dina Macki so we are not able to answer questions regarding this recipe
- To make the syrup, combine all the ingredients in a saucepan with 170ml (scant ¾ cup) of water. Place over a high heat and bring to the boil. Once it starts bubbling, boil for exactly 10 minutes, then remove from the heat and leave to cool completely. Do not stir the syrup while it’s boiling, and make sure it’s entirely cool before you use it; the idea is to pour the cooled syrup over the hot bread.
- Pour the 400ml (1¾ cups) milk into a bowl. Add the yeast and leave to sit for 5 minutes.
- In a mixer or large bowl, combine the flour, sugar and eggs. Add the milk and yeast mixture, then combine. Knead until the dough is soft and smooth – this will take 10–12 minutes in a mixer, or 15–17 minutes by hand.
- Cover with a clean damp cloth and leave to rise for 1½ hours or until it has doubled in size.
- Once risen, divide the dough into 20 even-sized pieces and shape into balls. Take the first ball and press it flat, then place a little mozzarella and soft cheese in the middle – just use about 5–10g (⅛–¼oz) of each, as you don’t want to overfill. Bring the rest of the dough around the cheese to encase it, pinch the edges together to seal, then roll back into a ball and flatten very slightly. Repeat with the remaining dough balls and cheese.
- Place the balls on a baking tray lined with baking parchment (parchment paper). Ideally, use a pizza tray, so you can arrange them in a honeycomb shape. Make sure to leave a little space between the balls so that they have room to spread as they rise.
- Cover with a clean damp cloth and leave to rise for 30–45 minutes.
- Preheat the oven to 200°C (180°C fan/400°F/Gas 6).
- When the balls are ready to bake, brush them with the remaining 2 tablespoons of milk and sprinkle over the sesame seeds. Bake for 20–25 minutes until golden.
- As soon as they come out of the oven, pour the cooled syrup over the top — or you can brush it on if you don’t want too much. The syrup will seep into the dough. Sprinkle over some crushed sea salt flakes to finish.
- Allow to cool for about 10 minutes, then serve while still warm so the cheese is melty and delicious. These are definitely best served freshly baked and warm, but will keep for 1–2 days in an airtight container.


Tell us what you think
Thank you {% member.data['first-name'] %}.
Explore more recipesYour comment has been submitted.