
Kimchi And Tofu Gyoza
by Tim Anderson, featured in Vegan JapanEasy: Classic and Modern Vegan Japanese Recipes To Cook At Home Published by Hardie GrantIntroduction
I'm sure you've seen those pop-sci articles about how to spot a psychopath, like how they don't yawn when other people yawn or how they watch Love Island. Well here's another dead giveaway: only psychopaths don't love gyoza. This is 100 per cent true. Or maybe not, I don't know, I'm not a psychologist. But I am an experienced gyozologist and if there's one thing my years of study has taught me, it's that gyoza is beloved by all decent human beings. What's not to love about steamy little parcels of dough, supple on top and crispy on the bottom, stuffed with juicy and flavourful fillings.
Making gyoza takes a bit of practise, but it's not hard - and once you find your groove, crimping and folding them becomes a pleasantly mindless repetitive task, like a kind of meditation. Or, if you are making a lot of gyoza, you can get your friends and family involved and it becomes a really fun, chatty, social experience (gyoza is a great conduit for gossip). Oh yes and gyoza is even easier if you buy the pre-made frozen wrappers - not a cheat, at all, as this is how most people in Japan make them, but you will have to go to an Asian supermarket to find them.
Otherwise, here is the gyoza dough recipe. I'm notoriously bad at pastry but I still find this easy, and it's made from really basic storecupboard ingredients that you probably already have.
And remember: ugly gyoza are still delicious, so don't worry if your pleats aren't perfect. It's all about that inner beauty.
Tofu and kimchi are like the good cop/bad cop of food. One is meek and timid, the other aggro and unhinged. Together they balance each other perfectly for a superb gyoza filling.
Ingredients
Makes: 20-24 gyoza
For the gyoza wrapper dough
- 280 grams plain flour
- ½ teaspoon salt
- 120 millilitres just-boiled water
- cornflour (as needed, for dusting)
For the kimchi and tofu gyoza filling
- 200 grams firm tofu (cut into small dice)
- 120 grams kimchi (finely chopped)
- 2 cloves garlic (minced)
- 10 grams fresh ginger (peeled and minced)
- 1 tablespoon oil
- 1 tablespoon sesame oil
- 1 tablespoon white sesame seeds
- 2 spring onions (finely sliced)
- 1 tablespoon plain flour
- salt to taste
- chilli powder to taste
For the gyoza wrapper dough
- 10 ounces / generous 2 cups all-purpose flour
- ½ teaspoon salt
- 4 fluid ounces / ½ cup just-boiled water
- cornstarch (as needed, for dusting)
For the kimchi and tofu gyoza filling
- 7 ounces firm tofu (cut into small dice)
- 4 ounces kimchi (finely chopped)
- 2 cloves garlic (minced)
- ½ ounce fresh gingerroot (peeled and minced)
- 1 tablespoon oil
- 1 tablespoon asian sesame oil
- 1 tablespoon white sesame seeds
- 2 scallions (finely sliced)
- 1 tablespoon all-purpose flour
- salt to taste
- chili powder to taste
Method
Kimchi And Tofu Gyoza is a guest recipe by Tim Anderson so we are not able to answer questions regarding this recipe
For the gyoza wrappers - makes 40
- Stir the flour and salt together in a mixing bowl. Add the boiled water to the flour little by little, incorporating it with a spoon or spatula as you go. When all the water has been added, start working it with your hands; when it comes together, it should be soft and very dry; in fact, it will probably seem too dry. That’s fine, because it will hydrate more as it rests. Tip the dough out onto the work surface and dust it with a little cornflour. Knead for about 10 minutes, until the dough is smooth. (If you have a stand mixer with a dough hook, by all means use it – it should only take a few minutes for it to come together.)
- Roll the dough out into 2 chubby logs, about 2.5 cm (1 in) in diameter. Wrap each log in cling film (plastic wrap) and leave to rest in the refrigerator for 30–60 minutes.
- Unwrap the dough – it should be nice and firm but less dry at this point. Sprinkle a little more cornflour on your work surface, then cut each log into coins about 5 mm (¼ in) thick – you should get 20 pieces out of each log. Use your hands to roll each piece of dough into a little ball, then roll each ball out on the work surface into flat discs.
- Try to make them very thin, but not so thin that they become difficult to work with – 1 mm thick is a good goal, but 2 mm will be fine. Dust each wrapper with cornflour and stack them up as you go, covering the stack with a clean, slightly damp dish towel to keep them from drying out. If not using immediately, you can keep them in the refrigerator, wrapped in cling film, for about 3 days.
For the filling - makes enough for 20-24 gyoza
- Combine everything except the spring onions, flour, salt and chilli powder in a bowl and mix well. Transfer to a frying pan (skillet) and stir-fry over a medium-high heat for about 10 minutes – this is mainly to dry out the ingredients but also to soften the garlic and ginger. When the mixture is quite dry and starting to colour, remove from the heat and stir in the spring onions and flour.
- Tip out into a bowl and leave to cool until you can handle it, then use your hands to mix it up and break the tofu into little crumbs (some big chunks are okay, but too many and the filling won’t stick together). Taste and adjust the flavour with salt and chilli powder, if you like. Assemble and cook the gyoza as per the instructions below.
Assembling and cooking gyoza
To make gyoza, you'll need 6 things at hand: the filling, the wrappers, a small bowl of water, a baking sheet lined with baking parchment or dusted with cornflour, a small spoon and a slightly damp dish towel or paper towel.
Lay out a few gyoza wrappers on your counter (I don't know why, but I always do either 4 or 6 at a time). Wet your fingertips with the water, then dampen the edge of each wrapper (don't use too much water or they will become unworkably soft). Spoon a little filling into the middle of each wrapper (a generous tablespoonful is all you need), then fold the wrapper over the filling and seal. There are 2 ways I advise doing this:
The not traditional but totally easy way that still makes very cute gyoza
Fold the wrappers over the filling and pinch them shut to make little half-moon shapes - no need to crimp or pleat them, but make sure the seal is very tight. Then, simply curl the ends of the half-moons around to meet each other and pinch them together, so you end up with shapes like tortelloni.
The traditional and somewhat more difficult way that will impress your Japanese mother-in-law
Fold the wrappers over the filling, but don't seal them. Instead, pinch the wrapper shut at one end. Then, use the index finger of your dominant hand to keep the filling 'tucked in' as you crimp and pinch the wrapper to seal; use your thumb to pleat the side of the wrapper closest to you, and with each pleat, pinch it firmly onto the opposite side of the wrapper. You should get about five pleats into each gyoza before you reach the other end, then simply pinch the corner shut to finish it off. This will result in lovely, traditional crescent-shaped gyoza.
Line the gyoza up on your papered or floured baking sheet, seal-side up, so they have nice flat bottoms, and keep them covered with a damp cloth as you work so they don't dry out. When all the gyoza are done, you can wrap them in clingfilm and keep them in the refrigerator until ready to cook, but I wouldn't recommend keeping them for much more than a day, because they tend to go soggy. (You can also freeze them at this point, on the tray, ensuring none of them are sticking together when you do. Once frozen solid, transfer them to a container or plastic bag and cook them from frozen using the same instructions as below.)
Cooking
To cook the gyoza, you will need 3 things: about 1 tablespoon of oil, a reliably non-stick pan with a snug-fitting lid, and about 100ml (3 1/2 fl oz / scant 1/2 cup) water.
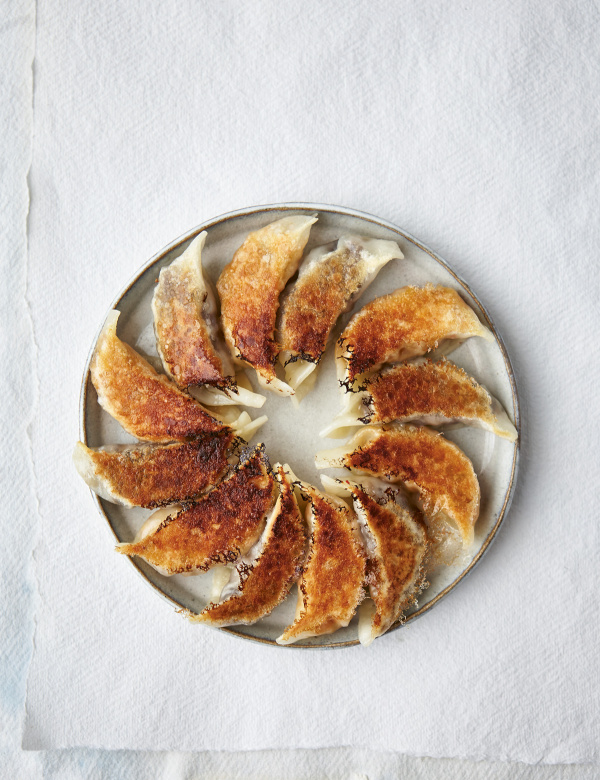
Heat the oil in the pan over a high heat and add the gyoza (cook as many as you can fit or as few as you need - the rest can be frozen). When the gyoza are sizzling, pour in the water and place the lid on the pan. Steam for 5 minutes with the lid on, then remove the lid and let all the water evaporate away. The gyoza should have nice crispy golden-brown bottoms - you can lift one to check, and if they're still quite pale when the water is gone, just keep cooking them for another couple of minutes. Tip the gyoza out onto a plate, and serve with a 'gyoza sauce' (3 parts soy sauce to 1 part vinegar, with a little drizzle of chilli oil or sesame oil).
For the gyoza wrappers - makes 40
- Stir the flour and salt together in a mixing bowl. Add the boiled water to the flour little by little, incorporating it with a spoon or spatula as you go. When all the water has been added, start working it with your hands; when it comes together, it should be soft and very dry; in fact, it will probably seem too dry. That’s fine, because it will hydrate more as it rests. Tip the dough out onto the work surface and dust it with a little cornstarch. Knead for about 10 minutes, until the dough is smooth. (If you have a stand mixer with a dough hook, by all means use it – it should only take a few minutes for it to come together.)
- Roll the dough out into 2 chubby logs, about 2.5 cm (1 in) in diameter. Wrap each log in cling film (plastic wrap) and leave to rest in the refrigerator for 30–60 minutes.
- Unwrap the dough – it should be nice and firm but less dry at this point. Sprinkle a little more cornstarch on your work surface, then cut each log into coins about 5 mm (¼ in) thick – you should get 20 pieces out of each log. Use your hands to roll each piece of dough into a little ball, then roll each ball out on the work surface into flat discs.
- Try to make them very thin, but not so thin that they become difficult to work with – 1 mm thick is a good goal, but 2 mm will be fine. Dust each wrapper with cornstarch and stack them up as you go, covering the stack with a clean, slightly damp dish towel to keep them from drying out. If not using immediately, you can keep them in the refrigerator, wrapped in cling film, for about 3 days.
For the filling - makes enough for 20-24 gyoza
- Combine everything except the scallions, flour, salt and chili powder in a bowl and mix well. Transfer to a frying pan (skillet) and stir-fry over a medium-high heat for about 10 minutes – this is mainly to dry out the ingredients but also to soften the garlic and ginger. When the mixture is quite dry and starting to colour, remove from the heat and stir in the scallions and flour.
- Tip out into a bowl and leave to cool until you can handle it, then use your hands to mix it up and break the tofu into little crumbs (some big chunks are okay, but too many and the filling won’t stick together). Taste and adjust the flavour with salt and chili powder, if you like. Assemble and cook the gyoza as per the instructions below.
Assembling and cooking gyoza
To make gyoza, you'll need 6 things at hand: the filling, the wrappers, a small bowl of water, a baking sheet lined with baking parchment or dusted with cornstarch, a small spoon and a slightly damp dish towel or paper towel.
Lay out a few gyoza wrappers on your counter (I don't know why, but I always do either 4 or 6 at a time). Wet your fingertips with the water, then dampen the edge of each wrapper (don't use too much water or they will become unworkably soft). Spoon a little filling into the middle of each wrapper (a generous tablespoonful is all you need), then fold the wrapper over the filling and seal. There are 2 ways I advise doing this:
The not traditional but totally easy way that still makes very cute gyoza
Fold the wrappers over the filling and pinch them shut to make little half-moon shapes - no need to crimp or pleat them, but make sure the seal is very tight. Then, simply curl the ends of the half-moons around to meet each other and pinch them together, so you end up with shapes like tortelloni.
The traditional and somewhat more difficult way that will impress your Japanese mother-in-law
Fold the wrappers over the filling, but don't seal them. Instead, pinch the wrapper shut at one end. Then, use the index finger of your dominant hand to keep the filling 'tucked in' as you crimp and pinch the wrapper to seal; use your thumb to pleat the side of the wrapper closest to you, and with each pleat, pinch it firmly onto the opposite side of the wrapper. You should get about five pleats into each gyoza before you reach the other end, then simply pinch the corner shut to finish it off. This will result in lovely, traditional crescent-shaped gyoza.
Line the gyoza up on your papered or floured baking sheet, seal-side up, so they have nice flat bottoms, and keep them covered with a damp cloth as you work so they don't dry out. When all the gyoza are done, you can wrap them in clingfilm and keep them in the refrigerator until ready to cook, but I wouldn't recommend keeping them for much more than a day, because they tend to go soggy. (You can also freeze them at this point, on the tray, ensuring none of them are sticking together when you do. Once frozen solid, transfer them to a container or plastic bag and cook them from frozen using the same instructions as below.)
Cooking
To cook the gyoza, you will need 3 things: about 1 tablespoon of oil, a reliably non-stick pan with a snug-fitting lid, and about 100ml (3 1/2 fl oz / scant 1/2 cup) water.
Heat the oil in the pan over a high heat and add the gyoza (cook as many as you can fit or as few as you need - the rest can be frozen). When the gyoza are sizzling, pour in the water and place the lid on the pan. Steam for 5 minutes with the lid on, then remove the lid and let all the water evaporate away. The gyoza should have nice crispy golden-brown bottoms - you can lift one to check, and if they're still quite pale when the water is gone, just keep cooking them for another couple of minutes. Tip the gyoza out onto a plate, and serve with a 'gyoza sauce' (3 parts soy sauce to 1 part vinegar, with a little drizzle of chilli oil or asian sesame oil).


Tell us what you think
Thank you {% member.data['first-name'] %}.
Explore more recipesYour comment has been submitted.