
Old Fashioned Chocolate Cake
by Nigella. Featured in FEASTIntroduction
This is, for me, the quintessential chocolate cake: melting, luscious and mood-enhancingly good. A food technologist would explain this in terms of "mouthfeel" but I don't know quite how that makes me feel. I often describe this cake as a sort of idealised chocolate cake out of a packet, which doesn't sound so very inviting either. But what I mean by this, is that the cake looks and tastes perfect and has that melting, smooth lightness — immensely chocolately but far from rich. The fact that it is scarcely harder than making one out of cake-mix (only worlds better) is an added joy. The recipe itself is an evolved version of a couple of cakes I've done before, and although the amounts and ingredients are slightly fiddled with, the real change, and an improvement in terms of ease, is that it can be made, all in one, in the processor.
And please read the Additional Information section at the end of the recipe before proceeding.

Ingredients
Yields: about 8 slices
For the Cake
- 200 grams plain flour
- 200 grams caster sugar
- 1 teaspoon baking powder
- ½ teaspoon bicarbonate of soda
- 40 grams best-quality cocoa powder
- 175 grams soft unsalted butter
- 2 large eggs
- 2 teaspoons vanilla extract
- 150 millilitres sour cream
For the Icing
- 75 grams unsalted butter
- 175 grams best quality dark chocolate (broken into small pieces)
- 300 grams icing sugar
- 1 tablespoon golden syrup
- 125 millilitres sour cream
- 1 teaspoon vanilla extract
- sugar flowers (optional)
For the Cake
- 1½ cups all-purpose flour
- 1 cup superfine sugar
- 1 teaspoon baking powder
- ½ teaspoon baking soda
- ⅓ cup best-quality unsweetened cocoa
- 1½ sticks soft unsalted butter
- 2 large eggs
- 2 teaspoons vanilla extract
- ⅔ cup sour cream
For the Icing
- ¾ stick unsalted butter
- 6 ounces best quality bittersweet chocolate (broken into small pieces)
- 2½ cups confectioners' sugar
- 1 tablespoon golden syrup or light corn syrup
- ½ cup sour cream
- 1 teaspoon vanilla extract
- sugar flowers (optional)
Method
- Take everything out of the fridge so that all the ingredients can come to room temperature.
- Preheat the oven to gas mark 4/180°C/160°C Fan/350ºF and line and butter two 20cm / 8 inch sandwich tins with removable bases.
- Now all you have to do is put all the cake ingredients — flour, sugar, baking powder and bicarb, cocoa, butter, eggs, vanilla and sour cream — into a food processor and process until you have a smooth, thick batter. If you want to go the long way around, just mix the flour, sugar and leavening agents in a large bowl and beat in the soft butter until you have a combined and creamy mixture. Now whisk together the cocoa, sour cream, vanilla and eggs and beat this into your bowl of mixture.
- Divide this batter, using a rubber spatula to help you scrape and spread, into the prepared tins and bake until a cake tester, or a thin skewer, comes out clean, which should be about 35 minutes, but it is wise to start checking at 25. Also, it might make sense to switch the two cakes around in the oven halfway through cooking time.
- Remove the cakes, in their tins, to a wire rack and let cool for 10 minutes before turning out of their tins. Don't worry about any cracks as they will easily be covered by the icing later.
- To make this icing, melt the butter and chocolate in a good-sized bowl either in the microwave or suspended over a pan of simmering water. Go slowly either way: you don't want any burning or seizing.
- While the chocolate and butter are cooling a little, sieve the icing sugar into another bowl. Or, easier still, put the icing sugar into the food processor and blitz. This is by far and away the least tedious way of removing lumps.
- Add the golden syrup to the cooled chocolate mixture, followed by the sour cream and vanilla and then when all this is combined whisk in the sieved icing sugar. Or just pour this mixture down the funnel of the food processor on to the icing sugar, with the motor running.
- When you've done, you may need to add a little boiling water — say a teaspoon or so — or indeed some more icing sugar: it depends on whether you need the icing to be runnier or thicker; or indeed it may be right as it is. It should be liquid enough to coat easily, but thick enough not to drip off.
- Choose your cake stand or plate and cut out four strips of baking parchment to form a square outline on it (this stops the icing running on to the plate). Then sit one of the cakes, uppermost (ie slightly domed) side down.
- Spoon about a third of the icing on to the centre of the cake half and spread with a knife or spatula until you cover the top of it evenly. Sit the other cake on top, normal way up, pressing gently to sandwich the two together.
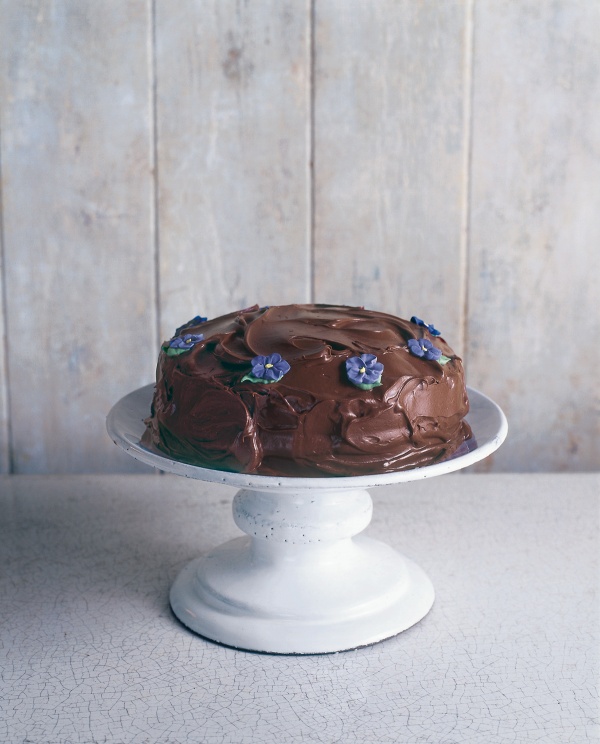
- Spoon another third of the icing on to the top of the cake and spread it in a swirly, textured way (though you can go for a smooth finish if you prefer, and have the patience). Spread the sides of the cake with the remaining icing and leave a few minutes till set, then carefully pull away the paper strips.
- I love to dot the top of this with sugar pansies — and you must admit, they do look enchanting — but there really is no need to make a shopping expedition out of it. Anything, or indeed nothing, will do.
- Take everything out of the fridge so that all the ingredients can come to room temperature.
- Preheat the oven to gas mark 4/180°C/160°C Fan/350ºF and line and butter two 20cm / 8 inch sandwich tins with removable bases.
- Now all you have to do is put all the cake ingredients — flour, sugar, baking powder and bicarb, cocoa, butter, eggs, vanilla and sour cream — into a food processor and process until you have a smooth, thick batter. If you want to go the long way around, just mix the flour, sugar and leavening agents in a large bowl and beat in the soft butter until you have a combined and creamy mixture. Now whisk together the cocoa, sour cream, vanilla and eggs and beat this into your bowl of mixture.
- Divide this batter, using a rubber spatula to help you scrape and spread, into the prepared tins and bake until a cake tester, or a thin skewer, comes out clean, which should be about 35 minutes, but it is wise to start checking at 25. Also, it might make sense to switch the two cakes around in the oven halfway through cooking time.
- Remove the cakes, in their tins, to a wire rack and let cool for 10 minutes before turning out of their tins. Don't worry about any cracks as they will easily be covered by the icing later.
- To make this icing, melt the butter and chocolate in a good-sized bowl either in the microwave or suspended over a pan of simmering water. Go slowly either way: you don't want any burning or seizing.
- While the chocolate and butter are cooling a little, sieve the confectioners' sugar into another bowl. Or, easier still, put the confectioners' sugar into the food processor and blitz. This is by far and away the least tedious way of removing lumps.
- Add the golden syrup or light corn syrup to the cooled chocolate mixture, followed by the sour cream and vanilla and then when all this is combined whisk in the sieved confectioners' sugar. Or just pour this mixture down the funnel of the food processor on to the confectioners' sugar, with the motor running.
- When you've done, you may need to add a little boiling water — say a teaspoon or so — or indeed some more confectioners' sugar: it depends on whether you need the icing to be runnier or thicker; or indeed it may be right as it is. It should be liquid enough to coat easily, but thick enough not to drip off.
- Choose your cake stand or plate and cut out four strips of baking parchment to form a square outline on it (this stops the icing running on to the plate). Then sit one of the cakes, uppermost (ie slightly domed) side down.
- Spoon about a third of the icing on to the centre of the cake half and spread with a knife or spatula until you cover the top of it evenly. Sit the other cake on top, normal way up, pressing gently to sandwich the two together.
- Spoon another third of the icing on to the top of the cake and spread it in a swirly, textured way (though you can go for a smooth finish if you prefer, and have the patience). Spread the sides of the cake with the remaining icing and leave a few minutes till set, then carefully pull away the paper strips.
- I love to dot the top of this with sugar pansies — and you must admit, they do look enchanting — but there really is no need to make a shopping expedition out of it. Anything, or indeed nothing, will do.
Additional Information
I tend to keep my kitchen stocked with very good dark chocolate buttons (70 per cent cocoa solids) as this entirely dispenses with any need to chop chocolate before melting it. Do not dream of using normal confectionary ones (except just to eat, of course).
MAKE AHEAD / STORE:
The cake can be made and iced a day ahead and stored in an airtight container. The sponge layers can also be frozen, wrapped individually in a double layer of food wrap and a layer of foil, for up to 3 months. Unwrap and thaw at room temperature for 2-3 hours. After cutting, the cake can be stored in an airtight container for up to 5 days.


Tell us what you think
Thank you {% member.data['first-name'] %}.
Explore more recipesYour comment has been submitted.
What 102 Others have said
-
Posted by Lauriekatherine on 15th March 2026
-
Posted by SMMck03 on 8th September 2025
-
Posted by JMFAGG on 14th July 2025
-
Posted by AmsterdamGirl7 on 20th February 2024
-
Posted by alanspinks on 24th June 2022
-
Posted by Last_Cat on 25th February 2022
-
Posted by roxypie on 31st January 2022
-
Posted by Perry61 on 13th March 2021
-
Posted by Berasategui on 6th February 2021
-
Posted by Hazie1 on 3rd January 2021
-
Posted by Rangido on 13th July 2020
-
Posted by Era17 on 11th April 2020
Show more commentsWe made this gluten free and in the shape of a unicorn. Pink and purple frosting and sprinkles! It was delightful.
I make this cake every year for my youngest son's birthday. Some years I make a whole cake (or cakes), some years cup cakes and for the past several years I have made them gluten free. This year he turns 22 and the tradition continues! This is the quintessential chocolate cake. Thanks Nigella xx
Love this recipe. I always halve and make into 7 muffins, adding chocolate chips to the mix too. They take around 25 minutes to cook, at 180 degrees Celsius. My children love them. Super moist and tasty.
Never made a chocolate cake before and it was easy. Probably took me longer than somebody who bakes frequently, but I was happy with the result. I only have cake tins with a diameter of 24 cm so I doubled the recipe and took the cakes after 33 minutes out of the oven. The cake is moist and not too sweet. Next time I will put also a bit of cherry jam between the two cakes.
Felt like some chocolate indulgence and gave this a go. I usually am bit dismissive of commentors who overly tinker with a recipe when nigella has already given us the gold standard. However mistaking a Dr O. valencian orange essence for vanilla essence the sponge suddenly became a very Terry orange flavour. Teaming with the theme a layer of bitter orange marmalade under the middle icing layer cut through the sweetness and gave a wonderfully sublime orangey chocolatey treat.
I halved the recipe and made chocolate cupcakes. Used Greek yoghurt as I had no sour cream. 15 minutes fan-forced at 160C. Delicious, quick & easy - 3 of my favourite recipe attributes. Thank you for sharing, Nigella!
Absolutely divine. I've made this cake several times and it's always been a hit.
I have made this cake over and over again. Even as cupcakes. The frosting is so yummy. Thank you for this recipe Nigella Lawson!
This is astonishingly good and so quick to make. I used an 18cm tin for nice deep layers and a bit of raspberry jam in the middle to sharpen it. Says 8 slices. With the icing it is very rich. I think 10-12.
I've just made this for my daughter's 7th birthday. I have iced it with slightly firmer icing and made it sharp edged. Covered the sides with grated chocolate, sprinkles and silver balls pressed into the icing and then put a circle of thin fondant with Frozen 2 wafer picture on top. Piped around the edges to finish off with rosettes and dusted with edible glitter. Lastly the candles, cake fireworks, fairy lights, diamanté number and Happy Birthday sign. All things girly! She will love it. Cook's privilege, I have tasted the trimmed off top and it is an amazing chocolatey moist cake. Can't wait to try a proper slice.
Just made the perfect chocolate cake. Amazing Recipe. I always adore Nigella's baking. I wish I could share a picture. I increased cocoa for 50g and add full cream yogurt as I didn't have sour cream. Also added expresso (half a teaspoon) instead of hot water in the icing and some chocolate chips into the batter as well as on the top of the cake. Amazingly amazing.
I have recently made this lovely cake. I actually used a ring cake tin even though I was afraid that it might be a bit small for the amount of cake mixture but it wasn't; it has risen beautifully and had a gorgeous shape. I made two small changes to the original recipe: 1) I used a raspberry flavoured high cocoa content chocolate. Nigella is right, the cake isn't too sweet at all, so the slight raspberry flavour worked really well in the icing. 2) I scattered toasted almond flakes on top for a little crunch. It was polished off rather quickly. I'll be using this recipe again! Thanks Nigella!