
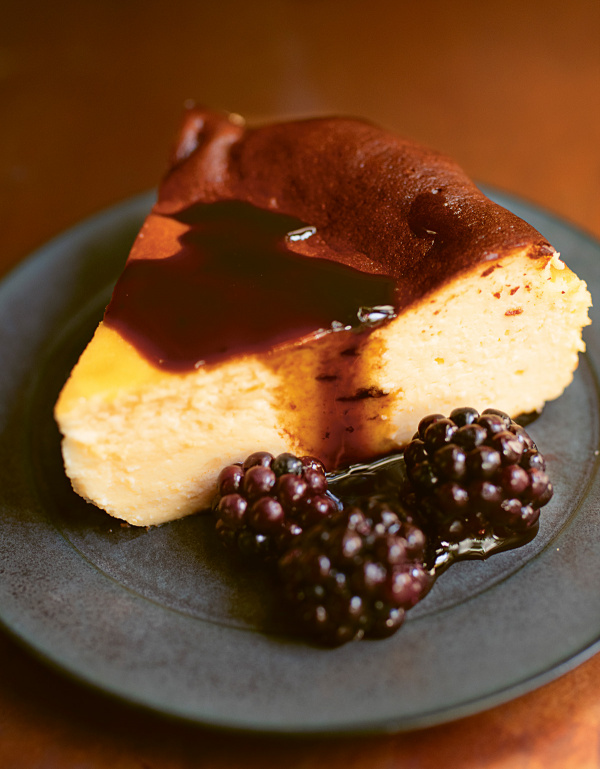
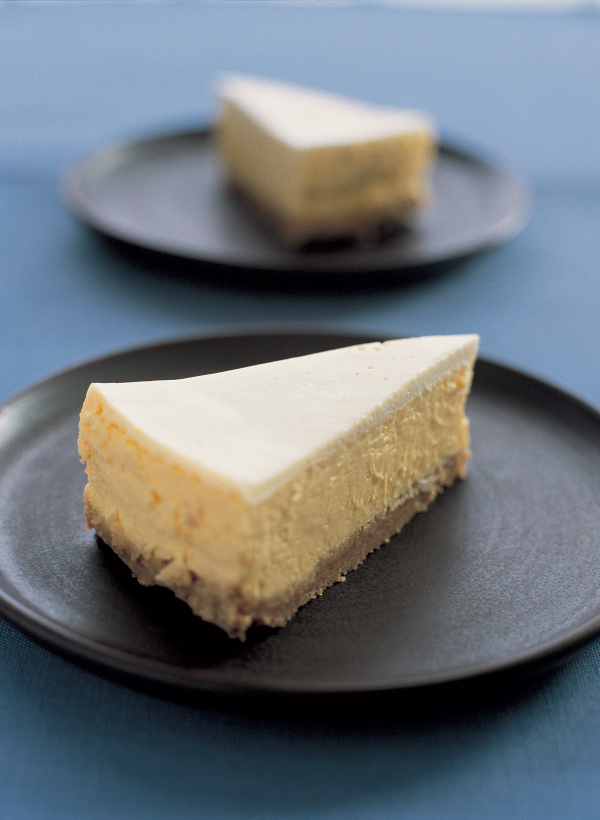
Basque Burnt Cheesecake With Liquorice Sauce
by Nigella. Featured in COOK EAT REPEATIntroduction
Where do I start with this cheesecake? Easy to make, luscious to eat, this crustless cheesecake — soft under its scorched tortoiseshell top — is a total joy. It’s best to eat this (first time out, at least) on the day you’ve made it; I reckon it takes around 3 hours to cool to room temperature. If you must refrigerate it before its grand unveiling, try not to do so for more than 30 minutes before eating it, as you don’t want it to set too solid, losing its oh-so-tender texture. Having said that, I really don’t think there is a bad way to eat this.
Speaking of which, while this is wonderful just with some berries (or paired with a rhubarb compote) for me there was no turning back once I ate the version from Sabor in London, where the sublime Basque chef, Nieves Barragán Mohacho drapes it with an intense and darkly glinting liquorice sauce. She was kind enough to tell me how she made it, and I include the recipe here, but obviously if you are a loather rather than a lover of liquorice, just leave it out.
Just a couple more things before I leave you to make this: first, you absolutely must make sure all ingredients are at room temperature before you start; and you have to believe me that you need to take the cheesecake out of the oven when, underneath the burnt top, it seems far too jiggly still.
Ingredients
Yields: 8-12 slices
FOR THE CHEESECAKE
- 600 grams full-fat cream cheese (at room temperature)
- 175 grams caster sugar
- 3 large eggs (at room temperature)
- 300 millilitres sour cream (at room temperature)
- ¼ teaspoon fine sea salt
- 25 grams cornflour
FOR THE SAUCE
- 15 grams hard pure liquorice pellets
- 90 grams caster sugar
- 300 millilitres water
- pinch of fine sea salt (optional)
TO SERVE
- blackberries or other berries of your choice
FOR THE CHEESECAKE
- 22 ounces full-fat cream cheese (at room temperature)
- ¾ cup plus 2 tablespoons superfine sugar
- 3 large eggs (at room temperature)
- 1¼ cups sour cream (at room temperature)
- ¼ teaspoon fine sea salt
- 2 tablespoons cornstarch
FOR THE SAUCE
- 1 - 1½ tablespoons hard pure liquorice pellets
- scant ½ cup superfine sugar
- 1¼ cups water
- pinch of fine sea salt (optional)
TO SERVE
- blackberries or other berries of your choice
Method
- Heat the oven to 200℃/180℃ Fan/400°F. Get out a 20cm/8-inch springform tin and a roll of baking parchment. Unfurl a long piece from the roll, and when it looks like you’ve got enough to line the tin with an overhang of 5–7cm/2-3in, tear it off and press it into the tin, and down into the edges at the bottom. Now do the same again with a second piece, placing it perpendicular to the first so that the tin is entirely lined. Push this piece down, too, and don’t worry about any pleats, creases and wrinkles; this is The Look. Sit something heavy in the tin to keep the paper in place while you get on with the cheesecake mixture.
- I use a freestanding mixer fitted with the flat paddle for this, but you could easily use a large mixing bowl, wooden spoon and elbow grease. First beat the cream cheese with the sugar until light and smooth; I beat for quite a long time, certainly not under 2 minutes, and it would be at least 5 minutes by hand. It is absolutely essential — and I’m sorry to repeat myself — that the cream cheese is at room temperature before you start.
- Beat in the eggs, one at a time, waiting for each one to be incorporated before adding the next, and when they’re all mixed in, you can — beating all the while — pour in the sour cream.
- Once that is also incorporated, you can slow down the mixer a little (or risk getting cornflour all over yourself) and then beat in the salt, followed by the cornflour, one teaspoon at a time. Remove the bowl from the mixer, scrape down the sides with a silicon spatula, and give everything a good stir.
- Pour into the lined tin (removing whatever’s been sitting in it, obviously), making sure no cheesecake mix is left in the bowl, and then rap the filled tin on the work surface about five times to get rid of any air bubbles.
- Place in the oven and bake for 50 minutes, by which time the cheesecake will be a burnished bronze on top, even chestnut brown in places, and it’ll have risen, like a dense soufflé. It will, however, still be very jiggly. It’s meant to be. You’ll think it’s undercooked, but it will carry on cooking as it cools, and it should have a soft set, anyway.
- Remove the tin to a wire rack and leave to cool. It will sink in the middle a little, but that too is part of its traditional appearance. I reckon it’s cool enough to eat after 3 hours, although you may need to leave it for a little longer. If you want to chill it in the fridge, do, but not for more than 30 minutes.
- Make the liquorice sauce once the cheesecake is out of the oven. If you have a bullet blender, you can pulverise the liquorice pastilles first, but whether whole or powder, put in a small saucepan with the 300ml/1¼ cups of water. Stir in the sugar, then put on a lowish flame until the liquorice has all but dissolved, stirring to give it a bit of a nudge every now and again to help it melt. Then turn up the heat and let bubble away until reduced to 150ml/⅔ cup — turning the heat down a bit if it looks like it’s boiling over. In a 14cm/6-inch diameter pan, I find this can take up to 20 minutes. Keep checking — you’ll need a small heatproof measuring jug by your side. Stir in a pinch of salt, if wished, and leave to cool, when it will have the texture of a syrup, which in effect, it is.
- Before serving, unclip and lift the sides of the tin up and away, and then lift the cheesecake up with the edges of the parchment. Place this on a board, and peel the paper back, and take it like that, rustically beautiful, to the table, along with your blackberries and even blacker liquorice syrup. Just drizzle a little over the slices of cheesecake as you hand them out, allowing hardcore liquorice lovers to spoon more over as they eat.
- Heat the oven to 200℃/180℃ Fan/400°F. Get out a 20cm/8-inch springform tin and a roll of baking parchment. Unfurl a long piece from the roll, and when it looks like you’ve got enough to line the tin with an overhang of 5–7cm/2-3in, tear it off and press it into the tin, and down into the edges at the bottom. Now do the same again with a second piece, placing it perpendicular to the first so that the tin is entirely lined. Push this piece down, too, and don’t worry about any pleats, creases and wrinkles; this is The Look. Sit something heavy in the tin to keep the paper in place while you get on with the cheesecake mixture.
- I use a freestanding mixer fitted with the flat paddle for this, but you could easily use a large mixing bowl, wooden spoon and elbow grease. First beat the cream cheese with the sugar until light and smooth; I beat for quite a long time, certainly not under 2 minutes, and it would be at least 5 minutes by hand. It is absolutely essential — and I’m sorry to repeat myself — that the cream cheese is at room temperature before you start.
- Beat in the eggs, one at a time, waiting for each one to be incorporated before adding the next, and when they’re all mixed in, you can — beating all the while — pour in the sour cream.
- Once that is also incorporated, you can slow down the mixer a little (or risk getting cornstarch all over yourself) and then beat in the salt, followed by the cornstarch, one teaspoon at a time. Remove the bowl from the mixer, scrape down the sides with a silicon spatula, and give everything a good stir.
- Pour into the lined tin (removing whatever’s been sitting in it, obviously), making sure no cheesecake mix is left in the bowl, and then rap the filled tin on the work surface about five times to get rid of any air bubbles.
- Place in the oven and bake for 50 minutes, by which time the cheesecake will be a burnished bronze on top, even chestnut brown in places, and it’ll have risen, like a dense soufflé. It will, however, still be very jiggly. It’s meant to be. You’ll think it’s undercooked, but it will carry on cooking as it cools, and it should have a soft set, anyway.
- Remove the tin to a wire rack and leave to cool. It will sink in the middle a little, but that too is part of its traditional appearance. I reckon it’s cool enough to eat after 3 hours, although you may need to leave it for a little longer. If you want to chill it in the fridge, do, but not for more than 30 minutes.
- Make the liquorice sauce once the cheesecake is out of the oven. If you have a bullet blender, you can pulverise the liquorice pastilles first, but whether whole or powder, put in a small saucepan with the 300ml/1¼ cups of water. Stir in the sugar, then put on a lowish flame until the liquorice has all but dissolved, stirring to give it a bit of a nudge every now and again to help it melt. Then turn up the heat and let bubble away until reduced to 150ml/⅔ cup — turning the heat down a bit if it looks like it’s boiling over. In a 14cm/6-inch diameter pan, I find this can take up to 20 minutes. Keep checking — you’ll need a small heatproof measuring jug by your side. Stir in a pinch of salt, if wished, and leave to cool, when it will have the texture of a syrup, which in effect, it is.
- Before serving, unclip and lift the sides of the tin up and away, and then lift the cheesecake up with the edges of the parchment. Place this on a board, and peel the paper back, and take it like that, rustically beautiful, to the table, along with your blackberries and even blacker liquorice syrup. Just drizzle a little over the slices of cheesecake as you hand them out, allowing hardcore liquorice lovers to spoon more over as they eat.
Additional Information
MAKE AHEAD:
Prepare liquorice sauce up to 1 week ahead. Cover and refrigerate until needed. Allow sauce to come to room temperature before serving.
STORE:
Refrigerate cheesecake leftovers, covered, for up to 3 days. Refrigerate sauce leftovers, covered, for up to 3 months.
FREEZE:
Freeze cheesecake leftovers in airtight container for up to 1 month. Defrost overnight in fridge and eat within 24 hours. Sauce leftovers can be frozen in airtight container for up to 6 months. Defrost overnight in fridge.


Tell us what you think
Thank you {% member.data['first-name'] %}.
Explore more recipesYour comment has been submitted.
What 12 Others have said
-
Posted by MummyFei on 25th October 2024
-
Posted by jtv0310 on 5th April 2024
-
Posted by dnrmom on 1st April 2024
-
Posted by Frangipane on 19th November 2023
-
Posted by Andy888 on 5th July 2021
-
Posted by JennyThompson on 27th June 2021
-
Posted by hollis517 on 30th May 2021
-
Posted by jules_june on 21st February 2021
-
Posted by LozzyS on 31st January 2021
-
Posted by MinaD on 27th January 2021
-
Posted by Vampire19 on 25th December 2020
-
Posted by CMS on 29th November 2020
Show more commentsI am a big fan of basque cheesecake and after trying several other recipes, I finally found this best one from Nigella. The cake is extremely easy to make and if you follow the instructions religiously, you surely can achieve perfect result each time. I am now addicted to it and have to make sure that there are always a few slices in the freezer ready to be thawed to room temperature and then warmed in microwave at 200W for 30 seconds. The end result is almost like freshly baked ones. Thank you Nigella for sharing this wonderful recipe.
The minute I started to make this recipe I knew I was going to love it. You don’t have to make a base, there’s no water bath, the method is simple, and you can eat it the day you make it. It comes out of the oven with a beautiful bronze top that makes it taste almost like a creme brûlée. When I cut into it, I could immediately tell that it had a voluptuous and light texture. If all that weren’t enough, serving it on a board with its peeled back parchment paper made for a very charming presentation. This is my new favorite dessert and I know it’s going to be one of my hip pocket regulars!
Made this for Easter and not a crumb left. Served with a choice of strawberry sauce or caramel sauce with a sprinkle of Malden salt. So easy to make! Thank you for the recipe.
Made this lactose-free by using lactose- free soft cheese and lactose-free Greek yoghurt instead of sour cream. It was absolutely delicious. I’ll definitely make it again.
Absolutely gorgeous - thank you! To help people wondering what they need in terms of the 'pure liquorice pellets', I did some digging around and found Nigella mentioning them on another recipe and talking about 'Rossano'. These are Spezzatina from the Italian liquorice manufacter Amarelli. Either spezzatina or spezzata do the job (The only difference is the shape of the pieces!)
Made this at the weekend for friends and it was totally spectacular, everyone absolutely loved it, especially the cook!
The combination of the liquorice sauce and blackberries with the light cheesecake was sublime.
BTW I couldn't get the hard pure liquorice pellets at the last minute so I used the best quality supermarket liquorice I could find and added a lot more with less sugar and just kept tasting and reducing till it was perfect. Yum! The pinch of salt is crucial.
Thanks Nigella, another perfect creation!
Out of all the cream-cheese-only cheesecakes, this is the only one that’s worth its salt. The licorice syrup sounds delicious to this licorice lover!
This is such a delightful surprise cheesecake. After waiting patiently, the creamy soft taste reminded me of Japanese cheesecake. Chilling it overnight turned the taste exactly like New York Cheesecake from Coffee Bean & Tea Leaf! Definitely will be making this again in near future! For the record, I made blackberry compote since I couldn’t find Liquorice here and not a fan of it. The cake is perfect on its own or with the blackberry compote!
Oh, my, goodness!! I could’ve eaten the entire thing to myself, and was panicking inwardly when people started clamouring for second helpings!! Delicious. Much lighter than I was expecting. Can’t wait for the leftovers tomorrow morning!! Not a fan of liquorice, I made the blueberry compote that goes with Nigella’s Lemon Tendercake.
Like a cross between creme brulee and cheesecake. No liquorice, so reduced some pomegranate juice with sugar to make a syrup to drizzle over the top. Lovely with glass of Sauternes. Next time will serve with a spoon of dried fruit soaked in Pedro Ximénez . Because no biscuits base or pastry, deceptively light.
Genius. Served as a Xmas pud. Converted liquorice haters to liquorice lovers.
So delicious! You do need to take the cheesecake out of the oven while there is still a wobble in the centre, but it cools to give a smooth and surprisingly light texture.