
Chocolate Cake with Coffee Buttercream
by Nigella. Featured in AT MY TABLEIntroduction
This is a reassuringly easy cake to make, and very popular in my house, requiring nothing more taxing than beating wet ingredients into dry: in other words, just a bowl and wooden spoon number.
And while you certainly don't need a processor to make the simple coffee buttercream, I loathe sieving, and this gets round the necessity of doing so. If you are making it by hand, however, sieve the icing sugar and beat with the butter until soft, before gently stirring in the hot coffee, to give you a smooth buff coloured icing.
Ingredients
Serves: 8-12 slices
FOR THE CAKE
- 225 grams plain flour
- 275 grams caster sugar
- 75 grams cocoa (sieved if lumpy)
- 2 teaspoons instant espresso powder
- 2 teaspoons baking powder
- 1 teaspoon bicarbonate of soda
- 175 millilitres full fat milk (at room temperature)
- 175 millilitres vegetable oil (plus more for greasing)
- 2 large eggs (at room temperature)
FOR THE ICING
- 350 grams icing sugar
- 175 grams soft unsalted butter
- 2½ teaspoons instant espresso powder (dissolved in 1 x 15ml tablespoons just-boiled water)
TO DECORATE
- chocolate coated coffee beans (optional)
FOR THE CAKE
- 1¾ cups all-purpose flour
- 1⅓ cups granulated sugar
- ¾ cup unsweetened cocoa (sieved if lumpy)
- 2 teaspoons instant espresso powder
- 2 teaspoons baking powder
- 1 teaspoon baking soda
- ¾ cup whole milk (at room temperature)
- ¾ cup vegetable oil (plus more for greasing)
- 2 large eggs (at room temperature)
FOR THE ICING
- 3½ cups confectioners' sugar
- 1½ sticks soft unsalted butter
- 2½ teaspoons instant espresso powder (dissolved in 1 x 15ml tablespoons just-boiled water)
TO DECORATE
- chocolate coated coffee beans (optional)
Method
You will need 2 x 20cm / 8 inch sandwich cake tins (not loose-bottomed).
- Preheat the oven to 180°C/160°C Fan/350°F and grease the sides and line the bases of your cake tins, but do not — I repeat, not — use ones with loose bottoms, as this is a very liquid batter.
- Combine the flour, sugar, cocoa, 2 teaspoons of instant espresso powder, baking powder and bicarb in a large batter jug (for ease of pouring later) or bowl and fork together until thoroughly combined. Whisk the milk, oil and eggs together in another jug, though it can be a much smaller one. Pour these wet ingredients into the dry ones and, just with a wooden spoon or a little hand whisk if you prefer, beat to mix until you have a smooth, but fudgily thick mixture. Finally, and gently, beat in 250ml/1 cup of just-boiled water, making sure to scrape the bottom of the jug or bowl well as you stir and fold. When you have a smooth, dark, glossy and now fairly runny batter, pour equally into the two tins.
- Put these well-filled tins into the oven and bake for 25–35 minutes — though start checking at 20 — by which time the cakes should be coming away from the edges of the tin, feel firm to the touch on top and a cake tester will come out all-but clean. Don’t worry if they’ve cracked a little on top.
- Stand the cooked cakes in their tins on a wire rack for 15 minutes, before unmoulding gently and peeling off the lining; proceed carefully as these are tender sponges. Let them cool completely before icing.
- To make the icing, pulse the icing sugar a good few times in the processor to get rid of any lumps, then add the butter and blitz to mix, scraping down the bowl once or twice. With the motor running again, pour the coffee down the funnel of the processor. Remove the blade, and use a large, bendy spatula to make sure everything is scraped down and combined.
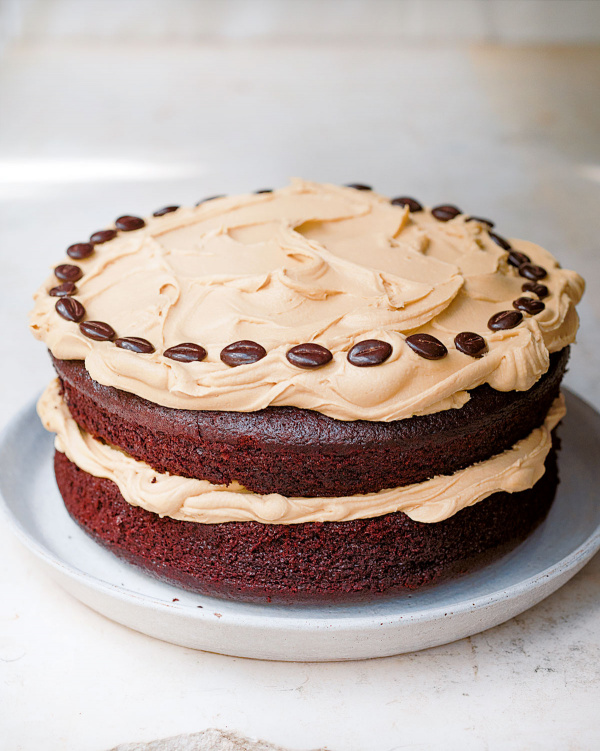
- Sit the thicker of the two cakes on a plate or stand, flat-side up. Spread generously with about half of the coffee buttercream, then sandwich with the other cake, top-side up. Pile the rest of the buttercream on top, and use a small cranked spatula to spread it, swirlingly, over the cake. Decorate with chocolate-covered coffee beans, however you so wish. I favour a shiny-beaded necklace effect, as you can see.
You will need 2 x 20cm / 8 inch sandwich cake tins (not loose-bottomed).
- Preheat the oven to 180°C/160°C Fan/350°F and grease the sides and line the bases of your cake tins, but do not — I repeat, not — use ones with loose bottoms, as this is a very liquid batter.
- Combine the flour, sugar, unsweetened cocoa, 2 teaspoons of instant espresso powder, baking powder and bicarb in a large batter jug (for ease of pouring later) or bowl and fork together until thoroughly combined. Whisk the milk, oil and eggs together in another jug, though it can be a much smaller one. Pour these wet ingredients into the dry ones and, just with a wooden spoon or a little hand whisk if you prefer, beat to mix until you have a smooth, but fudgily thick mixture. Finally, and gently, beat in 250ml/1 cup of just-boiled water, making sure to scrape the bottom of the jug or bowl well as you stir and fold. When you have a smooth, dark, glossy and now fairly runny batter, pour equally into the two tins.
- Put these well-filled tins into the oven and bake for 25–35 minutes — though start checking at 20 — by which time the cakes should be coming away from the edges of the tin, feel firm to the touch on top and a cake tester will come out all-but clean. Don’t worry if they’ve cracked a little on top.
- Stand the cooked cakes in their tins on a wire rack for 15 minutes, before unmoulding gently and peeling off the lining; proceed carefully as these are tender sponges. Let them cool completely before icing.
- To make the icing, pulse the confectioners' sugar a good few times in the processor to get rid of any lumps, then add the butter and blitz to mix, scraping down the bowl once or twice. With the motor running again, pour the coffee down the funnel of the processor. Remove the blade, and use a large, bendy spatula to make sure everything is scraped down and combined.
- Sit the thicker of the two cakes on a plate or stand, flat-side up. Spread generously with about half of the coffee buttercream, then sandwich with the other cake, top-side up. Pile the rest of the buttercream on top, and use a small cranked spatula to spread it, swirlingly, over the cake. Decorate with chocolate-covered coffee beans, however you so wish. I favour a shiny-beaded necklace effect, as you can see.
Additional Information
MAKE AHEAD / STORE:
Bake cake layers 1 day ahead. Cool, carefully wrap in cling film and store in an airtight container. Fill and frost before serving. The buttercream can be made up to 1 week ahead and stored in an airtight container in the fridge. Remove from the fridge and leave at room temperature until soft enough to spread. Keep leftovers of iced cake in an airtight container in a cool place for up to 5 days.
FREEZE:
Carefully wrap un-iced cake layers in a double layer of foil, and freeze for up to 3 months. To defrost, unwrap and put on a wire rack at room temperature for 2-3 hours. Fill and ice with buttercream before serving. The buttercream can also be frozen for up to 3 months. Defrost for several hours at room temperature, until soft enough to spread.


Tell us what you think
Thank you {% member.data['first-name'] %}.
Explore more recipesYour comment has been submitted.
What 2 Others have said
-
Posted by Smiles10 on 3rd February 2025
-
Posted by jtv0310 on 11th October 2023
Show more commentsThis is a delicious cake. We have made it a double layer cake when needed for special occasions or we have visitors but also as just two separate single layer cakes for our regular weekly bakes. We use one half of the buttercream on one layer. The other half is stored in fridge and the other sponge layer wrapped up in cling film- in both cases, until needed. Great recipe, thank you Nigella!
This is the best version of a chocolate layer cake that I have tried. Not only is it an easy method (just a bowl and a spoon), it happens to make the most tender and luscious cake layers you could ever imagine. The buttercream speaks for itself, it is delicious! If you want this dairy free, the licorice layer cake in “Simply” is the same recipe, but uses almond milk instead of regular. It comes out beautifully! Either way, this is a winner!