
Chocolate Peanut Butter Cake
by NigellaIntroduction
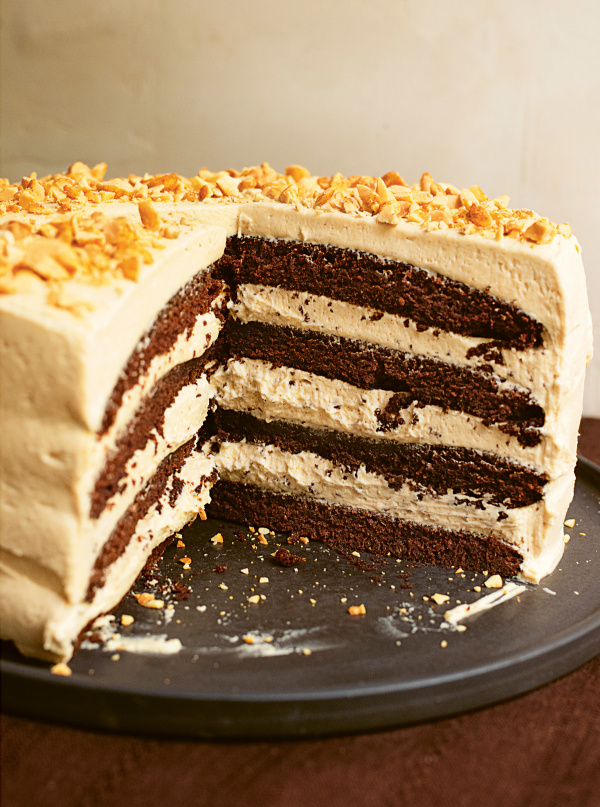
Over the years, I’ve made many different cakes for my children’s birthdays, but for some time now this has been the chosen one, the cake of cakes, elected to celebrate many special occasions, and with good reason. The cake itself is dark, damp and divinely chocolatey — and an easy, melt-everything-in-the-pan number — but it's the icing that truly makes it, as my daughter says “the cake of dreams’. It’s a simple enough buttercream but what makes it so spectacular is the length of time you whisk it for, and the cream you add to it, which turns it gloriously light and moussy.
Don’t worry if you don’t have the very shallow tier-cake tins (sometimes called easy-layer tins): I made this for a long time as a regular double-decker layer cake; indeed I have presumed that that is how most people will make it. Should you want to make the high-rise version, you will need to double all the quantities for the buttercream. What I don’t advise doing is making two layers and attempting to split each layer into two; these cakes are too tender for that.
And while I’ve topped the cake here with dry-roasted peanuts, as I love the saltiness and crunch they provide, you can ignore me and decorate with chocolate curls, sprinkles, or anything else you fancy. Or, indeed, add nothing: left unadorned, the cake does have an undeniably elegant splendour.
Ingredients
Yields: 8-12 slices
FOR THE CAKE
- 200 grams unsalted butter plus more for greasing
- 50 grams cocoa
- 100 grams soft dark brown sugar
- 125 grams caster sugar
- 2 teaspoons vanilla extract
- 225 grams plain flour
- 1 teaspoon baking powder
- ½ teaspoon bicarbonate of soda
- 2 large eggs at room temperature
FOR THE ICING
- (Double the quantities below if making a four-tier cake)
- 300 grams icing sugar
- 150 grams soft unsalted butter
- 200 grams smooth peanut butter (the normal commercial, mass-produced peanut butter - not a health-store variety)
- 1 teaspoon vanilla extract
- ¼ teaspoon fine sea salt
- 4 x 15ml tablespoons double cream
TO DECORATE
- 4 x 15ml tablespoons chopped dry roasted peanuts
FOR THE CAKE
- 1 stick plus 5 tablespoons unsalted butter plus more for greasing
- ¼ cup unsweetened cocoa
- ½ cup soft dark brown sugar
- ⅔ cup granulated sugar
- 2 teaspoons vanilla extract
- 1¾ cups all-purpose flour
- 1 teaspoon baking powder
- ½ teaspoon baking soda
- 2 large eggs at room temperature
FOR THE ICING
- (Double the quantities below if making a four-tier cake)
- 3 cups confectioners' sugar
- 1¼ sticks soft unsalted butter
- ¾ cup plus 1 tablespoon creamy peanut butter (the normal commercial, mass-produced peanut butter - not a health-store variety)
- 1 teaspoon vanilla extract
- ¼ teaspoon fine sea salt
- 4 tablespoons heavy cream
TO DECORATE
- ¼ cup chopped dry roasted peanuts
Method
- Heat the oven to 180℃/160℃ Fan/350°F. Butter two 20cm / 8 inch sandwich tins (or four tier-cake tins) and line them with baking parchment. Don’t use loose-bottomed tins as this is a runny batter.
- Cut the butter lengthways into four pieces (just to aid melting) and put into a heavy-based fairly wide saucepan — I use one of 22cm / 9 inches diameter — and set over gentle heat. Add 250ml/1 cup of just-boiled water, and whisk in the cocoa and both brown and white sugars, and keep on low heat, whisking gently, until the butter has melted, and you have a smooth, amalgamated mixture. Remove from the heat, and stir in the vanilla extract. Let stand for 5 minutes.
- Measure out the flour in a bowl, add the baking powder and bicarbonate of soda and fork to mix. Whisk the eggs together in a small jug.
- Pour the eggs gradually into the pan, whisking all the while, until they are completely absorbed.
- Finally, whisk in the flour slowly and gently until you have a smooth batter, and pour and scrape evenly into your waiting tins.
- Bake in the oven for 18–20 minutes (or approx. 7 minutes for the ultra-shallow tins), by which time the cakes will be beginning to shrink away at the edges, and a cake tester will come out cleanish; it is a damp cake, though, so it’s fine if a few crumbs cling to the cake tester.
- Leave the cakes to cool for 10–15 minutes on a rack; they can be turned out once the tins are not so hot that you’d need to use oven gloves. Or you can leave them in their tins until cold. I always do this if making the four-tier variant.
- To make the buttercream, you must first sift the icing sugar into a bowl. This is one of the few jobs in the kitchen I hate, so I wouldn’t tell you to do it if it weren’t necessary.
- In another — large — bowl (or the bowl of a freestanding mixer that you’ve fitted with the whisk), beat the butter and peanut butter together very thoroughly; that’s to say, for 3 minutes if you’re using a mixer, or 5 minutes with a handheld electric whisk, by which time you should have a light and fluffy creamy mixture. Beat in the vanilla extract and salt.
- Still beating, but now at a slightly lower speed, patiently add the sifted icing sugar a spoonful at a time until you’ve used half of it, then beat in the rest in 3 batches. Once it’s all in, turn up the mixer a little and carry on beating for 2 minutes, or for 3 with a handheld electric whisk. Scrape down the sides, to incorporate any icing sugar clinging to the bowl, and beat again for 30 seconds to 1 minute.
- Still beating, add the cream a tablespoonful at a time and, when it’s all in, carry on beating for 4 minutes (or for 6 minutes with a handheld electric whisk) until you have a soft, aerated and moussily light mixture.
- Peel away the lining papers from the cakes and place one of the layers, flat-side up, on a cake stand or plate. If this is a 2-layer cake, spread — armed, ideally, with a bendy spatula and a small offset spatula — about a third of the icing evenly onto the waiting cake layer, taking it right out to the very edges of the circle; this will bulge out a bit when you place the other cake on top, which will make it easier for you to ice the sides. And if this is a 4-layer cake, just think in terms of spreading the icing 1cm / ¼ inch thick.
- Top with your second cake, placing it domed-side up, so that the two flat sides are meeting. Then spread another third of the icing over the top. And if making a 4-layer cake, create your tower, spreading 1cm / ¼ inch thickness of icing between each layer, and on the top.
- Use the bendy spatula to get a dollop of buttercream onto the side of the cake, then spread it gently to cover and smooth, ideally with a small offset spatula, and carry on like this, with your two tools, until the cake is covered all the way round. Then run the offset spatula on top and all round the cake again to smooth the buttercream. Leave plain or decorate with the chopped peanuts or as your heart desires.
- Heat the oven to 180℃/160℃ Fan/350°F. Butter two 20cm / 8 inch sandwich tins (or four tier-cake tins) and line them with baking parchment. Don’t use loose-bottomed tins as this is a runny batter.
- Cut the butter lengthways into four pieces (just to aid melting) and put into a heavy-based fairly wide saucepan — I use one of 22cm / 9 inches diameter — and set over gentle heat. Add 250ml/1 cup of just-boiled water, and whisk in the unsweetened cocoa and both brown and white sugars, and keep on low heat, whisking gently, until the butter has melted, and you have a smooth, amalgamated mixture. Remove from the heat, and stir in the vanilla extract. Let stand for 5 minutes.
- Measure out the flour in a bowl, add the baking powder and baking soda and fork to mix. Whisk the eggs together in a small jug.
- Pour the eggs gradually into the pan, whisking all the while, until they are completely absorbed.
- Finally, whisk in the flour slowly and gently until you have a smooth batter, and pour and scrape evenly into your waiting tins.
- Bake in the oven for 18–20 minutes (or approx. 7 minutes for the ultra-shallow tins), by which time the cakes will be beginning to shrink away at the edges, and a cake tester will come out cleanish; it is a damp cake, though, so it’s fine if a few crumbs cling to the cake tester.
- Leave the cakes to cool for 10–15 minutes on a rack; they can be turned out once the tins are not so hot that you’d need to use oven gloves. Or you can leave them in their tins until cold. I always do this if making the four-tier variant.
- To make the buttercream, you must first sift the confectioners' sugar into a bowl. This is one of the few jobs in the kitchen I hate, so I wouldn’t tell you to do it if it weren’t necessary.
- In another — large — bowl (or the bowl of a freestanding mixer that you’ve fitted with the whisk), beat the butter and peanut butter together very thoroughly; that’s to say, for 3 minutes if you’re using a mixer, or 5 minutes with a handheld electric whisk, by which time you should have a light and fluffy creamy mixture. Beat in the vanilla extract and salt.
- Still beating, but now at a slightly lower speed, patiently add the sifted confectioners' sugar a spoonful at a time until you’ve used half of it, then beat in the rest in 3 batches. Once it’s all in, turn up the mixer a little and carry on beating for 2 minutes, or for 3 with a handheld electric whisk. Scrape down the sides, to incorporate any confectioners' sugar clinging to the bowl, and beat again for 30 seconds to 1 minute.
- Still beating, add the cream a tablespoonful at a time and, when it’s all in, carry on beating for 4 minutes (or for 6 minutes with a handheld electric whisk) until you have a soft, aerated and moussily light mixture.
- Peel away the lining papers from the cakes and place one of the layers, flat-side up, on a cake stand or plate. If this is a 2-layer cake, spread — armed, ideally, with a bendy spatula and a small offset spatula — about a third of the icing evenly onto the waiting cake layer, taking it right out to the very edges of the circle; this will bulge out a bit when you place the other cake on top, which will make it easier for you to ice the sides. And if this is a 4-layer cake, just think in terms of spreading the icing 1cm / ¼ inch thick.
- Top with your second cake, placing it domed-side up, so that the two flat sides are meeting. Then spread another third of the icing over the top. And if making a 4-layer cake, create your tower, spreading 1cm / ¼ inch thickness of icing between each layer, and on the top.
- Use the bendy spatula to get a dollop of buttercream onto the side of the cake, then spread it gently to cover and smooth, ideally with a small offset spatula, and carry on like this, with your two tools, until the cake is covered all the way round. Then run the offset spatula on top and all round the cake again to smooth the buttercream. Leave plain or decorate with the chopped peanuts or as your heart desires.
Additional Information
MAKE AHEAD:
Prepare frosting (without cream) up to 1 day ahead. Cover and store in cool place. Whisk frosting briefly then whisk in cream before using.
STORE:
Store leftovers in airtight container in cool place for up to 5 days.
FREEZE:
Freeze sponge layers, individually wrapped in double layer of food wrap and layer of foil, for up to 3 months. Unwrap and defrost at room temperature for 2-3 hours.


Tell us what you think
Thank you {% member.data['first-name'] %}.
Explore more recipesYour comment has been submitted.
What 9 Others have said
-
Posted by RebeccaLo on 19th March 2024
-
Posted by jtv0310 on 19th November 2023
-
Posted by TraceyParker on 8th December 2022
-
Posted by MinaD on 15th May 2021
-
Posted by amnawaheed on 14th March 2021
-
Posted by Otleymum on 9th March 2021
-
Posted by _Sapphire_ on 13th February 2021
-
Posted by jules_june on 30th January 2021
-
Posted by sarahlf on 5th December 2020
Show more commentsThis is the third time I've made the cake and it's always yummy. I used two 7" tins and about 1/3 the recommended amount of icing sugar; the result was a much less sweet, almost diet (ha!) edition. Decorated it with freshly shelled, toasted and crushed peanuts. Served on my Iittala Kastehelmi cake stand. Forgot to put some instant coffee into the batter to amp up the chocolate flavour but will do so the next time. It travels relatively well--so will be gifting it to clients today at a lunch and serving it tomorrow at an afternoon tea paired with a floral black brew. Thank you, Nigella!
The frosting for this cake is DIVINE! The cake layers are easy to make and turn out so luscious. The peanut butter frosting takes it over the top. It has an incredible texture, and the salt-sweet vibe is truly incredible. The whole thing tastes like the best version of a peanut butter cup. This one will definitely be on repeat!
didn't look quite as finished as yours and I spent ages cleaning the icing sugar up, but it didn't last long!
Had in the schedule to make this cake but found that there was only enough butter for half a quantity of icing...no chance to shop so substituted equal weight oil for the butter and made the 4 layer version...absolultely delicious. Half the icing gave a nice coverage....sides were "semi nude" but a big success. Lovely recipe..will try the cake for black forest gateaux next in the "thin tins" as no where for the cherries to sink...
This was the best chocolate cake, it was fun to participate in cook along. I always struggled with making perfect 3 layered cake. but with all instructions and tips given here it was a success. everyone in family loved it. Want to ask what hashtag to add if trying any recipe from here?
Beautiful! Having read others’ comments, I went for 1.5 times the buttercream recipe to fill and ice four layers and it worked perfectly. The buttercream was light but not sickly sweet and the cake just lovely.
This cake was amazing! I had trouble with cutting the cakes in two so I could make a 4 layer. They broke up so was like a jigsaw but once icing on when it was cut you couldn't tell. Didn't last very long as was too popular.
This is a sinfully yummylicious cake! The icing is creamy and delicious. Love how easy it is to make the cake batter. Hate the sifting of the icing (just like Nigella)! Seems to take forever to finish with the sifting since I doubled the icing in ingredients for the 4 tier cake. Just like previous commenter, I too, had lots of the icing leftover. Next time I’ll skip doubling the icing ingredients.
Fabulous cake! Went down very well with the whole family for my son’s 11th birthday. We used the 4 shallow tins but our buttercream was not as thickly spread so I found myself with a lot left over! We decorated with peanut & chocolate M&Ms (sorry!) and chocolate fingers around the side!!