
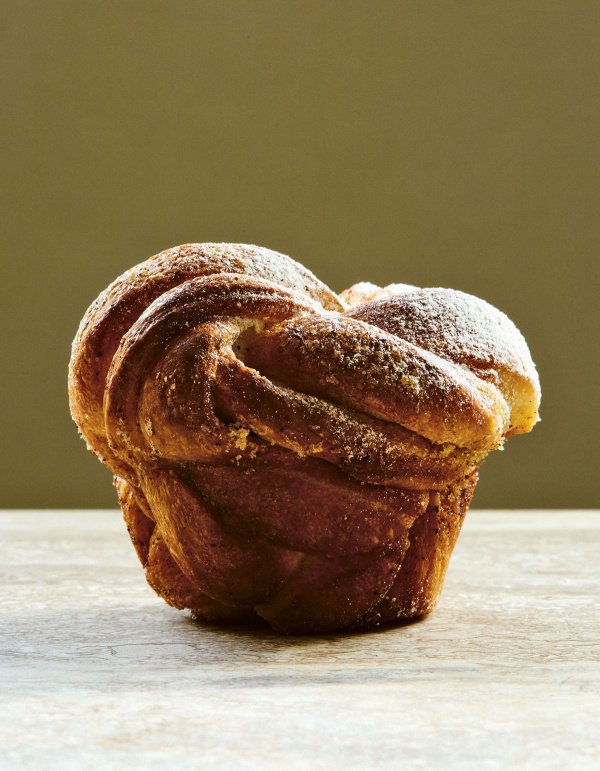
Brown Butter & Vanilla Buns
by Louise Hurst, featured in Buns Published by QuadrilleIntroduction
Brown butter is incredibly delicious because it undergoes a heat process that causes the milk solids to caramelize and develop a rich, nutty flavour. This transformation adds depth and complexity to the butter. That said, the flavour is delicate, so don’t overdo the vanilla.
Brown butter is incredibly delicious because it undergoes a heat process that causes the milk solids to caramelize and develop a rich, nutty flavour. This transformation adds depth and complexity to the butter. That said, the flavour is delicate, so don’t overdo the vanilla.
Ingredients
Makes: 10 buns
BASIC ENRICHED DOUGH
- 345 grams strong white bread flour
- 5 grams fast-action dried yeast
- 65 grams unsalted butter (softened)
- 40 grams golden caster sugar
- ½ teaspoon fine sea salt
- 55 grams full fat milk (at room temperature)
- 40 grams beaten eggs (at room temperature)
- 100 grams water
VANILLA SUGAR
- 1 vanilla pod
- 100 grams golden granulated sugar
BROWN BUTTER FILLING
- 120 grams unsalted butter (diced, plus extra for greasing)
- 15 grams vanilla sugar
- 30 grams golden caster sugar
EGG WASH
- 1 large egg
- 1 teaspoon water
- a pinch of fine sea salt
BASIC ENRICHED DOUGH
- 12 ounces strong white bread flour
- 1½ teaspoons fast-action dried yeast
- 2¼ ounces unsalted butter (softened)
- 1½ ounces golden granulated sugar
- ½ teaspoon fine sea salt
- 2 ounces whole milk (at room temperature)
- 1½ ounces beaten eggs (at room temperature)
- 3½ ounces water
VANILLA SUGAR
- 1 vanilla bean
- 3½ ounces golden granulated sugar
BROWN BUTTER FILLING
- 4¼ ounces unsalted butter (diced, plus extra for greasing)
- 1½ ounces vanilla sugar
- 1 ounce superfine sugar
EGG WASH
- 1 large egg
- 1 teaspoon water
- a pinch of fine sea salt
Method
Brown Butter & Vanilla Buns is a guest recipe by Louise Hurst so we are not able to answer questions regarding this recipe
For the BASIC ENRICHED DOUGH
This is my go-to dough recipe when time isn’t on my side. It’s vital to knead the dough for at least 12 minutes, as this develops gluten, a network of proteins in the flour. Kneading also strengthens the dough, making it less likely to tear during shaping and rising. This strength is crucial for maintaining the bread’s structure as it bakes. I often prove this dough in the fridge, overnight.
- Put the flour, yeast, butter, sugar and salt in a large bowl, along with the milk, egg and water. Mix to combine. Once the dough has come together, knead for 15–18 minutes by hand. Alternatively, add the ingredients to the bowl of a stand mixer with the dough hook attached. Mix on a slow speed until a dough forms. Once the dough has come together, increase the speed to medium–high and work the dough for at least 12 minutes – no less. Don’t be tempted to add more flour. To check the dough is ready to prove, do the windowpane test: take a small portion of dough and stretch it out until a thin film forms in the middle without breaking. The dough must be thin enough for light to pass through it. If this doesn’t happen, knead for a little longer. When it’s ready, you’ll have a silky smooth dough that’s soft and elastic.
- Scrape down the sides of the bowl with a dough scraper and tip the dough onto the work surface. With a firm hand, shape the dough into a round with a nice smooth surface on top by using the dough scraper or cupped hands. The dough may stick to the work surface as you rotate it. Lift it, with the aid of the dough scraper, into a lidded container or bowl, large enough for the dough to expand. Either place in the fridge overnight (up to 12 hours) or bulk ferment at room temperature for 1–1½ hours, or until doubled in size (this will depend on your room temperature).
- The dough is now ready to knock back and shape (see below).
For the VANILLA SUGAR
- Begin by splitting the vanilla pod in half lengthways. Put the split pod in an ovenproof dish and place in the oven at 60℃ fan (140℉), gas ¼ (or as low as your oven will go), for 1-2 hours. Once the time is up, turn the oven off and leave the pod in there until the oven is completely cool.
- Now break the pod into small pieces, then place in a small high-speed blender with the sugar and blitz for 30 seconds. Alternatively, use a pestle and mortar. Pass the sugar through a fine sieve to remove any larger pieces. Store in an airtight container or jar in the fridge for up to 3 months.
For the buns
- Begin with the brown butter filling. Place the diced butter in a small saucepan over a medium heat. Cook the butter, swirling the pan occasionally, until it becomes foamy. Once you reach this point, keep an eye on it as it will turn quite quickly. Keep swirling the pan so you can see what is going on under the foam. You’re looking for the butter to be amber and the milk deposits brown. Remove from heat and pour into a bowl. Be sure to scrape out all the little flecks of brown in the bottom of the pan – they are toasted milk solids and are full of flavour. Leave to set. Once firm, mix with the vanilla and caster sugars.
- Grease a muffin tray with butter.
- Knock back the dough. On a lightly floured work surface, roll out the prepared dough to a rectangle measuring approximately 54 x 30cm (21¼ x 12 inches), lifting it a few times during rolling to release the tension in the dough. Spread the brown butter filling all over the surface of the dough with an offset spatula. With a short edge towards you, fold the dough in three, folding the bottom third up to cover the middle and the top third down to cover that. Gently roll out the dough again to a rectangle measuring 21 x 35cm (8¼ x 14 inches).
- With a pizza roller or large knife, cut the dough into 10 wide strips, each measuring approximately 35mm (1½ inches) across. Cut along the length of a strip through the middle, almost to the top (it should look like a pair of trousers). Now twist the two strands of dough in different directions, twisting one clockwise and the other anti-clockwise, then tie them in a knot. Repeat to shape all the buns. Some of the filling will escape, so rinse your hands between each shaping. Once shaped, place the buns in the prepared muffin tray. Cover with a lightly dampened dish towel and leave to prove for about 1–1½ hours, or until doubled in size.
- Towards the end of the proving time, preheat the oven to 190°C fan (410°C), gas 6, and whisk together all the ingredients for the egg wash. Brush the buns with egg wash, trying to avoid brushing too close to the tin or they may stick. Bake for 10–12 minutes, or until golden brown. Remove from the tin and leave to cool on a wire rack.
- Once cool, dust lightly with vanilla sugar.
- Best eaten on the day of baking.
For the BASIC ENRICHED DOUGH
This is my go-to dough recipe when time isn’t on my side. It’s vital to knead the dough for at least 12 minutes, as this develops gluten, a network of proteins in the flour. Kneading also strengthens the dough, making it less likely to tear during shaping and rising. This strength is crucial for maintaining the bread’s structure as it bakes. I often prove this dough in the fridge, overnight.
- Put the flour, yeast, butter, sugar and salt in a large bowl, along with the milk, egg and water. Mix to combine. Once the dough has come together, knead for 15–18 minutes by hand. Alternatively, add the ingredients to the bowl of a stand mixer with the dough hook attached. Mix on a slow speed until a dough forms. Once the dough has come together, increase the speed to medium–high and work the dough for at least 12 minutes – no less. Don’t be tempted to add more flour. To check the dough is ready to prove, do the windowpane test: take a small portion of dough and stretch it out until a thin film forms in the middle without breaking. The dough must be thin enough for light to pass through it. If this doesn’t happen, knead for a little longer. When it’s ready, you’ll have a silky smooth dough that’s soft and elastic.
- Scrape down the sides of the bowl with a dough scraper and tip the dough onto the work surface. With a firm hand, shape the dough into a round with a nice smooth surface on top by using the dough scraper or cupped hands. The dough may stick to the work surface as you rotate it. Lift it, with the aid of the dough scraper, into a lidded container or bowl, large enough for the dough to expand. Either place in the fridge overnight (up to 12 hours) or bulk ferment at room temperature for 1–1½ hours, or until doubled in size (this will depend on your room temperature).
- The dough is now ready to knock back and shape (see below).
For the VANILLA SUGAR
- Begin by splitting the vanilla bean in half lengthways. Put the split pod in an ovenproof dish and place in the oven at 60℃ fan (140℉), gas ¼ (or as low as your oven will go), for 1-2 hours. Once the time is up, turn the oven off and leave the pod in there until the oven is completely cool.
- Now break the pod into small pieces, then place in a small high-speed blender with the sugar and blitz for 30 seconds. Alternatively, use a pestle and mortar. Pass the sugar through a fine sieve to remove any larger pieces. Store in an airtight container or jar in the fridge for up to 3 months.
For the buns
- Begin with the brown butter filling. Place the diced butter in a small saucepan over a medium heat. Cook the butter, swirling the pan occasionally, until it becomes foamy. Once you reach this point, keep an eye on it as it will turn quite quickly. Keep swirling the pan so you can see what is going on under the foam. You’re looking for the butter to be amber and the milk deposits brown. Remove from heat and pour into a bowl. Be sure to scrape out all the little flecks of brown in the bottom of the pan – they are toasted milk solids and are full of flavour. Leave to set. Once firm, mix with the vanilla and caster sugars.
- Grease a muffin tray with butter.
- Knock back the dough. On a lightly floured work surface, roll out the prepared dough to a rectangle measuring approximately 54 x 30cm (21¼ x 12 inches), lifting it a few times during rolling to release the tension in the dough. Spread the brown butter filling all over the surface of the dough with an offset spatula. With a short edge towards you, fold the dough in three, folding the bottom third up to cover the middle and the top third down to cover that. Gently roll out the dough again to a rectangle measuring 21 x 35cm (8¼ x 14 inches).
- With a pizza roller or large knife, cut the dough into 10 wide strips, each measuring approximately 35mm (1½ inches) across. Cut along the length of a strip through the middle, almost to the top (it should look like a pair of trousers). Now twist the two strands of dough in different directions, twisting one clockwise and the other anti-clockwise, then tie them in a knot. Repeat to shape all the buns. Some of the filling will escape, so rinse your hands between each shaping. Once shaped, place the buns in the prepared muffin tray. Cover with a lightly dampened dish towel and leave to prove for about 1–1½ hours, or until doubled in size.
- Towards the end of the proving time, preheat the oven to 190°C fan (410°C), gas 6, and whisk together all the ingredients for the egg wash. Brush the buns with egg wash, trying to avoid brushing too close to the tin or they may stick. Bake for 10–12 minutes, or until golden brown. Remove from the tin and leave to cool on a wire rack.
- Once cool, dust lightly with vanilla sugar.
- Best eaten on the day of baking.


Tell us what you think
Thank you {% member.data['first-name'] %}.
Explore more recipesYour comment has been submitted.