
Smooth Hatbox Icing
by Nigella. Featured in NIGELLA CHRISTMASIntroduction
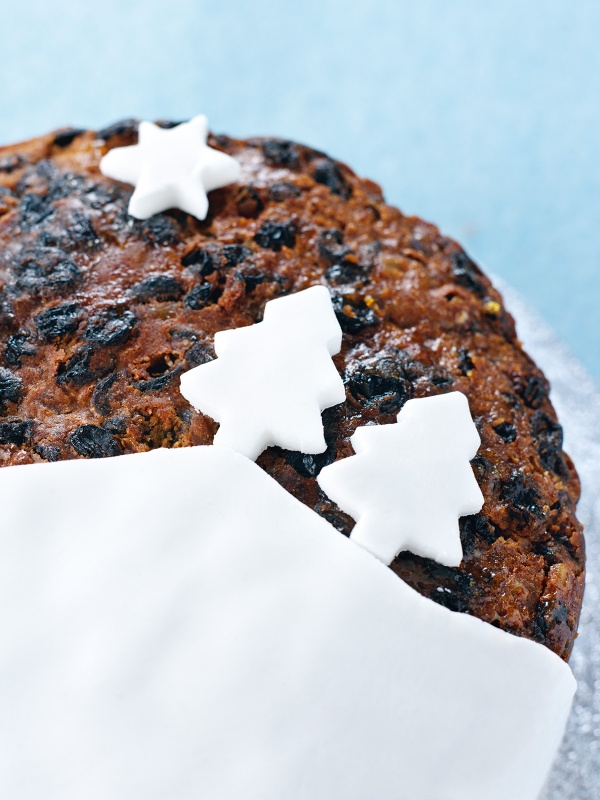
I love a plain white-iced cake: smooth icing, wrapping the cake almost like a hatbox. I am happy to have this decorated, but I'd just as soon the decorations were also white. Here, I've cut out a wibbly-wobbly hillscape and some trees and a star. The partially iced cake doesn't last as well as a fully covered one, but has a dramatic prettiness, if such is not a contradiction in terms. If you choose to do the same, I'd recommend halving the quantities for the icing.
But play as you wish: red and green roll-out icing can be used to exuberantly Christmassy effect.

Ingredients
Makes: enough for a 23cm/9in cake
- 200 grams rindless marmalade or smooth apricot jam
- 500 grams marzipan
- 1 kilogram ready-to-roll icing (more if you want different colourways)
- icing sugar for dusting
- 1 cup rindless marmalade or smooth apricot jam
- 1¼ pounds marzipan
- 2¼ pounds ready-to-roll icing (more if you want different colourways)
- confectioners' sugar for dusting
Method
- Warm the marmalade in a small saucepan over a low to medium heat. (If you are not using a rindless marmalade or smooth apricot jam, when it’s hot and runny, strain into a bowl to remove rind or pips.)
- Place the cake on a cake board or cake stand and, with a pastry brush, paint the warm marmalade or jam all over the sides and the top of the cake to make a tacky surface.
- Dust a work surface with icing sugar, roll out the marzipan till it’s about 2.5mm thick (don’t be fanatical; you just want a supple and pliable layer) and drape over the cake. Then press the marzipan cloak against the cake so it covers it smoothly and cut off the excess with a sharp knife. If you find it easier to roll out two lots of 250g / 10oz marzipan, that’s fine, but be sure to smooth over any joins, so the icing will lie smoothly on top.
- Dust the work surface again with icing sugar and plonk down your block of icing. Knead the icing for a couple of minutes until slightly softened, then dust the top with icing sugar and roll out patiently until it’s about 3mm thick.
- Cover the cake with it, cutting off the excess. If you need to stick bits together to patch up any breaks, sprinkle with cold water first; the water fuses breaks magically together.
- Cut out the shapes you want — stars, snowflakes, holly trees or ivy leaves — from leftover bits of icing and dibble or brush the undersides with cold water to stick them on to the cake.
- Warm the marmalade in a small saucepan over a low to medium heat. (If you are not using a rindless marmalade or smooth apricot jam, when it’s hot and runny, strain into a bowl to remove rind or pips.)
- Place the cake on a cake board or cake stand and, with a pastry brush, paint the warm marmalade or jam all over the sides and the top of the cake to make a tacky surface.
- Dust a work surface with confectioners' sugar, roll out the marzipan till it’s about 2.5mm thick (don’t be fanatical; you just want a supple and pliable layer) and drape over the cake. Then press the marzipan cloak against the cake so it covers it smoothly and cut off the excess with a sharp knife. If you find it easier to roll out two lots of 250g / 10oz marzipan, that’s fine, but be sure to smooth over any joins, so the icing will lie smoothly on top.
- Dust the work surface again with confectioners' sugar and plonk down your block of icing. Knead the icing for a couple of minutes until slightly softened, then dust the top with confectioners' sugar and roll out patiently until it’s about 3mm thick.
- Cover the cake with it, cutting off the excess. If you need to stick bits together to patch up any breaks, sprinkle with cold water first; the water fuses breaks magically together.
- Cut out the shapes you want — stars, snowflakes, holly trees or ivy leaves — from leftover bits of icing and dibble or brush the undersides with cold water to stick them on to the cake.
Additional Information
MAKE AHEAD / STORE:
Cake can be covered and decorated up to 5 days ahead.
MAKE AHEAD / STORE:
Cake can be covered and decorated up to 5 days ahead.


Tell us what you think
Thank you {% member.data['first-name'] %}.
Explore more recipesYour comment has been submitted.