
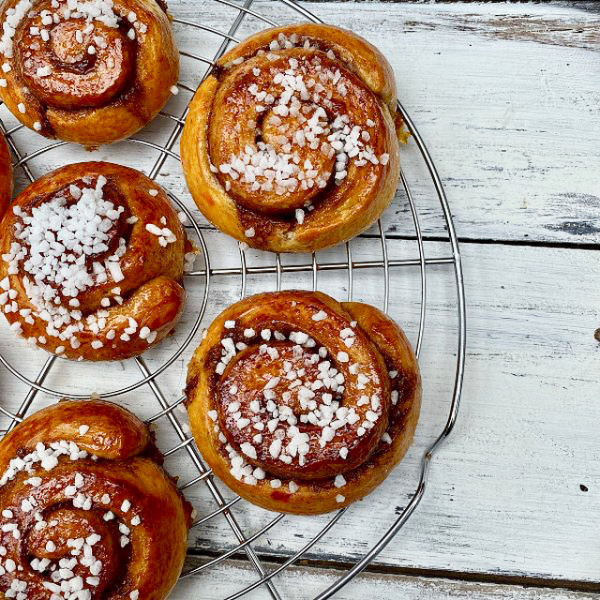
Swedish Cinnamon Buns
by NigellaIntroduction
Swedish Cinnamon Buns are not radically different from other cinnamon buns (and do see my Norwegian Cinnamon Buns), but they do diverge in one fundamental way: rather than having the fluffiness of, say American cinnamon buns, they are more solid, more bready (and certainly less sweet) and yet they do have a certain bounce and softness, too. It took me a while to get the balance right — I will spare you all the various permutations, using different flours and amounts of yeast, ratio of butter to milk, what measurements to roll the dough out to, etc — and the route I eventually decided upon is certainly unorthodox: adding an egg to the dough made them a tad too fluffy, and leaving the egg out made them just a little too stodgy; the compromise of using the egg white in the dough and keeping the yolk for the egg wash turned out to be the perfect solution: they are soft and yet have that essential bit of chew to them.
And please read the Additional Information section at the end of the recipe before proceeding.
Ingredients
Makes: 8 buns
- 100 millilitres full fat milk (or more if making these by hand, as explained in Step 6)
- 50 grams very soft unsalted butter (plus more for greasing)
- 1 large egg (at room temperature)
- 250 grams plain flour (plus 1 tablespoon more for rolling)
- 6 grams / 2 teaspoons instant yeast (see Additional Info below for using fresh yeast)
- 25 grams / 2 x 15ml tablespoons caster sugar
- ½ teaspoon ready-ground cardamom or ¼ teaspoon if freshly ground yourself
- ¼ teaspoon fine sea salt
For the filling
- 50 grams very soft unsalted butter
- 50 grams soft light brown sugar
- 7 grams / 1 x 15ml tablespoon ground cinnamon
- ⅛ teaspoon fine sea salt
For the egg wash
- 1 egg yolk (reserved from the egg used in the dough)
For the glaze
- 50 grams caster sugar
To decorate
- pearl sugar (certainly not optional in Sweden, but if you can't get it, you can't get it!)
- 7 tablespoons whole milk (or more if making these by hand, as explained in Step 6)
- 3 tablespoons plus 1 teaspoon very soft unsalted butter (plus more for greasing)
- 1 large egg (at room temperature)
- 2 cups all-purpose flour (plus 1 tablespoon more for rolling)
- 2 teaspoons instant yeast (see Additional Info below for using fresh yeast)
- 2 tablespoons granulated sugar
- ½ teaspoon ready-ground cardamom or ¼ teaspoon if freshly ground yourself
- ¼ teaspoon fine sea salt
For the filling
- 3 tablespoons plus 1 teaspoon very soft unsalted butter
- ¼ cup soft light brown sugar
- 1 tablespoon ground cinnamon
- ⅛ teaspoon fine sea salt
For the egg wash
- 1 egg yolk (reserved from the egg used in the dough)
For the glaze
- ¼ cup granulated sugar
To decorate
- pearl sugar (certainly not optional in Sweden, but if you can't get it, you can't get it!)
Method
- If you’re using fresh yeast, see note in the additional information box below before starting; if using instant yeast, proceed now. Scald the milk, which is to say, heat it to boiling point (though don’t actually let it boil) and then stir in the butter, which should be soft enough to melt almost immediately, then pour the buttery milk into a small jug and leave it to cool down to blood temperature or just above. If you have a food thermometer, you want it to be around 37-38ºC / 98-100°F. It may sound odd to suggest scalding the milk, then waiting for it to drop down to blood temperature, but — apart from the fact that it makes the butter melt quickly — the Scandinavian foodwriter Signe Johansen advises that doing so makes for softer buns.
- While you wait, separate the egg, letting the white drop into a small jug and put the yolk into a cup or small bowl, reserved for the egg wash later, and cover it so that it doesn’t get a skin, and mix the flour, instant yeast, sugar, ground cardamom and salt into the bowl of a freestanding mixer if you have one, or otherwise in a medium-sized bowl.
- Using a fork, whisk the egg white but only enough to break the gel, as it were; you don’t need it frothy in any way. When the buttery milk is no longer hot but just warm (as described in step 1) pour in the egg white and fork to mix.
- Now pour the jug of wet ingredients into your bowl of dried ingredients, stirring with a fork, your hand, or a dough whisk until you have a shaggy mixture; not all the flour will be absorbed at the very bottom of the bowl.
- If using a mixer, fit with the dough hook and knead boisterously for 6 minutes a notch above medium speed. You will feel that the dough looks too wet about halfway through, and certainly it will be sticking to the bottom of the bowl, but whatever you do, however tempted you are, don’t add flour: when time’s up, the edges and bottom of the bowl will be clean, and the dough wonderfully soft and will slide easily off the dough hook. Lightly butter a medium sized bowl or wide measuring jug (I use a 1-litre/4-cup Pyrex jug, 15cm/6 inches in diameter) take the dough out of its bowl, and knead for 10 seconds by hand on a clean surface — don’t flour it — then form into a ball, place in your buttered receptacle and cover the bowl tightly. Leave in a warm place (I put mine on a shelf high up in the cupboard that hotly houses all the computery and internetty bits) for about an hour, until doubled in volume, or actually a bit more. (While you’re waiting, mix the filling ingredients in a smallish bowl with a fork until you have a paste.) Handily, with the particular jug I use, as just specified, the dough bulges right up to the top, almost touching the tight cover, when done. If you don’t have anywhere warm to leave the dough, it may take an hour and a quarter. Towards the end of the proving time, line a large baking sheet (I use one that measures 40cm x 30cm/ 18 x 13 inches) with baking parchment (if you don’t have one that large, you’ll need two baking sheets). Should the tin be very cold when it comes out of the drawer you keep it in, run warm water over it, and dry it before lining with parchment.
- If you’re making the buns by hand, you need to increase the milk to 150ml/ ⅔ cup as the extra hydration will help with the gluten development; even forceful kneading by hand is less powerful than the action of a mixer’s dough hook. You must also be prepared for a lot of mess! With the dry ingredients mixed in a bowl, and the wet ingredients in their jug, following steps 1-3, pour the wet ingredients into the dry, and mix with your hand, or other implement of choice. You will have a very wet, very sticky porridge. Pour and scrape this onto a clean work surface (do not flour or oil it) and, with the help of a dough scraper to keep pulling the wet dough together when needed, start kneading following the slap and fold method, which essentially involves throwing the dough down constantly on the worksurface, and then stretching it over itself. You can see exactly what I mean if you checkout Richard Bertinet’s slap and fold method on YouTube. But in order to able to do this, you will first have to attack your sticky dough frenetically, pulling it this way and that to form a dough (still very sticky) in one piece, rather than lots of clumps. After 10 minutes of violent slapping and throwing (which I very much enjoy), the dough should be smooth and holding together though you may need to go on for longer. Let the dough rest on the counter for 2 minutes, then knead for another 2 minutes or so, until the dough is bouncy and elastic (and won’t tear when you stretch bits of it) and can be formed into a buoyant ball. Then carry on with the recipe, proving the dough as instructed in the second part of step 5, and proceed from there.
- Now you’re ready to roll out your dough. I prefer to do this on a silicon mat, but you don’t have to. Very lightly flour your mat or surface; I use just a tablespoon of flour. Knock back the dough — just give it a light punch or press with your hand, then tip it out onto your prepared surface and pat into a slab that’s roughly 12cm/4¾ inches square to help you roll it out in the right shape. Now roll it out into a 24cm/9½ inches square, and once you’re moreorless there (the edges might end up curved at this stage) use your fingers to press and pat it into a neat shape.
- Spread the filling on top of the dough, going right to the very edges to cover completely; this helps stop the swirls unravelling as the buns bake. Starting with the edge nearest you, roll it up and away from you as tightly as possible — pressing gently against the ends of the roll as you go with the flat palms of your hands, as if very very gently squeezing an accordian, to keep the edges neat.
- Very gently press in the ends, again with the palms of your hands until you have a neat swiss (jelly) roll 24cm/9½ inches long. Cut into 8 equal sized 3cm/1¼-inch slices with a very sharp bread knife or other long serrated knife. Even if the slices are a bit squished once you’ve cut them, they can easily be patted back into a round shape. Transfer them to your lined baking sheet, trying to leave 5-6cm between each bun (it doesn't really matter if some of them end up sticking together, though) and press down on them very lightly as you go. Cover the buns lightly and leave in a warm place to prove for about 45 minutes (though it could take an hour) until they are increased in size and puffy. 30 minutes in, heat the oven to 180ºC/160ºC Fan/350ºF.) Again, this will take longer if you don’t have a warm place to stash them. Either once the buns go in the oven, or before you put them in, make the glaze by stirring together 30ml/2 tablespoons of water and sugar in a small pan before putting it on the heat, and gently bring it to the boil. Swirl the pan a couple of times to help the sugar to dissolve. Once it starts bubbling away, take if off the heat.
- Add a scant teaspoon of cold water to your reserved egg yolk and mix with a fork to combine and loosen. Using a silicon pastry brush — for choice — gently and lightly paint the tops and sides of the buns and bake for 18-20 minutes in the heated oven until deep gold and just firm to the (quick!) touch. In my oven, 18 minutes has been exactly right every time, but all ovens vary. And if yours runs hot, you might want to check them at 16 minutes.
- Once the buns are ready, take the tin out of the oven, and using another silicon pastry brush (or just wash the egg-glaze one with cold water, then dry it first) brush the glaze over the tops and sides of the buns; it can make a wonderful hissing noise as the glaze hits the hot dough. Immediately sprinkle about a teaspoon of pearl sugar, if you have some, over each bun, then transfer them all to a wire rack to cool. I know it’s tempting, but try and wait until they are just warm until you bite into one; they are too cakey when hot. I think, though, I like them best at room temperature. And much as I am a tea drinker, I do think these sweet buns call for the bitterness of coffee alongside.
Additional Information
If you are able to get fresh yeast, then you need to start step 1 a little differently. Put 1 tablespoon of the scalded milk in a cup, and stir in 1 tablespoon of caster sugar from the dough sugar. When the milk has cooled to around blood temperature (37-38°C / 98-100°F), crumble in 20g/¾oz fresh yeast, stir with a fork till you have a putty-coloured, slightly thickish liquid, cover, and leave for 5-10 minutes until puffy and risen up in the cup. Pour this into your buttery milk when it is 37-38°C / 98-100°F also, give a stir with a fork and proceed with step 2.
MAKE AHEAD / STORE:
Wrap baked buns, the minute they're cold, individually with food wrap and freeze in an airtight container for up to 3 months. Unwrap and defrost on a wire rack at room temperature for 2-3 hours and eat on the same day.


Tell us what you think
Thank you {% member.data['first-name'] %}.
Explore more recipesYour comment has been submitted.
What 1 Other has said
-
Posted by Doug87L98 on 5th October 2024
Show more commentsWe just had some Swedish Cinnamon buns in Banf National Park. They were amazing!!!!! I can't wait to try and make them myself! Thanks for the recipe.