
Pineapple Upside Down Cake
by Nigella. Featured in NIGELLA EXPRESSIntroduction
This is a bit before my time, but I have vague nursery memories of a friend of my grandmother's making a version of this, which she would serve with a warm sauce made of pineapple juice thickened with — I imagine — cornflour. That I can do without, but I am still of the mind that it is perfectly all right to make this with canned pineapple rings. I feel it is slightly bad sport to start peeling and slicing your own pineapple.
Anyway, canned pineapple is just fine, though I advise going for the one in its own juice rather than in syrup, and I add some of the juice to the sponge, too. This seems to make it light and fluffy.

Ingredients
Yields: 8 slices
- butter (for greasing)
- 2 tablespoons sugar
- 6 - 7 slices canned pineapple in juice (plus 3 tablespoons of the juice)
- 11 glace cherries (approx. 75g total weight)
- 100 grams plain flour
- 1 teaspoon baking powder
- ¼ teaspoon bicarbonate of soda
- 100 grams soft butter
- 100 grams caster sugar
- 2 large eggs
- butter (for greasing)
- 2 tablespoons sugar
- 6 - 7 slices canned pineapple in juice (plus 3 tablespoons of the juice)
- 11 candied cherries (approx. 75g total weight)
- ⅔ cup all-purpose flour
- 1 teaspoon baking powder
- ¼ teaspoon baking soda
- 1 stick soft butter
- ½ cup superfine sugar
- 2 large eggs
Method
- Preheat the oven to 200°C/180°C Fan/gas mark 6/400ºF. Butter a tarte Tatin tin (24cm/9 inches wide at the top and 20cm/8 inches diameter at the bottom) or use a 23cm / 8-9 inch cake tin (neither loose-bottomed nor springform).
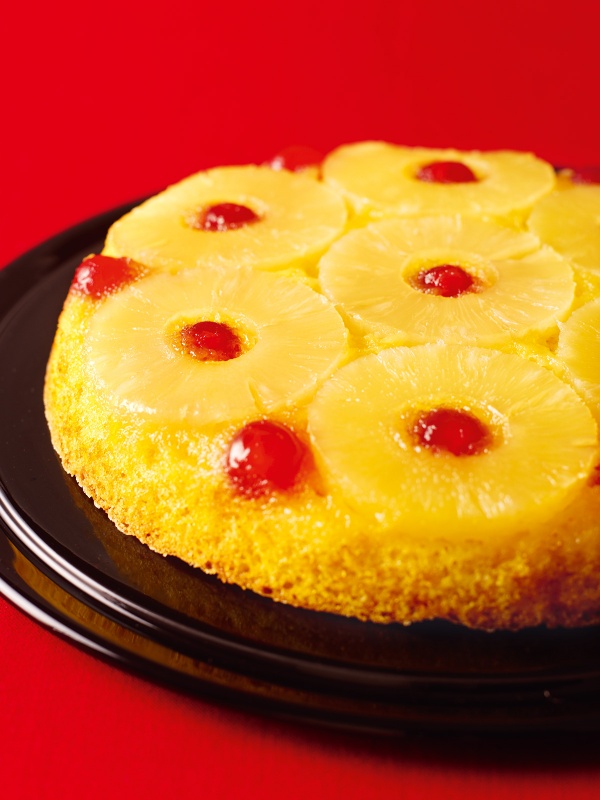
- Sprinkle the 2 tablespoons of sugar on top of the buttered base, and then arrange the pineapple slices to make a circular pattern as in the picture.
- Fill each pineapple ring with a glace cherry, and then dot one in each of the spaces in between.
- Put the flour, baking powder, bicarbonate of soda, butter, caster sugar and eggs into a food processor and run the motor until the batter is smooth. Then pour in the 3 tablespoons of pineapple juice to thin it a little.
- Pour this mixture carefully over the cherry-studded pineapple rings; it will only just cover it, so spread it out gently.
- Bake for 30 minutes, then ease a spatula around the edge of the tin, place a plate on top and, with one deft — ha! — move, turn it upside-down.
- Preheat the oven to 200°C/180°C Fan/gas mark 6/400ºF. Butter a tarte Tatin tin (24cm/9 inches wide at the top and 20cm/8 inches diameter at the bottom) or use a 23cm / 8-9 inch cake tin (neither loose-bottomed nor springform).
- Sprinkle the 2 tablespoons of sugar on top of the buttered base, and then arrange the pineapple slices to make a circular pattern as in the picture.
- Fill each pineapple ring with a glace cherry, and then dot one in each of the spaces in between.
- Put the flour, baking powder, baking soda, butter, superfine sugar and eggs into a food processor and run the motor until the batter is smooth. Then pour in the 3 tablespoons of pineapple juice to thin it a little.
- Pour this mixture carefully over the cherry-studded pineapple rings; it will only just cover it, so spread it out gently.
- Bake for 30 minutes, then ease a spatula around the edge of the tin, place a plate on top and, with one deft — ha! — move, turn it upside-down.
Additional Information
MAKE AHEAD / STORE:
Best on the day it is made. Leftovers can be stored, covered, in the fridge for up to 3 days but may become slightly soggy over time.
MAKE AHEAD / STORE:
Best on the day it is made. Leftovers can be stored, covered, in the fridge for up to 3 days but may become slightly soggy over time.


Tell us what you think
Thank you {% member.data['first-name'] %}.
Explore more recipesYour comment has been submitted.
What 43 Others have said
-
Posted by Anita52 on 30th December 2023
-
Posted by Ephany on 29th January 2023
-
Posted by Odelle on 19th December 2022
-
Posted by joshv41680 on 23rd April 2021
-
Posted by gnili3p on 11th April 2021
-
Posted by dreiT on 1st April 2021
-
Posted by Dave56 on 21st April 2020
-
Posted by Bohana on 1st March 2020
-
Posted by DiRidgy on 29th February 2020
-
Posted by Hiddz on 21st February 2020
-
Posted by Mayose on 20th January 2019
-
Posted by Sridevi2233 on 23rd December 2018
Show more commentsI use cranberry instead of the glacé cherries, they look very pretty and taste less sweet more tangy!
One of my favorites
An amazing retro style 70's inspired pineapple upside down cake using tinned pineapples with a glace cherry placed in the middle of the pineapple upside cake soft fluffy sponge cake turns out perfectly every time it can also be made with tinned peaches or any other sweet fruits of your choice it's utterly delicious, especially when served warm as a dessert with crème Anglaise, whipped double cream or equally delicious with whipped double cream on the top of it, a delightful, decadent and ever such a delight! Enjoy!
I couldn't believe how easily and quickly this went together. Before I knew it, it was out of the oven and ready to go. It was ultra fluffy and light and looked like a retro-fabulous magazine cover. My guests were delighted!
Made this 4 times for the past 4 weekends. First time I see my husband eats fruit willingly and have more than 1 serving. A success without saying anymore. My "one deft - ha!-move" always went successful but when cutting, left the top/bottom part of the cake stuck to the serving plate. The fourth and most previous bake, I let it rest for about 30mins before the "one deft - ha!" (that's funny btw) and voilà! no stick! Also, didn't have glazed cherry handy so just cut more pineapple into smaller squares to fill the middle of the pineapple slices. And I used fresh pineapple.
Simple recipe, quite easy to put together and yielded a delicious cake! Added cinnamon on the sugar before putting the pineapple rings. Used 9-inch pan and baked for 30min. Heavenly smell wafting as it baked and cooled down. Thanks for sharing this recipe.
I made this and it turned out very well. My deft 'ha move' wasn't as deft as it should have been as I was using oven gloves, but I avoided a disaster by a few arm and wrist contortions, with no major injuries. By the way, you need seven pineapple rings, not six. The photo actually shows seven. I also tried the recipe using tinned peaches stuffed between the pineapple. It worked very well.
Great easy recipe, always works perfectly. I cut up the extra slice of pineapple into seven pieces and pop into the wholes instead of cherries.
Followed the recipe - it turned out perfectly - wish I could add a photo as it’s the best pineapple upside down cake I have ever made!
Used golden syrup (instead of sugar) on the pineapple before adding the sponge... the pineapple sauce was actually pretty tangy and delish.
This is delicious! I used brown sugar because that's what I had. The topping kinda stuck to the pan so I'll use more butter next time but the cake certainly hit my pineapple upside down cake craving. Thank you for sharing your recipe.
I tried this recipe 2 days back and it turned out lovely. However it started to turn brown within 15 mins in the oven and I had to reduce the temp. But my mom said this is the best recipe she has tasted so far and the cake texture was so soft and yummy. Thank you.